Thursday, May 6, 2021

How to setup PasswordLess SSH in Linux?

How to setup PasswordLess SSH in Linux?

This tutorial answers your question i.e. How to setup Passwordless SSH?

SSH  is a protocol to communicate a server with the client in an encrypted manner. It has replaced telnet protocol, which was not at all secure at all. Almost all the Linux system admins know about it because they use it to connect to Linux servers as the physical access to the server is very limited.

SSH is installed by default on most Linux distribution. & to access a server through ssh is very easy, you use the following command

$ ssh {Server IP address or FQDN}

and then you enter the credentials. But in this tutorial, we will learn to access ssh session securely with the help of Public/Private keys authentication aka passwordless ssh setup. Advantages of using Public/Private keys authentication are

  • You won’t be asked for a password every time you access the server (unless you are using a passphrase to decrypt the keys)
  • No-one can gain unauthorized access to your server unless they have the right key.

Now let’s create Public/Private keys for passwordless ssh setup to access our servers.

Setup PasswordLess SSH

Creating keys on the Local machine

Remember this, keys are to be created on each host that you wish to gain access from. So if there are 10-20 hosts from where you want to access a server, we must create keys on all those 10-20 servers.


To create keys, run the following command

$ ssh-keygen –t rsa

It will then ask you to select a location for the generated keys. By default, the keys will be stored in the ~/.ssh which is a hidden directory in your home folder (/home/dan/.ssh). The private key will be called id_rsa and the associated public key will be called id_rsa.pub.

It will also ask you to enter a passphrase, which is used to decrypt the keys. If you don’t wish to use any pass-phrase just leave it empty & press enter or else provide a pass-phrase.

Next, set permissions on your private keys,

$ chmod 700 ~/.ssh
$ chmod 600 ~/.ssh/id_rsa


Configuration on Remote Server

Now copy the Public key (id_rsa.pub) & move it to the remote server at /home/user/.ssh/authorized_keys folder. Now that the public keys have imported to server, remove them from local machine.

Next, we will also have to set permissions on the server as well

$ chmod 700 ~/.ssh
$ chmod 600 ~/.ssh/authorized_keys

All the settings for Public/Private keys authentication are now complete.


Testing the Public/Private keys authentication  

Now log back into the local machine to access the server & enter

$ ssh {Server IP address or FQDN}

& hit enter. You will notice that you won’t be asked for the credentials & are logged directly into the server.

Once you have tested your passwordless ssh setup, you can also disable the use of password authentication so that everyone uses only keys to access the server. Thus making your servers more secure. To disable password authentication , open /etc/sshd/sshd_config & change the following parameter

PasswordAuthentication no

That’s it, this completes our tutorial on how to setup PasswordLess SSH on Linux machines. 
Simple guide to install SSH on Ubuntu

Simple guide to install SSH on Ubuntu

 SSH is one of the most widely used methods to access Linux & Unix servers. SSH provides an encrypted method to access & communicate between servers over insecure networks. In  technical term, it’s a cryptographic protocol that allows for secured, encrypted communication between a host & a client.

In most of the Linux distributions, SSH comes installed & we can access those servers using ssh command but with Ubuntu Desktop (& based distros) that is not the case. We are required to install SSH on Ubuntu to be able access it.

Though we have an ssh client available on Ubuntu, it’s the ssh server that we need to install on Ubuntu. It means we can access other servers from Ubuntu using ssh but other machines will not be able to access our Ubuntu systems.

Install SSH on Ubuntu

SSH server is available with default Ubuntu repositories & we are not required to add any other repos to install it. We only need to run the following command to install it,

$ sudo apt update && sudo apt install openssh-server

Once installed, the ssh server will start on it’s own, but it required we can start it using the following command,

$ sudo systemctl start ssh

Check status with,

$ sudo systemctl status ssh

 Note: If you have your firewall enabled on your Ubuntu system, then you would also be required to enable the ssh connections through the firewall. Run the following command to do so,

$ sudo ufw allow ssh

We can now access our Ubuntu system from other servers. Just open a ssh client & run the ssh command to access it,

$ ssh user@IP_ADDRESS


LINUX AIO - How To Configure X11 Forwarding Using SSH In Linux

How To Configure X11 Forwarding Using SSH In Linux


Today, we are going to learn a lesser known, interesting and useful feature about Linux. I am sure most of you know about SSH. We can access remote Linux systems securely via SSH. But, did you know that it is possible to forward X over SSH to run graphical applications remotely? Yes! This mechanism is known as X11 forwarding. In this guide, we are going to configure X11 forwarding using SSH in Linux.

What is X11 forwarding?

X11 forwarding is method of allowing a user to start a graphical applications installed on a remote Linux system and forward that application windows (screen) to the local system. The remote system need not to have X server or graphical desktop environment. Hence configuring X11 forwarding using SSH enables the users to securely run graphical applications over SSH session.

To put this in layman terms,

  • We connect to a remote system via SSH,
  • And then we launch a GUI application (which is installed in the remote system) from that SSH session,
  • Now, the GUI application runs on the remote system, but the application window appears on our local system. So we can use this remote GUI program on your local system as the way we use a locally installed program.

Clear? Now let us go ahead and see how to run remote GUI applications over SSH session.

Configure X11 Forwarding Using SSH In Linux

For the purpose of this guide, I will be using the following two systems:

  • Remote server - CentOS 8 minimal server (No GUI).
  • Local system - Ubuntu 20.04 LTS with Gnome DE.

Configuring X11 forwarding is trivial.

Make sure you have installed "xauth" on your remote serer system. If it is not installed, run the following command as root or sudo user:

# dnf install xorg-x11-xauth

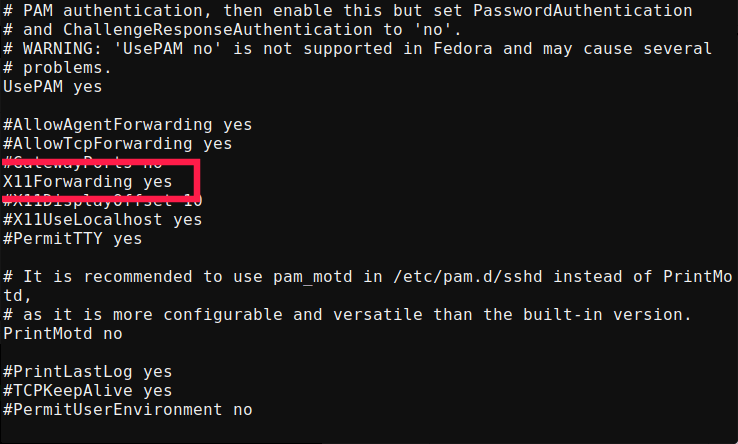
Go to your remote system (in my case it is CentOS 8) and edit "/etc/ssh/sshd_config" file using your favorite editor:

# vi /etc/ssh/sshd_config

Add/modify following line:

[...]
X11Forwarding yes
Configure X11 Forwarding Using SSH In Linux OS

Configure X11 Forwarding Using SSH In Linux

Press ESC key and type :wq to save and close the file.

Restart sshd service to effect the changes:

# systemctl restart sshd

Done! We have configured X11 forwarding.

Now go to your client system (in my case, it is Ubuntu 20.04) and access the remote server via SSH using command:

$ ssh -X root@192.168.225.52

Here, -X option is used to enable X11 forwarding over SSH. Replace "root@192.168.225.52" with your remote server's username and IP address.

You will see the following warning message at first time.

/usr/bin/xauth: file /root/.Xauthority does not exist

However, the .Xauthority file should be automatically generated during the first login, thus subsequent logins should be fine.

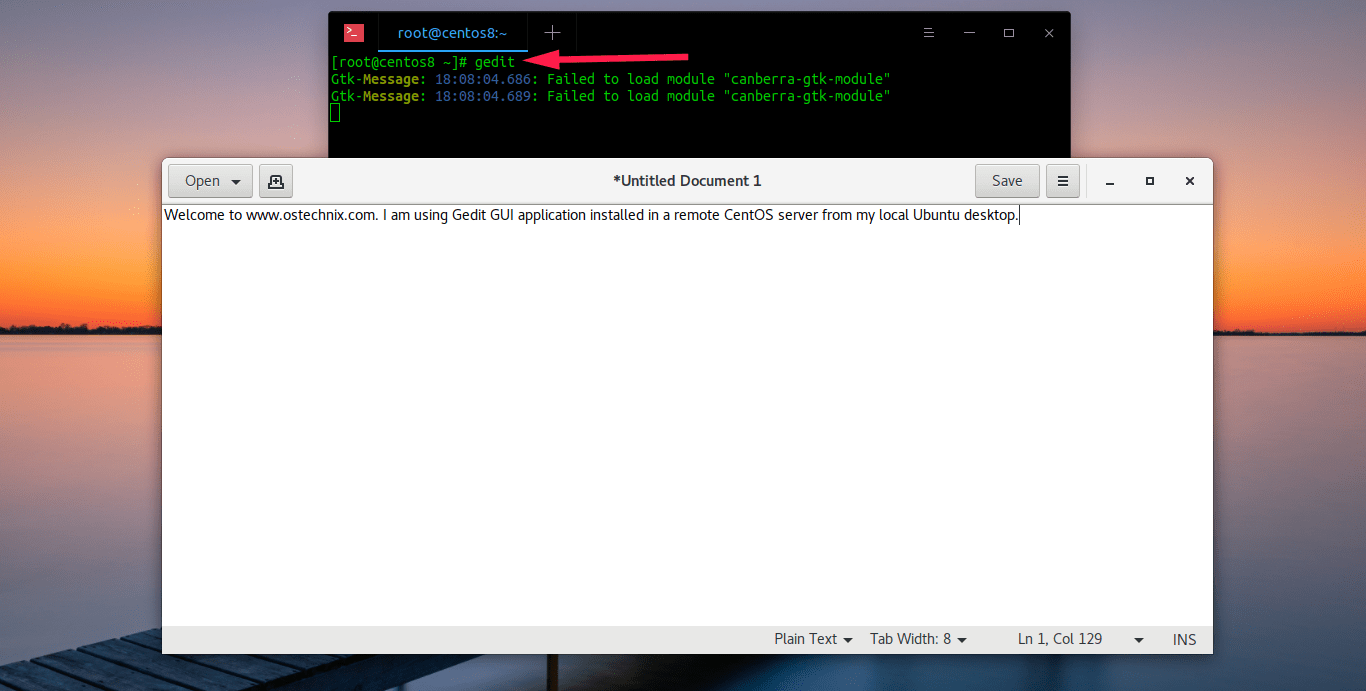
Next, launch any GUI applications from this SSH session. I already have installed Gedit graphical text editor in my CentOS 8 server, so I am going to launch it using command:

# gedit

The gedit GUI window screen will now appear in your local system.

Run remote graphical applications over SSH session in Linux

Run remote graphical applications over SSH session in Linux

You can interact with the Gedit application installed on the remote server using your local system's display, mouse, and keyboard.

Even though my CentOS 8 server doesn't have GUI desktop, I can be able to open Gedit graphical editor and use it from my local Ubuntu system.

Configure X11 forwarding in Putty

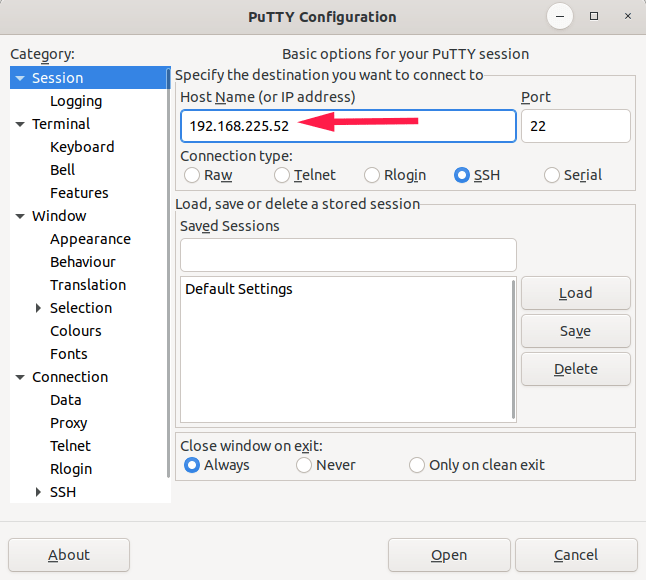
If you use Putty client to access remote systems, enter your remote system's IP or hostname in the Session tab:

Connect to remote system using Putty

Connect to remote system using Putty

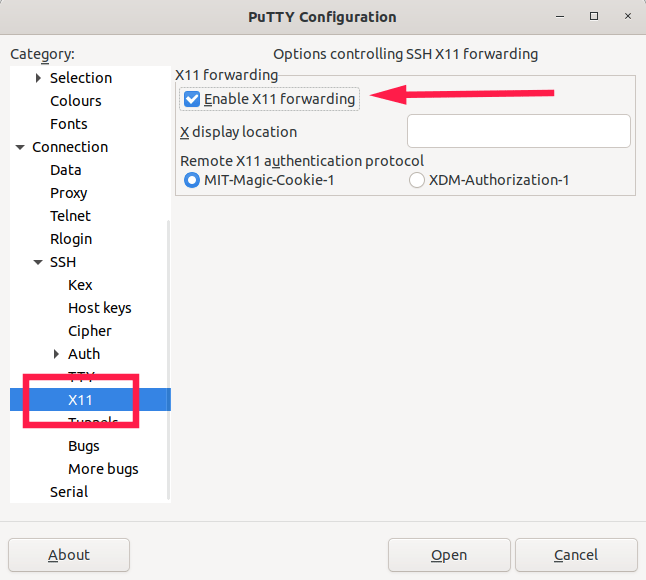
Next, navigate to Connection -> SSH -> X11 and enable X11 forwarding option. Click Open to establish a new Putty session:

Configure X11 forwarding in Putty

Configure X11 forwarding in Putty

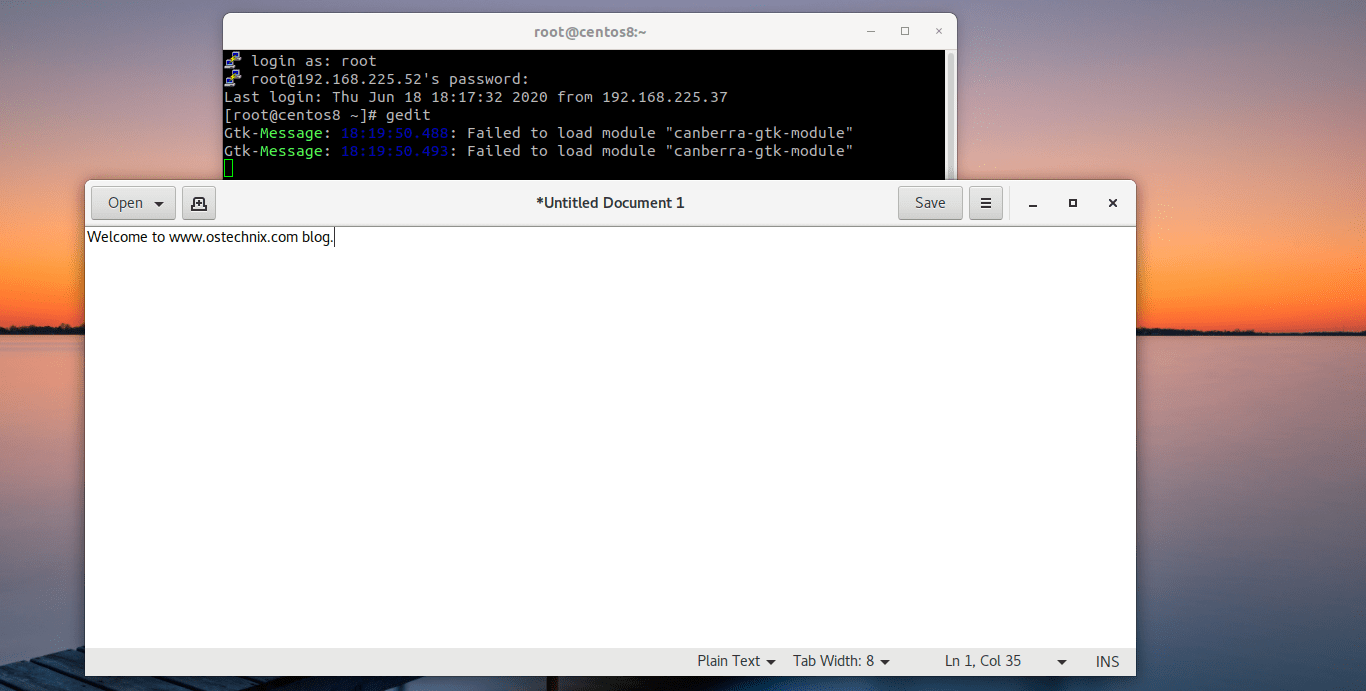
Enter the username and password of the remote server. Once you connected to the remote system via Putty, launch any X application installed in the remote server.

Run graphical applications over Putty session

Run graphical applications over Putty session

Start interacting with the remote GUI application from your local system!