Wednesday, November 19, 2014

Debian: How to install Xen hypervisor on unused old hardware

How to install Xen hypervisor on unused old hardware


Xen is a bare metal hypervisor, meaning that you must prepare a bare machine to install and run Xen. KVM is a little different - you can add it to any machine already running Linux. This tutorial describes how to install and configure Xen hypervisor on unused hardware.
This procedure uses Debian Jessie (their testing distribution) as the host OS (also known as Dom0). Jessie is not the only choice - Xen support is built into the Linux kernel, and plenty of Linux distributionsinclude one of these Xen-enabled kernels.

Find unused hardware

As a start, find a suitable workstation which can be wiped out, such as an old laptop or desktop. Older hardware may not be good for gaming, but it is good enough for a host OS and a couple of guests. A PC with these specifications works fine.
  • 1 CPU with 2 cores (64-bit)
  • 4GB memory
  • 80GB hard disk
  • ability to boot from CD, DVD or USB
  • a network interface
Note that the CPU must be a 64-bit processor since Debian dropped support for 32-bit Xen packages. If you don't have spare hardware, you could invest in an old machine. 2010's $1000 flagship laptop is today's $100 bargain. A second-hand laptop from eBay and a memory upgrade will do fine.

Burn a bootable CD/USB

Download the ISO image for Debian Jessie. The small netinst image available from the official Debian website works fine.
$ wget http://cdimage.debian.org/cdimage/jessie_di_beta_2/amd64/iso-cd/debian-jessie-DI-b2-amd64-netinst.iso
Next, identify the device name assigned to your CD/DVD or USB drive (e.g., /dev/sdc).
Burn the downloaded ISO image into a bootable CD or a USB using dd command. Replace /dev/sdc with the device name you identified above.
$ sudo dd if=debian-jessie-DI-b2-amd64-netinst.iso of=/dev/sdc

Start the installation

To start the installation, boot with the Debian installer CD/USB.
It's a good idea to use a wired connection, not WiFi. If the WiFi won't connect because firmware or driver software is missing, you won't get very far.
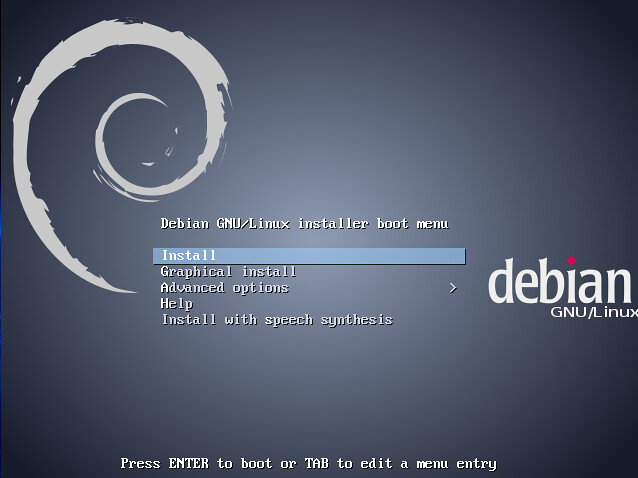
Partition the disk

This setup uses four primary disk partitions. Automatic OS installers usually set up an extended partition that contains logical partitions. Set up the four partitions like this.
  • sda1 - mount on /boot, 200MB
  • sda2 - /, 20GB, Ubuntu uses 4GB
  • sda3 - swap, 6GB (4GB of memory x 1.5 = 6)
  • sda4 - reserved for LVM, not mounted, all the rest of the disk space

Install the base system

It's a good idea to make the install as simple and short as possible. A basic working system can always be added to later. Debian's APT (Advanced Package Tool) makes adding software easy. Installing Debian on a workstation can cause pretty obscure time-wasting issues. Perhaps a graphics driver does not agree with the kernel or maybe the old CD-ROM drive only works intermittently.
When it comes to choosing what to install, do install an SSH server and don't install a desktop like Gnome.
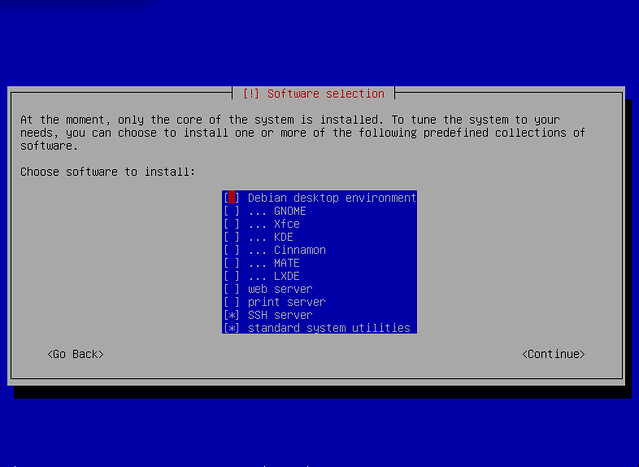
A graphical desktop requires hundreds of package installs - it's a lot of extra work that can be done later. If you run into problems, waiting for that desktop install is a waste of time. Also, without desktop component, the system boot will be much quicker - seconds rather than minutes. This procedure requires a few reboots, so that's a handy time-saver.
An SSH server lets you configure the workstation from another computer. This allows you to avoid some of the problems with old hardware - perhaps the old machine's keyboard is missing keys, the LCD screen has dead pixels or the trackpad is unresponsive etc.

Add LVM (Logical Volume Manager)

Install the LVM tools as the root.
# apt-get update
# apt-get install lvm2
Pick a physical volume to work with.
# pvcreate /dev/sda4
Create a volume group.
# vgcreate vg0 /dev/sda4
You don't need to create a logical volume. If you want to test LVM works, create a volume then delete it.
# lvcreate -nmytempvol -L10G vg0
# lvremove /dev/vg0/mytempvol
Check LVM status.
# pvs (to view information about physical volumes)
# vgs (to view information about volume groups)
# lvs (to view information about logical volumes)

Add a Linux Ethernet bridge

We are going to set up a Linux bridge so that all Xen's guest domains can be connected to, and communicate through the bridge.
Install the bridge tools.
# apt-get install bridge-utils
See what interfaces are configured.
# ip addr
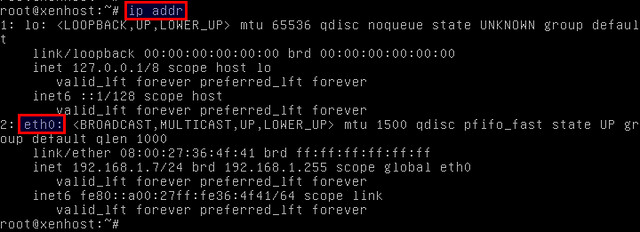
In this example, we have one primary interface assigned eth0. We are going to add eth0 to the Linux bridge by editing the network configuration file (/etc/network/interfaces).
Before making any change, back up the network configuration file to keep the original working configuration safe.
# cd /etc/network/
# cp interfaces interfaces.backup
# vi /etc/network/interfaces
The file contents look something like this.


1
2
3
4
5

auto lo
iface lo inet loopback
allow-hotplug eth0
iface eth0 inet dhcp
Change the file to this.
1
2
3
4
5
6
7
8
9
auto lo
iface lo inet loopback
auto eth0
iface eth0 inet manual
auto xenbr0
iface xenbr0 inet dhcp
bridge_ports eth0
Activate the network configuration change:
# systemctl restart networking

Verify networking settings

Verify that a Linux bridge xenbr0 is created successfully.
# ip addr show xenbr0
Also check that the primary interface eth0 is successfully added to the bridge.
# brctl show
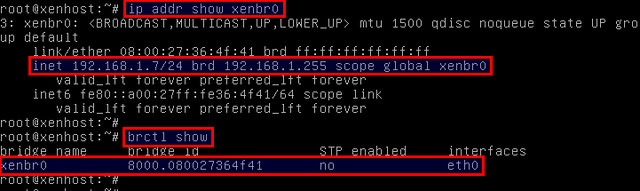
You now have a working machine with Jessie installed. Xen is not yet installed at this point. Let's proceed to install Xen next.

Install the Xen hypervisor

Install Xen and QEMU packages, and update the GRUB bootloader.
# apt-get install xen-linux-system
Reboot.
When the GRUB screen appears, you can see extra booting options listed.
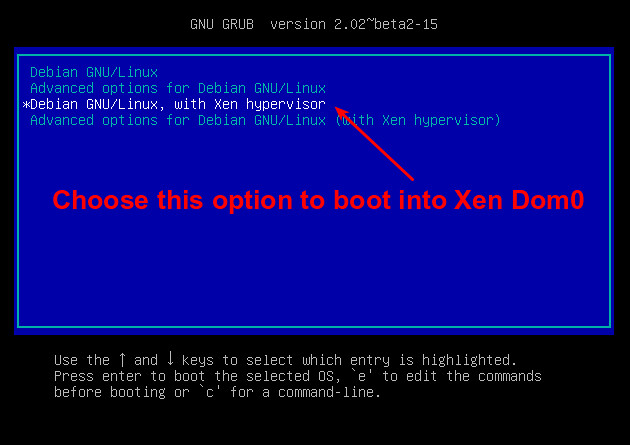
The first option will boot automatically in five seconds (see the GRUB_TIMEOUT line in /etc/default/grub), so this is not the time to get a coffee.
Press the down arrow to highlight the option "Debian GNU/Linux, with Xen hypervisor", and press RETURN. Many lines of information appear, followed by the usual login screen.

Check Xen works

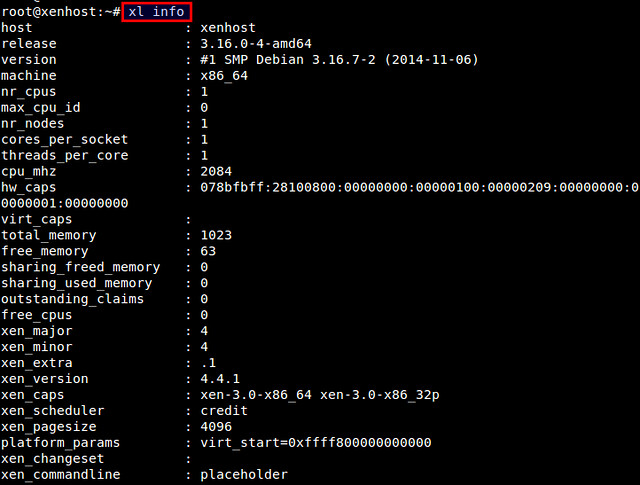
Xen hypervisor comes with Xen management command-line tool called xl, which can be used to create and manage Xen guest domains. Let's use xl command to check if Xen is successfully installed.
Log in as root, and run:
# xl info
which will display various information about Xen host.
To see a list of existing Xen domains:
# xl list

A little table of domains appears. Without any Xen guest domain created, the only entry should be Domain-0, your Debian installation.

Change the boot order

When you reach this point, the Xen install is complete. There is one more thing to fix - the default boot will not load Xen. GRUB chooses the first item in the boot menu (Debian GNU/Linux), not the third (Debian GNU/Linux, with Xen hypervisor).
The default option in the boot menu is defined in the grub configuration file /boot/grub/grub.cfg. To change the default option, don't edit that file, but edit /etc/default/grub instead. A little helper program called grub-mkconfig reads in this default configuration file and all the templates in /etc/grub.d/, then writes the grub.cfg file.
Edit Debian's configuration file for grub-mkconfig.
# vi /etc/default/grub
Change the line:
GRUB_DEFAULT=0
to
GRUB_DEFAULT='Debian GNU/Linux, with Xen hypervisor'
Then update the grub configuration file.
# grub-mkconfig -o /boot/grub/grub.cfg
Finally reboot. After a few seconds, the grub boot menu appears. Check that the third option "Debian GNU/Linux, with Xen hypervisor" is highlighted automatically.

Final note

If you use this machine as your hands-on workstation, install a graphical desktop. The Debian library includes a few desktop environments. If you want a graphical desktop that includes everything and the kitchen sink, go for Gnome. If graphics just get in your way, try Awesome.
Note that the Debian Jessie default environment Gnome comes with a huge amount of extra applications including the productivity suite LibreOffice, the Iceweasel web browser and the Rhythmbox music player. The install command "apt-get install gnome" adds 1,000 packages and takes up nearly 2GB of disk space. Running this heavyweight desktop takes up 1GB of memory.

Monday, November 17, 2014

Ubuntu : Install Webmin On Ubuntu 14.04

Install Webmin On Ubuntu 14.04


Webmin is an open source, web based system administration tool for Unix/Linux. Using Webmin, you can setup and configure all services such as DNS, DHCP, Apache, NFS, and Samba etc via any modern web browsers. So, you don’t have to remember all commands or edit any configuration files manually.

Install Webmin On Ubuntu 14.04 LTS using official repository

Add the webmin official repository:
Edit file /etc/apt/sources.list,
sudo vi /etc/apt/sources.list
Add the following lines:
deb http://download.webmin.com/download/repository sarge contrib
deb http://webmin.mirror.somersettechsolutions.co.uk/repository sarge contrib
Add the GPG key:
sudo wget http://www.webmin.com/jcameron-key.asc
sudo apt-key add jcameron-key.asc
Update the sources list:
sudo apt-get update
Install webmin using the following command:
sudo apt-get install webmin
Allow the webmin default port “10000″ via firewall, if you want to access the webmin console from a remote system.
sudo ufw allow 10000

Access Webmin console

Open up your browser and navigate to the URL https://ip-address:10000/. The following screen should appear. Enter the user name and password to log in to webmin console.

Saturday, November 1, 2014

UNUNTU : Install LEMP Server (Nginx, MySQL or MariaDB, PHP And phpMyAdmin) On Ubuntu 14.10/14.04/13.10

Install LEMP Server (Nginx, MySQL or MariaDB, PHP And phpMyAdmin) On Ubuntu 14.10/14.04/13.10

LEMP is a combination of the operating system and open-source software stack. The acronym LEMP comes from the first letters of Linux, Nginx(engine-x) HTTP Server, MySQL database, and PHP/Perl/Python.
In this tutorial, let us see how to install Nginx, MySQL or MariaDB, PHP and phpMyAdmin on Ubuntu 14.10.

Install Nginx

Nginx (pronounced as engine-x) is a free, open-source, high-performance HTTP server and reverse proxy, as well as an IMAP/POP3 proxy server written by Igor Sysoev.
To install Nginx enter the following command in your terminal:
Note: If you have already installed apache2 in your system, remove it first to avoid conflicts. To uninstall apache, run the following commands:
sudo apt-get purge apache2*
sudo apt-get autoremove -y
Now, install nginx using command:
sudo apt-get install nginx
Start Nginx service using the command:
sudo service nginx start

Test nginx

Open up your web browser and navigate to http://ip-address/ or http://localhost/. You will see a screen something like below.
Welcome to nginx! - Mozilla Firefox_005

Configure Nginx

Open the file /etc/nginx/nginx.conf in any editor:
sudo nano /etc/nginx/nginx.conf
Set the worker_processes (i.e No. of CPU’s in your system). To see the no. of CPU’s, use the command “lscpu”. In my case it’s “1″. So I set this as ’1′.
worker_processes 1;
Restart Nginx service:
sudo service nginx restart
The default vhost(server block) is defined in the /etc/nginx/sites-available/default file.
Open the file /etc/nginx/sites-available/default in any editor.
sudo nano /etc/nginx/sites-available/default
Under the Server section, set the server FQDN or IP address as shown below. Make sure you’ve added aindex.php line.
[...]
server {
      listen 80 default_server;
      listen [::]:80 default_server ipv6only=on;
      root /usr/share/nginx/html;
      index index.php index.html index.htm;
      # Make site accessible from http://localhost/
      server_name server.unixmen.local;
[...]
Here,
  • listen 80; –> listen for ipv4
  • listen [::]:80 default_server ipv6only=on; –> listen for ipv6
  • root /usr/share/nginx/html; –> document root directory.
  • server_name server.unixmen.local; –> Server FQDN.
Now, scroll down further and find the section #location ~ \.php$. Uncomment and modify the following lines as shown below.
 location ~ \.php$ {
         try_files $uri =404;   ---------> Add this line
         fastcgi_split_path_info ^(.+\.php)(/.+)$;
         #       # NOTE: You should have "cgi.fix_pathinfo = 0;" in php.ini
         #
         #       # With php5-cgi alone:
         #       fastcgi_pass 127.0.0.1:9000;
         #       # With php5-fpm:
         fastcgi_pass unix:/var/run/php5-fpm.sock;
         fastcgi_index index.php;
         include fastcgi.conf;
    }
Here, I added an extra line ‘try_files $uri =404;’ to prevent zero day exploits.
Save and exit the file.

Test nginx configuration

Test the nginx configuration for any syntax errors using command:
sudo nginx -t
Sample output:
nginx: the configuration file /etc/nginx/nginx.conf syntax is ok
nginx: configuration file /etc/nginx/nginx.conf test is successful
Finally restart nginx service
sudo service nginx restart

Install MySQL

MySQL is a relational database management system (RDBMS) that runs as a server providing multi-user access to a number of databases, though SQLite probably has more total embedded deployments
sudo apt-get install mysql-server mysql-client
During installation, you’ll be asked to setup the MySQL root user password. Enter the password and click Ok.
sk@server: ~_001
Re-enter the password.
sk@server: ~_002
Now, MySQL server has been installed.
You can verify the MySQL server status using command:
sudo service mysql status
Sample output:
mysql start/running, process 5671
Note: If you want to use MariaDB instead of MySQL, then follow the below steps.

Install MariaDB

MariaDB is a drop in replacement for MySQL. It is a robust, scalable and reliable SQL server that comes rich set of enhancements.
First you have to remove existing MySQL packages if any. To completely uninstall MySQL with configuration files, enter the following command:
sudo apt-get purge mysql*
Run the following command to remove unwanted packages.
sudo apt-get autoremove
After removing MySQL, run the following command to install MariaDB.
sudo apt-get install mariadb-server mariadb-client
Alternatively, you can install it from MariaDB repository if you want to try most recent version of MariaDB. Run the following commands to add PPA. As of writing this, MariaDB PPA is not yet updated to Ubuntu 14.10. However, we can use the repository of Ubuntu 14.04 instead.
sudo apt-get install software-properties-common
sudo apt-key adv --recv-keys --keyserver hkp://keyserver.ubuntu.com:80 0xcbcb082a1bb943db
sudo add-apt-repository 'deb http://sgp1.mirrors.digitalocean.com/mariadb/repo/5.5/ubuntu trusty main'
Update the software sources list and install MariaDB using following commands:
sudo apt-get update
sudo apt-get install mariadb-server mariadb-client -y
During installation you will be asked to set database ‘root’ user password.
sk@server: ~_003
Re-enter password:
sk@server: ~_004
Click Yes to migrate to MariaDB. Note that you’ll not be asked this question if you install MariaDB before MySQL.
sk@server: ~_005
You can check the MariaDB version using command:
sudo mysql -v -u root -p
Sample output:
Welcome to the MariaDB monitor.  Commands end with ; or \g.
Your MariaDB connection id is 34
Server version: 5.5.39-MariaDB-2 (Ubuntu)

Copyright (c) 2000, 2014, Oracle, Monty Program Ab and others.

Reading history-file /home/sk/.mysql_history
Type 'help;' or '\h' for help. Type '\c' to clear the current input statement.
Check if mariadb is running or not, using the following command:
sudo service mysql status
Sample output:
 * /usr/bin/mysqladmin  Ver 9.0 Distrib 5.5.39-MariaDB, for debian-linux-gnu on x86_64
Copyright (c) 2000, 2014, Oracle, Monty Program Ab and others.

Server version        5.5.39-MariaDB-2
Protocol version    10
Connection        Localhost via UNIX socket
UNIX socket        /var/run/mysqld/mysqld.sock
Uptime:            2 min 21 sec

Threads: 1  Questions: 566  Slow queries: 0  Opens: 330  Flush tables: 4  Open tables: 22  Queries per second avg: 4.014

Install PHP

PHP (recursive acronym for PHP: Hypertext Preprocessor) is a widely used open-source general purpose scripting language that is especially suited for web development and can be embedded into HTML.
Install PHP with following command:
sudo apt-get install php5 php5-fpm php5-mysql

Configure PHP

Open php.ini file in any editor:
sudo nano /etc/php5/fpm/php.ini
Find the line ‘cgi.fix_pathinfo=1′, uncomment it and change the value 1 to 0.
cgi.fix_pathinfo=0
Now restart php-fpm service.
sudo service php5-fpm restart

Test PHP

Create a sample “testphp.php” file in nginx document root folder.
sudo nano /usr/share/nginx/html/testphp.php
Add the following lines in it.
<?php
 phpinfo();
?>
Save and exit the file.
Navigate to  http://server-ip-address/testphp.php. It will display all the details about php such as version, build date and commands etc.
phpinfo() - Mozilla Firefox_001
PHP-FPM listens on the socket /var/run/php5-fpm.sock by default. If you want to make PHP-FPM use a TCP connection, open the file /etc/php5/fpm/pool.d/www.conf,
sudo nano /etc/php5/fpm/pool.d/www.conf
Find the line listen = /var/run/php5-fpm.sock,
;listen = /var/run/php5-fpm.sock
and modify it to listen = 127.0.0.1:9000.
listen = 127.0.0.1:9000
Save and exit the file. Restart php5-fpm service.
sudo service php5-fpm restart
Now open the nginx configuration file:
sudo nano /etc/nginx/sites-available/default
Find the line fastcgi_pass unix:/var/run/php5-fpm.sock; and change it to fastcgi_pass 127.0.0.1:9000; as shown below.
location ~ \.php$ {
        try_files $uri =404;
        fastcgi_split_path_info ^(.+\.php)(/.+)$;fastcgi_pass 127.0.0.1:9000;
        #       # NOTE: You should have "cgi.fix_pathinfo = 0;" in php.ini
        #
        #       # With php5-cgi alone:
        fastcgi_pass 127.0.0.1:9000;
        #       # With php5-fpm:
        #        fastcgi_pass unix:/var/run/php5-fpm.sock;
        fastcgi_index index.php;
        include fastcgi.conf;
   }
Save and exit the file. Finally restart nginx service.
sudo service nginx restart

Manage MySQL Databases Using phpMyAdmin (Optional)

phpMyAdmin is a free open-source web interface tool used to manage your MySQL databases.

Install phpMyAdmin

It is available in the Official Debian repositories. So install it with command:
sudo apt-get install phpmyadmin
Select any webserver. By default, nginx will not be displayed here. So, select apache or lighttpd, and we will link phpmyadmin to work with nginx webserver later.
sk@server: ~_007
Select Yes to configure database for phpmyadmin with dbconfig-common.
sk@server: ~_008
Enter password of the database’s administrative user.
sk@server: ~_009
Enter MySQL application password phpmyadmin.
sk@server: ~_010
Re-enter the password.
sk@server: ~_011
The phpMyAdmin installation has been completed.
Create a symbolic link between phpMyAdmin and the website root directory. Here our website root document directory is /usr/share/nginx/html/.
sudo ln -s /usr/share/phpmyadmin/ /usr/share/nginx/html
Restart nginx server.
sudo service nginx restart

Access phpMyAdmin Web Console

Now you can access the phpmyadmin console by navigating to http://server-ip-address/phpmyadmin/ from your browser.
Enter your MySQL username and password which you have given in previous steps. In my case its “root” and “ubuntu”.
phpMyAdmin - Mozilla Firefox_002
You will be redirected to PhpMyAdmin main web interface.
192.168.1.100 - localhost | phpMyAdmin 4.2.6deb1 - Mozilla Firefox_003
Now you can manage your MySQL databases from phpMyAdmin web interface.
That’s it. Your LEMP server is now up and ready to use.