Restore Ubuntu Desktop and Server to previous state
About Systemback
Systemback is a free utility that can be used to backup and restore Ubuntu-like systems. It is somewhat similar to MS Windows ‘System restore’ option. Using Systemback, we can easily create backup of a Ubuntu desktop or server system, and restore them to the previous state whenever we want. It creates one or more restore points date and time-wise, and displays the most recent restore points at the top. Not only restore points, we can create the complete backup of your live system including user configuration files and folders as ISO, and save them in an external hard disk.
In a nutshell, using Systemback, we can,
- Backup the system with or without user configuration files and folders;
- Restore system to any previous working state;
- Copy files/folders from one partition to another;
- Create the live Ubuntu system as ISO, and boot your system using it in-case of any problems;
- Upgrade our system to next available version etc.
In this tutorial, let us see how to install and use Systemback utility in Ubuntu 16.04 LTS desktop and server editions.
Install Systemback in Ubuntu
I have tested this utility in Ubuntu 16.04 LTS desktop and server editions. However, It will work on previous Ubuntu versions such as Ubuntu 15.10, 15.04, and 14.04 LTS versions, and other Ubuntu derivatives like Linux Mint.
Add Systemback PPA using command:
Sample output:

Add Systemback PPA
Update the software sources using command:
Finally, install Systemback using command:
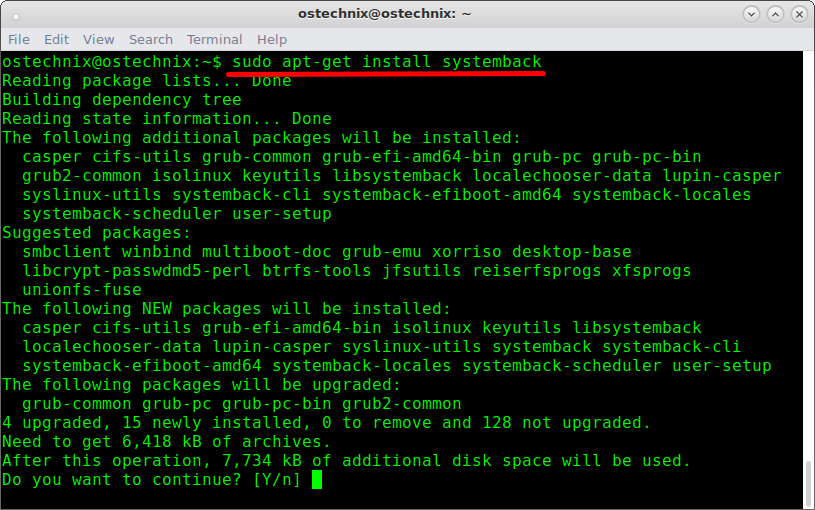
Install Systemback
Systemback Usage in Ubuntu desktop
Once installed, Launch Systemback either from Menu or Unity launcher.
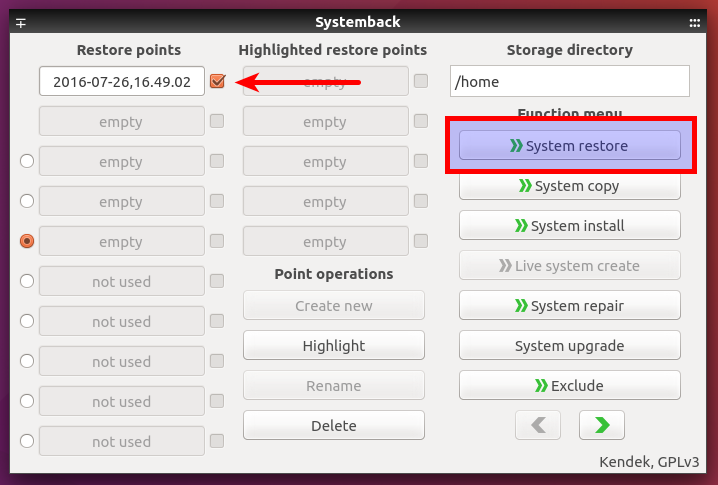
The default interface should look like below.

Systemback main interface
As you see in the above screenshot, there are five sections namely,
- Restored points – List of available restore points
- Highly restore points
- Point operations – Create, hightlight, rename or delete restore points
- Storage directory – The location of saved restore points
- Function menu – This menu contains the main options such as System copy, restore, install, live system create, system repair, system upgrade, exclude, include, Schedule, and Settings etc.
Creating system restore points
At first launch, there is no restore points. So, let us create our first restore point. You can create any number of restore points either manually or automatically.
To do so, click Create New button under Point operations section.

Create system restore point
Now, Systemback will start to create the first restore point.

Once the restore point, It will be displayed in the main interface under Restore points sections.

Display system restore points
The newly created restore points will be stored under /home directory by default. You can change this location fromStorage directory section. Make sure you have enough free space in the storage directory (i.e /home directory).
System restore
To restore your Ubuntu system, select the restore point of your choice and click System restore option found underFunction menu.
System restore
In the next window, select whether you want to do full system restore or just the System files restore. Also, you can choose whether you want to restore user(s) configuration files.
I wanted to to do full restore, so I selected the first option.

Finally, click Start.

That’s it. Your system will be restored to the selected restore point.
Create live system as ISO
This is another useful option. You can create the entire the system as live bootable ISO and write the ISO to DVD or USB drive.
Click Live system create button.

Choose the location where you want to store the ISO file. Finally, click Create New button.

Also, you can include the user data files in the ISO by selecting the checkbox that reads Include the user data files.
System repair
This option helps you to fix any errors in the GRUB and fstab files.

System upgrade
Want to upgrade your Ubuntu system to the most recent version? That’s also possible. Just click on the System upgradeoption.
Systemback will upgrade your system automatically.
![Ubuntu 16.04 LTS Desktop [Running] - Oracle VM VirtualBox_014](http://www.ostechnix.com/wp-content/uploads/2016/07/Ubuntu-16.04-LTS-Desktop-Running-Oracle-VM-VirtualBox_014-1.png)
Exclude
Using this section, you can exclude some files and folders from restore points.

Include
This option allows us to include the files and folders in restore points.

Schedule
This another important and useful option. We can create restore points at regular interval.

Settings
The settings option has other settings such as override auto-detected language, disable incremental restore points, create live ISO images automatically, disable scheduler daemon for particular users, enable compress for squashfs filesystems etc.

Systemback backup has plenty of useful options. Just go through every section and choose the options of your choice.
Systemback Usage in Ubuntu server
Systemback is not only for Desktops, but also works very well in Ubuntu Servers too. Systemback doesn’t need GUI desktop environment. You can use it both on GUI and CLI environments.
To launch Systmback in CLI mode (i.e Servers without Graphical desktop), run the following command:
You will see the following screen.

Systemback-cli
Since it is the first time, there is no available restore points. So, let us create a new restore point.
To do so, type “g”.
Now, Syetmback utility will create the restore point of your Ubuntu server.

Once the restore point created, Systemback utility will display it in the main window under Available restore point(s)section.
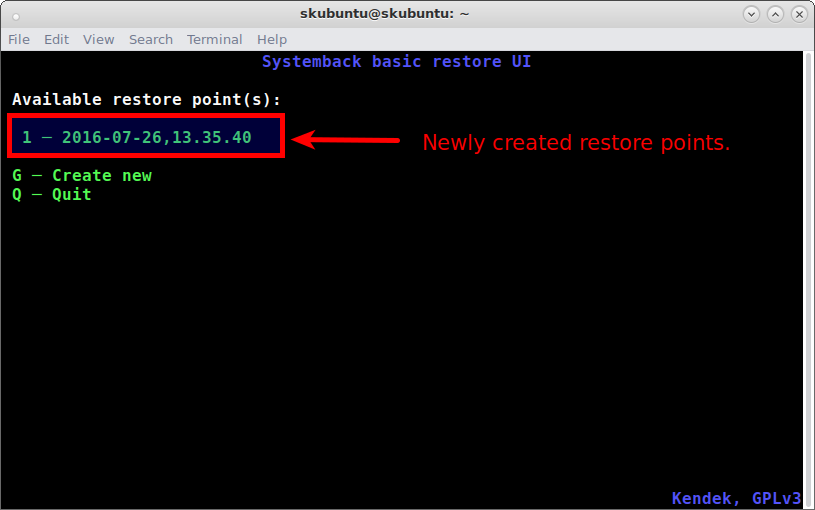
As you see in the above screenshot, I have created only one Restore point ( 1 ─ 2016-07-26,13.35.40 )
of my Ubuntu server. The second restore point name will be 2-2016-xx-xx-xx.
of my Ubuntu server. The second restore point name will be 2-2016-xx-xx-xx.
To restore the Ubuntu server to its previous state, just select the restore point number (i.e 1 in our case).
In the next screen you will see the following three options.

To delete the restore point, type “1”. To restore the system, type “2”. To go back to the previous screen, type “3”.
Let us restore the system. To do so, enter number “2”.
In the next window, you can select the available restore method. There are two methods:
- Full restore
- System files restore
Also, you can select whether the user configuration files should be restored or not.
I want to do “full system restore”, so I entered number “1”.

Next you need to choose whether you want to keep the current fstab file and whether you want to reinstall Grub bootloader file or not.

Finally press “Y” to start the “Full Restore”.
That’s it. Now, Your Ubuntu server will be restored to the previous state.
After the full system restoration is completed, Press ‘ENTER’ key to reboot the computer, or ‘Q’ to quit.

As I mentioned already, the restore points will be available in the /home directory. Copy them to a USB external drive and keep them in a safe location. You can use them to restore your Ubuntu system if something went wrong.
Conclusion
It is always a best practice to create two or three working restore points in your Production Desktop or Server. It will always help you in-case something went wrong while installing or configuring something in your Ubuntu systems. If something went wrong, You can easily restore your Ubuntu system to the previous working state in couple minutes. As I mentioned already, make sure you have enough free space in your hard drive where you keep the restore points.
That’s all for now. Hope this helps.
Cheers!
Reference links:
No comments:
Post a Comment