Some Random One-liner Linux Commands
Some Random One-liner Linux Commands
These commands are mostly for beginners. All commands are given in no order. If there any typos, mistakes in commands, let me know in the comment section. I will update them ASAP.
1. Feel bored at work? Open any random man pages and start reading it. It’s good for killing your boring time.
2. To show all the available information about your current distribution, package management and base details, run:
3. To get notified when a command is completed, add the following line at end of the command. It is good for monitoring commands that takes long time to complete.
Example:
4. Find files bigger than X size, for example 10 MB, and sort them by size:
5. To run Linux commands non-interactively, use “yes” command like below.
It doesn’t require user intervention. To put this simply, you don’t have to type “yes” or “y” to complete the given command. It might useful in scripts. It’s also dangerous. You might accidentally do some damages. Be cautious when using “yes” command.
6. Recall “N”th command from your BASH history without executing it:
The above command will display 12th command from the history, but it won’t execute it.
7. To learn about Unix/Linux file system hierarchy, run:
8. If you don’t know what a particular command will do, copy/paste that command in the following site.
This site breaks down the long/confusing commands and instantly display what each command part will exactly do. This is recommended site to newbies.
9. To use the Terminal on a system where the ENTER key doesn’t work, use:
- CTRL+j or CTRL+m
10. Find all broken sym links in your system:
11. Monitor CPU speed in real time:
Press CTRL+c to stop monitoring.
12. Find the exact installation and date a Linux OS, run the following command:
Arch Linux:
If the logs are already delete, use the following commands instead. Run these commands as root user.
Or,
On RPM based systems such as Fedora, RHEL and its clones such as CentOS, Scientific Linux, Oracle Linux:
Or,
13. Find most used commands:
This command will display the top 15 most used commands.
14. Find when was the last time your system went to sleep:
15. To enable and start a service, for example docker, with a single command:
Usually, I enable and start a service like below until I came to know this one-liner.
16. Difference between “&&” and “;” operators between commands:
The “&&” operator executes the second command only if the first command was successful.
Example:
In the above case, the second command (sudo apt-get upgrade) will execute if the first command was successful. Otherwise, it won’t run.
The “;” operator executes the second command even if the first command was successful or fail.
Example:
In the above case, the second command (sudo apt-get upgrade) will execute even if the first command is failed.
16. To monitor Kernel messages in live:
To stop monitoring press CTRL+c.
17. Copy everything except one file or directory:
The above command will copy everything from dir1 to dir2, except “ostechnix”. The “ostechnix” can be either file or folder.
18. To check if a particular service is enabled or not at startup, use:
19. Delete all consecutive duplicate lines in a file:
This command will delete all consecutive duplicate lines from the ostechnix.txt file.
20. List all resolutions supported by your X:
To change X’s resolution on the fly:
21. Display crypto currency exchange rates from command line:
22. To check your CPU compatibility i.e 32 bit or 64 bit, run:
23. To quickly copy or backup a file, use this command:
This command will copy the file named “ostechnix.txt” to a file named “ostechnix.txt.bak”. This can be useful for making backups of configuration files before editing them.
24. To create files with specific permission on the fly:
Here, -b flag is used to take backup of the file if it already exists.
25. Play multiplayer Tron game in your Terminal:
Use W, A, S, D keys for movement. It is useful to kill your boring time.
26. Display a sequence of numbers in Terminal:
This command will display the numbers from 01 to 10.
27. Display the latest Arch Linux news in your Terminal:
Make sure you have installed w3m text browser. w3m is available in the default repositories.
28. Create a password-protected file using vim:
Enter the encryption key twice.
To remove the password, open the file using vim:
And type:
Finally type :wq to save and close the file.
29. Watch ASCII episode of Star Wars IV in Terminal:
Please be mindful that you can’t pause, rewind once the movie starts. Be prepared to watch the entire episode in a single sitting.
30. List hidden files and directories first:
31. Find and delete all files of certain type. for example “.PDF”:
Double check before you running this command. You might accidentally run it in wrong directory and delete all data.
32. Display disk usage of all files and directories in human readable format:
Display only the total disk usage (summary) of current directory:
33. To use vim editor on a system where ESC key doesn’t work, use:
- CTRL+[
34. To reset and erase all characters entered at Unix password prompt, press:
- CTRL+ALT+u
Before I know this tip, I hit BACKSPACE key repeatedly to erase the characters.
35. To view the list of packages to be upgradable on Debian based systems, use:
36. To find when was an “ext” filesystem last mounted, run:
Where “x” is the partition number like sda1, sda2
Example:
Or,
You can also use this command to check how many times the file system has been mounted and when was the file system created .
37. Here are some useful BASH shortcut keys.
- CTRL+r : Search command history
- CTRL+l : Clears the Terminal screen. (Here l is the letter L)
- CTRL+c : Cancels the running command.
- CTRL+z : Suspends the running command.
- CTRL+u : Delete the entire line before the cursor.
- CTRL+k : Delete the entire line after the cursor.
- CTRL+t : Interchange the last two characters before the cursor. useful to correct mistyped commands.
- CTRL+d : Close the Terminal.
1. Let us start this part with Emacs. If you have Emacs installed on your system, press CTRL+x and CTRL+e to open the Emacs editor containing whatever you just typed in your Terminal. For example, type “ls” on your Terminal and press CTRL+x followed by CTRL+e. Now the Emacs editor will automatically open with “ls” on it.
2. To list files and directories in the current working directory, type:
The smallest items will be showed on top.
3. To go back to the previous working directory from any location, type:
Please note the space between cd and – (dash).

To go back to your $HOME directory from any location, the command is:

It doesn’t matter which is your previous working directory. The “cd” command will take you from any location to your $HOME directory.
4. Some times I forget to add “sudo” when I am editing Apache configuration files using vim editor. The result? I couldn’t save the file after making some changes. It will throw the permission denied error if I try to save. This cool trick helped me to save a file edited in vim without the needed permissions.
You don’t need to quit the vim and re-edit the file with sudo permission. After making the changes, just type above line to save it with sudo permissions. It is really cool trick when you forget to add “sudo” when editing files.
5. To recall a command with a specific prefix from the BASH history without executing the command, type:

The above command will recall the last command with prefix “su”, but it will not run it. As you see in the above picture, my last command with prefix “su” was – sudo netctl restart wlp9s0sktab.
6. To continuously monitor the output of a file, use this command:

This command will be useful to monitor a file that produces output a lot.
7. To upgrade a single package using “APT” package manager, use:
8. If you accidentally modified or overwrote your .bashrc file, you can restore to its default settings by copying the default copy from skel folder.
Be aware that this command will overwrite all changes in your existing .bashrc file.
9. To automatically “ls” when changing directory, add the following lines in your .bashrc file.
To update the changes made in your .bashrc file, run:
Now cd to any directory. You will see the list of files and folders including the hidden items in it. Please be mindful that it will be annoying sometimes you change to directory that contains hundreds of files/folders.
10. To display the total numbers of files and folders in the current directory, run:
To display total number files/folders including hidden files, type:
11.To download a .deb package with all required dependencies without installing it, use this command:
This command will download “vim” package with all necessary dependencies, but it will not install it.
For more details, refer this link.
- Download Packages With Dependencies Locally In Ubuntu
Download Packages With Dependencies Locally In Ubuntu
We can do this in two methods. For the purpose of this tutorial, I will be using Ubuntu 16.04 LTS desktop.
Method 1:
This is the simplest and straight forward method than everything else.
To download a package with all dependencies without installing them, run:
All downloaded files will be saved in /var/cache/apt/archives directory. Just copy the entire cache folder on any USB or transfer them via network to any system where you wanted to install the packages.
To install the downloaded packages, go to the cache folder and install them as shown below.
See? It is easier than you ever thought, isn’t? Well, let us see the another method.
Method 2:
First, download the dependencies of the package you wanted to download.
To display list of all dependencies of a package, for example Python, run:
Sample output:
Let us download python package with its dependencies to our local disk.
To do so, first create a directory to save the packages.
Go to the directory:
And then run:
The above command will download Python package along with all required dependencies and saves them in the current working directory. This command will also save any errors in the errors.txt file.
Let us view the downloaded files using ‘ls’ command:
Sample output:

As you see in the above output, python package with all its dependencies has been downloaded.
Just copy them to your USB drive and install the python packages on any offline system as shown below.
Mount the USB drive, go to the location where you have mounted the drive, and run the following command to install Python.
You can also download a .rpm package with all dependencies without installing it. Check this below link to know how.
- How To Download A RPM Package With All Dependencies In CentOS
Download A RPM Package With All Dependencies Using “Downloadonly” plugin
We can easily download any RPM package with all dependencies using “Downloadonly” plugin for yum command.
To install Downloadonly plugin, run the following command as root user.
Now, run the following command to download a RPM package.
By default, this command will download and save the packages in /var/cache/yum/ in rhel-{arch}-channel/packages location. However, you can download and save the packages in any location of your choice using “–downloaddir” option.
Example:
Sample output:
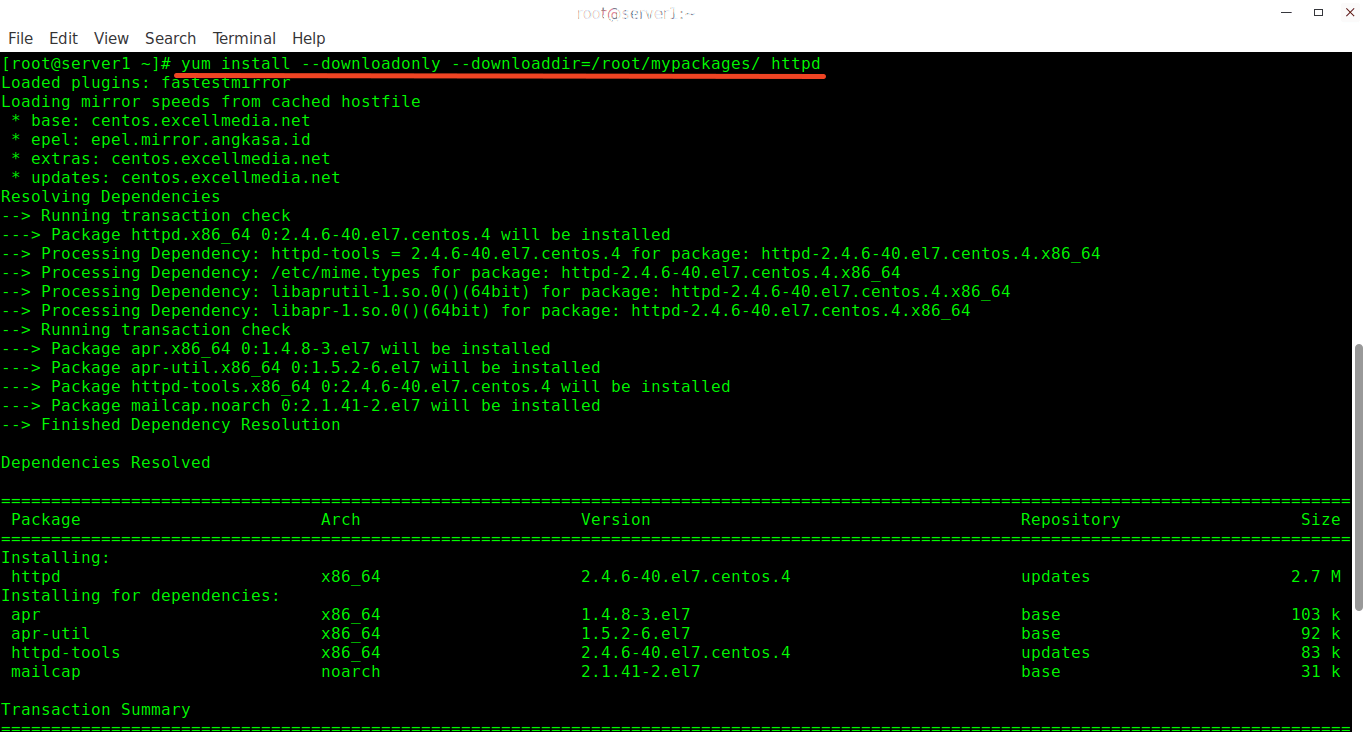
Now go the location that you specified in the above command. You will see there the downloaded package with all dependencies. In my case, I have downloaded the packages in /root/mypackages/ directory.
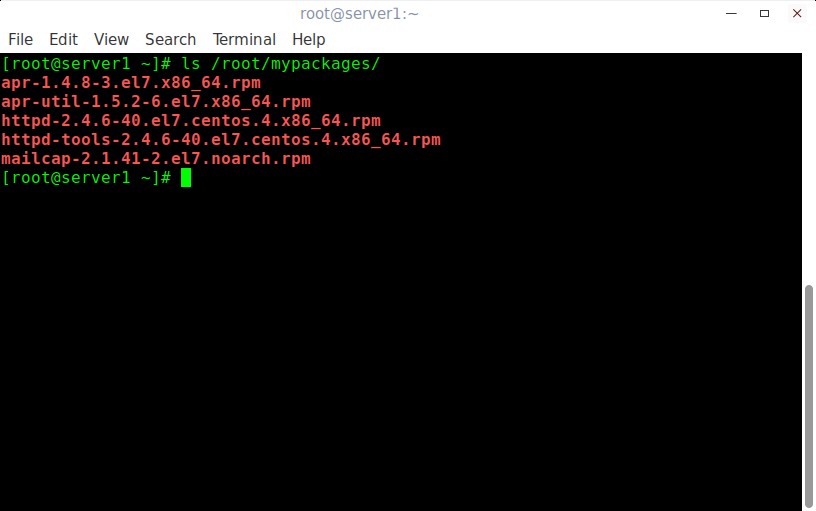
Let us verify the contents.
Sample output:
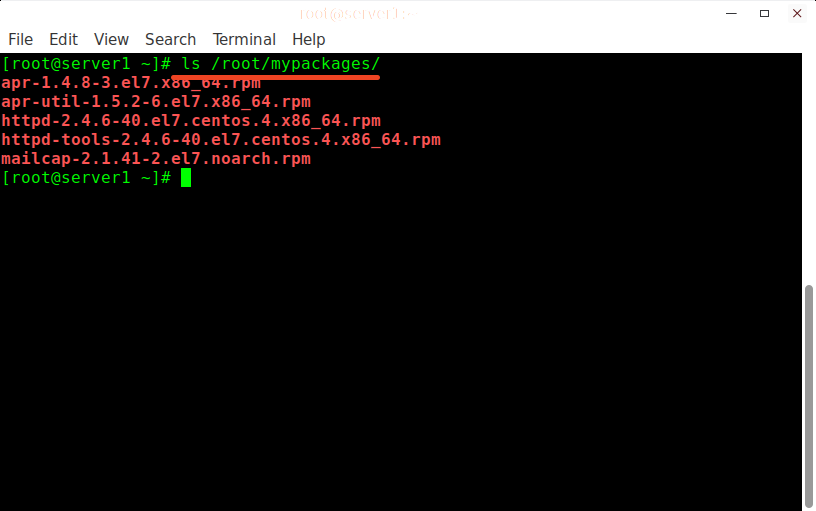
As you see in the above output, the package httpd has been downloaded with all dependencies.
Please note that this plugin is applicable for “yum install/yum update” and not for “yum groupinstall”. By default this plugin will download the latest available packages in the repository. You can however download a particular version by specifying the version.
Example:
Also, you can download multiple packages at once as shown below.
Method 2 – Download A RPM Package With All Dependencies Using “Yumdownloader” utility
Yumdownloader is a simple, yet useful command-line utility that downloads any RPM package along with all required dependencies in one go.
Install Yumdownloader using the following command as root user.
Once installed, run the following command to download a package, for example httpd.
To download packages with all dependencies, use –resolve option:
By default, Yumdownloader will download the packages in the current working directory.
To download packages along with all dependencies to a specific location, use –destdir option:
Or
Sample output:

Let us verify whether packages have been downloaded in the specified location.
Sample output:
Unlike “Downloadonly” plugin, Yumdownload can download the packages related to a particular group.
Personally, I prefer Yumdownloader over “Downloadonly” plugin for yum. But, both are extremely easy and handy and does the same job.
12. To list all installed packages on a Debian based system, run:
To display the files installed and path details of a given package, use:
One-liner Linux Commands
1. To find when a package was installed on Fedora, RHEL, CentOS, run:
Example:
2. To list all packages associated with a particular language, for example Spanish, in RPM-based systems like RHEL, Fedora, CentOS, run:
3. At times, you might need to copy a file to multiple directories. Here is the one-liner command example to copy a file to multiple directories:
In the above example, we copy file.txt to dir1 and dir2 at once.
Suggested read:
4. List the contents of a directory, sorted by access time:
Suggested read:
- Find And Sort Files Based On Access, Modification Date And Time In Linux
- How To List Installed Packages Sorted By Installation Date In Linux
5. To quickly create a file with some contents:
Here, I created a file named file.txt with contents “Welcome To OSTechNix”.
6. To shutdown your Linux box at a specific time, for example 9PM, run:
To reboot at a specific time, for example 9PM, run:
7. Normally, we do the following to remove package in YUM-based systems:
To install a package, we do:
How about combining these two commands into one?
To remove one package and install another package at the same time in RHEL, CentOS, run:
This command will first remove “nano” package and then install “emacs”. This is one of the best option I found in YUM package manager.
8. Looking for a CLI utility to crop your media files between a specific time intervals. I suggest you to use “ffmepg”. If you haven’t installed it already, refer the following guide.
Once ffmpeg installed, you can a audio/video file using start and stop times using as shown below.
The above command will crop “input.mp3” file starting from 1:54 minutes to ending time 6:53 and save the final output in a separate file named “output.mp3”.
Suggested read:
- 20 FFmpeg Commands For Beginners
- How To Create Animated GIF In Linux
- How To Create A Video From PDF Files In Linux
9. We used to use “cat” command to displaying file’s output. Did you know we can also use “awk” command to display the contents of a file like below?
The above command is equivalent to “cat file.txt” command.
10. A one liner Linux command to assign multiple permissions to a file/directory at once:
This command assigns write permission to “group” members, removes read/write permissions from “other” users, and assigns the execute permission to “all” to the given file or directory.
11. Print detailed usage of each sub-directory in a directory in human-readable format:
This command displays the disk usage of all sub-directories in the directory named “ostechnix”.
12. Split files at a particular line:
This command splits file.txt at line number 3 and saves the output in two separate files namely xx00 and xx01.
13. Display file’s output in reverse order:
I have a file named file.txt with following contents:
Now let me reverse the above file’s output:
See? The “rev” command reverses the order of the characters in every line.
14. Feel bored at work or want to impress your female/male colleague, here is an interesting command that I came across a few days ago.
Simulate on-screen typing like in the movies:
This command will print the characters in the given sentence (i.e Welcome to OSTechNix) in your Terminal at 5 per second. You can change the time interval as per your wish.

Please note that “pv” command should be installed in your system. PV is available in the default repositories of Arch-based systems and DEB-based systems. On RHEL/CentOS, you need to enable EPEL repository and then install pv command.
15. The following command will delete all files that doesn’t match the specific extensions. In other words, we delete all files in a current working directory except the given file types. Take a look at the following command:
This command will delete all files that doesn’t match .txt, .mp3, .zip extensions in the current working directory. To put this simply, it will keep .txt, .mp3, .zip type files and delete all other files. Here ! operator specifies not.
Please be very careful while using this command. You may unknowingly delete the files in a wrong directory. Make sure you’re in the right directory and make sure you have specified the correct file extensions.
16. Create a directory and cd into it with a single command:

This will command will create directory named “ostechnix” inside “/home/sk/” location and and cd into it immediately.
No comments:
Post a Comment