Showing posts with label File Transfer. Show all posts

Monday, December 16, 2019

Quick Tips: How To Keep Ownership And File Permissions Intact When Copying Files Or Directories

How To Keep Ownership And File Permissions Intact When Copying Files Or Directories

The other day I planned to backup some data from my Ubuntu desktop system to an external USB drive. After I transferred all data to the external drive, I noticed that the owner and permissions of the files and directories on source and destination are different. But, I wanted to keep existing file attributes (such as owner, group and timestamp etc.) intact on both location. After a quick Google search and going through man pages of “cp” command, I found that we can keep ownership and file permissions intact when copying files and directories on Linux. If you ever been in a situation like this, here is a quick workaround to do it.

Keep Ownership And File Permissions Intact When Copying Files Or Directories On Linux

The cp command has an option to copy files and directories but preserves modification times, access times, and modes from the original file.
$ cp -rp ~/data /media/sk/sk_seagate/data/
Here, I am copying the contents of a folder named “data” to my external drive.
From the cp command’s man pages:
-p     same as --preserve=mode,ownership,timestamps

       --preserve[=ATTR_LIST]
              preserve the specified attributes (default: mode,ownership,timestamps), if possible
              additional attributes: context, links, xattr, all
So, if you use -p flag, it will preserve all existing file attributes such as mode, ownership and timestamps from original file.
And the “-r” flag is used here to copy directories recursively. Meaning – it will copy directories and its sub-directories and files.
Alternatively, you can use -a flag. It includes the -r flag and preserves everything, such as links, xattr, SELinux attributes etc.
$ cp -a ~/data /media/sk/sk_seagate/data/
From cp command’s man pages:
-a, --archive
              same as -dR --preserve=all
To verify if the file permissions and ownership are intact, use getfacl command on both locations i.e. source and destination.
$ getfacl ~/data
$ getfacl /media/sk/sk_seagate/data/
If you want to copy files between from the local system to a remote system in the same network, you can use “scp” command to transfer files from one system to another like below.
$ scp -rp ~/data senthil@192.168.225.22:/home/senthil/
The above command will copy the contents folder named “data” from my local system to a remote system. Here, 192168.225.22 is the IP address of my remote system and “senthil” is the user name of remote system.
Check the file permissions and ownership of the “data” directory on both systems using “getfacl” command.
First let check the file attributes of “data” directory on the local system:
$ getfacl data/
Sample output:
# file: data/
# owner: sk
# group: sk
user::rwx
group::rwx
other::r-x
Next, check check the file attributes of “data” directory on the remote system. You can directly log in to the remote system and check the fie attributes of a remote directory via ssh command like below.
$ ssh senthil@192.168.225.22 getfacl data
Sample output:
senthil@192.168.225.22's password:
# file: data
# owner: senthil
# group: senthil
user::rwx
group::rwx
other::r-x
As you may noticed in the above outputs, the owner and group information (i.e. senthil) are different in my remote system. Because, the -p flag of scp command doesn’t preserve all permissions.
From the man pages of scp command:
-p      Preserves modification times, access times, and modes from the original file.
It is clear that the -p flag will only preserve modification times, access times, and modes from the original file, but not the ownership. In such cases, you can create a common user name on both systems and try the above command to carry the same ownership and file permissions on different systems. Or simply use the “chown” command on the destination system to change the ownership.
For more details, refer man pages of cp and scp commands.
$ man cp
$ man scp

Suggested read:

Hope this helps.

Tuesday, February 27, 2018

GoogleDrive CLI : DriveSync - Sync Local Files with Google Drive from Linux CLI

DriveSync - Sync Local Files with Google Drive from Linux CLI 

DriveSync is a command line utility that synchronizes the local files in your computer with Google Drive. It provides a simple and efficient method to keep your files organized and backup them to be accessed remotely.

Features

  • Download remote files
  • Upload local files to Google Drive
  • Delete or update files both locally and on Drive
  • Able to Ignore selected files
  • Able set file size thresholds
  • Automate using cron job

Installation

First of all, you need to have Ruby 2.x installed. The software is officially tested and developed with 2.3.0 and 2.1.2.
You can check the installed version by typing:
$ ruby -v

1. Install Ruby

If you don't have Ruby installed, just install it:
Ubuntu
$ sudo apt-get install ruby ruby-bundler
Arch Linux
$ sudo pacman -S ruby ruby-bundler
Fedora
$ sudo dnf install ruby rubygem-bundler

2. Install DriveSync

Now it's the same in every distribution, execute this lines (separately):
$ git clone git@github.com:MStadlmeier/drivesync.git
$ cd drivesync
$ bundle install
And that's it! You can now run DriveSync by typing:
$ ruby drivesync.rb

How to use

When you run the program, it'll give you a URL, like this one (I've hidden the id for security reasons):
run drivesync
Then, paste the URL in your browser and you'll get the authorization code. Copy that code and paste it in your open terminal as it is. Then press Enter:
google authorization
Now, DriveSync will start to synchronize your computer with Google Drive, so it may take some time.

Configuration

All the software settings are located in a config.yml file. It's located in pathToDrivesync/config.yml. For example, as I have DriveSync installed on /home directory, the path should be: drivesync/config.yml
That config file has all the settings explained. As the official documentation says, the most important configuration at the beginning is the location for the drive folder in your local system. You can set it as you like.

Automatic synchronization

It'd be better to synchronize your files automatically than doing it manually by adding to cron job. This is possible by following these steps:
Type in a terminal:
$ crontab -e
You'll be asked what text editor do you want to use. Choose the one that you prefer, in this case I chose nano.
Then paste this line:
*/1 * * * * ruby /pathToDrivesync/drivesync.rb
It should be something like this:
add cronjob
Save the file and close.
The developer doesn't advise syncing large files. DriveSync ignores by default any file above 512MB. This can be changed in the config file, and you may have to change the timeout threshold too (in the same file).
Google Drive allows files or folders with identical paths, while Linux doesn't. So try not to have identical paths. Also, DriveSync ignores Google Docs files, but there may be a fix in the future. You can go to the official repository and read more documentation.


Tuesday, February 20, 2018

rsync - How to Backup Files in Linux With Rsync on the Command Line

How to Backup Files in Linux With Rsync on the Command Line

There are many GUI tools; some come preinstalled on many distros, but since I run a headless file server I use command line tools and that's what I am going to talk about in this article.
I also tend to keep things as simple as possible, so the tool I use for my back-up is 'rsync'.

What’s rsync

Rsync stands for remote sync which was written by Andrew Tridgell and Paul Mackerras back in 1996. It's one of the most used 'tools' in the UNIX world and almost a standard for syncing data. Most Linux distros have rsync pre-installed, but if it’s not there you can install the 'rsync' package for your distribution.
Rsync is an extremely powerful tool and does more than just make copies of your files on your system. You can use it to sync files on two directories on the same PC; you can sync directories on two different systems on the same network; or sync directories residing on machines thousands of miles apart, over the Internet.
The functionality of rsync can be expanded by using different 'options', which we will talk about soon.
The basic syntax of rsync is
rsync option source-directory destination-directory
Let’s assume you have a directory /media/hdd1/data-1 on hard drive 1 and you want to make a copy of it on a new hard drive which is mounted at /media/hdd2. 
The following command will create the directory data-1 on the second hard drive can copy the content of the directory to the destination:
rsync -r /media/hdd1/data-1 /media/hdd2/
The option '-r' ensures that it's recursive and will also sync all directories.
However once the directory data-1 is created on hdd2 then you can start syncing the content of the two directories:
rsync -r /media/hdd1/data-1/ /media/hdd2/data-1/
Don't forget the backward slash at the end otherwise rsync will create a new directory inside the destination directory.
Alternatively you can create a new directory on destination and then sync it with source. Let's assume you created a directory data-2 on the second hard drive and want to sync the two without any confusion:
rsync -r /media/hdd1/data-1/ /media/hdd2/data-2/
This command will simply make an exact copy of your files in the data-1 directory inside the data-2 directory.
What if you have symlinks of different permissions of file ownership and you want to preserve them? Just use the '-a' option and it will preserve the date, ownership, permissions, groups, etc. of the files.
Now you have two sets of directories synced with each other. There is a chance that you may delete some files or folders from the source; I do it all the time. How do we ensure that those are deleted from the destination as well? You need to use the '--delete' option which will take care of such cases.The command becomes:
rsync -a --delete /media/hdd1/data-1/ /media/hdd2/data-2/
If you want to see the progress of files in the terminal, add the '-v' option to it:
rsync -av --delete /media/hdd1/data-1/ /media/hdd2/data-2/
It's also advisable to compress files for transfer so it saves bandwidth over the network, resulting in faster transfer. You should do it if your devices have slower transfer. The option to use is '-z'.
rsync -avz --delete /media/hdd1/data-1/ /media/hdd2/data-2/
You can also throw in '-P' option which is for partial progress.
rsync -avzP --delete /media/hdd1/data-1/ /media/hdd2/data-2/

Working on networked machines

As I wrote in an article earlier I run a local file server at home and mount it on all my devices to access my files. I never save any data on my local machine; I always work on files stored on the primary hard drive on the server. That way my files are always up-to-date and I can pick them from any machine and continue to; no need to copy from one machine to another.
I don't mount the second, or the back-up hard drive. Mounting it and working on files saved on this hard drive will complicate things because when I run the rsync command it will overwrite the changes from the primary hard drive. Though rsync has a trick (or option) up its sleeves to address such issues.  You can use the '-u' option which will force rsync to skip any file which has the modification date later than the source file.

How to sync directories over network

This is where ssh protocol comes into play. I use the following syntax to sync a remote directory with a local directory:
rsync -avzP --delete -e ssh user@server_IP:source-directory /destination_directory_on_local_machine/
Example:
rsync -avzP --delete -e ssh 
 This e-mail address is being protected from spambots. You need JavaScript enabled to view it
 :/home/swapnil/backup/ /media/internal/local_backup/
To sync a local directory with a remote directory the syntax becomes:
rsync -avzP --delete -e ssh source_directory user@server_IP:path_destination_directory
Example:
rsync -avzP --delete -e ssh /home/swapnil/Downloads/ 
 This e-mail address is being protected from spambots. You need JavaScript enabled to view it
 :/home/swapnil/Downloads/

Automate backup

You may want to automate backup so you don't have to add it to your calendar. It will actually be easier to automate the backup then create a calendar entry.
I tend to keep things simple and easy, so I can show new users how easy it is to do such things under Linux. The solution that I use for automation is 'crontab'. It’s simple, lightweight and does the job well. With Crontab I can configure when I want to run the rsync command: daily, weekly,  monthly, or more than once a day (which I won’t do). I have configured mine to run at 11:30 p.m. every day after work so all of the files that I worked on throughout the day get synced.
Depending on your distro you may have to install a package to get crontab on your system. If you are on Arch Linux, for example, you can install ‘cronie’. You can choose the default editor for crontab; I prefer nano. Run this command and replace 'nano' with the desired editor.
export EDITOR=nano
Now run 'crontab -e' to create cron jobs. It will open an empty file where you can configure the command that you want to run at a desired time. (See image, above.)
The format of crontab is simple; it has five fields followed by the command:
m h dm m dw command
Here m stands for minutes (0-59); h for hour (0-23); dm for day of the month (1-31); m for month (1-12); and dw for day of the week (0-6 where 0 is Sunday). The format is numerical and you have to use ‘*’ to commend the fields that you don’t want to use.
I run the command every day at 11.30 so the format will be
30 23 * * * rsync -av --delete /media/hdd1/data-1/ /media/hdd2/data-2/
If you want to run rsync only once a month then you can do something like this:
30 23 1 * * rsync -av --delete /media/hdd1/data-1/ /media/hdd2/data-2/
Now it will run at 11:30 p.m. on 1st of every month. If you don’t want it to run every month than you can configure it to run every six months:
30 23 1 6 * rsync -av --delete /media/hdd1/data-1/ /media/hdd2/data-2/
That will make it run every year on June 1. If you want to run more than one command, then create a new line for every command. Rsync is not the only command you can automate with 'crontab' you can run 'any' command using it.
As you can see both tools - rsync and crontab - are extremely simple and lightweight yet extremely powerful and highly configurable. Linux doesn't have to to complicated!

Keep one copy remotely

One risk of keeping all your data on local machines is that in case of a natural disaster, fire or flood, your local system will be damaged and you will lose your data. It's recommended to keep another copy of your data on a machine located elsewhere. I have one server at my in-laws' place; I call it 'Server In Law'.
The bad news is ISPs don't allow static IP and may block forwarded ports so it's not possible to ssh between two machines and sync data. That's where TeamViewer and SSH Tunnel comes into play. I log into my Server In Law, open a temporary ssh tunnel and then rsync the files.
Since these are GUI-based tools they are beyond the scope of this cli focused article. I may cover it in the future.


Friday, December 1, 2017

Creating SWAP partition using FDISK & FALLOCATE commands

Creating SWAP partition using FDISK & FALLOCATE commands

Swap-partition holds the memory which is used in case the physical memory (RAM) is full . When RAM capacity has been utilized to maximum , Linux machine moves inactive pages from memory to swap-space which are then used by the system. Though it gets the work done, it should not be considered as a replacement to physical memory/RAM.

In most cases, it is advised to keep SWAP-memory equal to size of physical memory at minimum & double the size of physical memory at maximum. So if you have 8 GB RAM on your system, Swap should be between 8-16 GB.
If a swap-partition has not been configured in your Linux system, your system might start killing off the running process/applications & might cause your system to crash. In this tutorial, we will learn to add swap-partition to Linux system & we will be discussing two methods for creating a swap-partition
  • Using fdisk command
  • Using fallocate command

First Method (Using Fdisk command)

Normally, first hdd of the system is named /dev/sda & partitions for it are named /dev/sda1 , /dev/sda2. For this tutorial we will using a HDD that have 2 primary partitions on system i.e. /dev/sda1/dev/sda2 & SWAP will be /dev/sda3.
Firstly we will create a partition,
$ fdisk /dev/sda
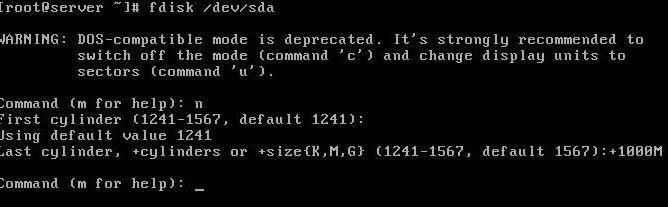
to create a new partition type ’n’ . You will now be asked to enter the first cylinder value, just hit enter key to use default value & then you will asked to enter last cylinder value, here we will enter the size of swap partition (we will be using 1000MB). Enter the value in last cylinder as +1000M.
swap
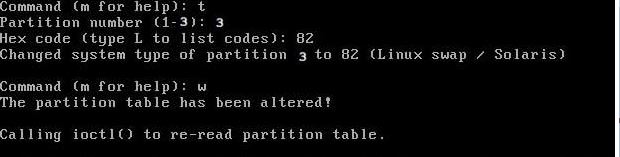
We have now created a partition of size 1000MB but we have not assigned it any partition type, so to assign a partition type, press “t” & press enter.
Now you will be first asked to enter partition number, which is 3 for our partition & then we will asked to enter  partition id which for swap it’s 82 (to see list of  all available partition types, press “l” ) & then press “w” to save the partition table.
swap
Next we will format our swap partition  using mkswap command
$ mkswap /dev/sda3
& will then activate our newly created swap
$ swapon /dev/sda3
But our swap will not be mounted automatically after every reboot. To mount it permanently in our system, we need to append /etc/fstab file. Open /etc/fstab file & make an entry of the following line
$ vi /etc/fstab
/dev/sda3             swap            swap            default          0   0
Save & close the file. Our swap now will even work after a reboot.

Second Method (using fallocate command)

I prefer this method as this is easiest & fastest way to create swap. Fallocate is one of the most underestimated & very less used command. Fallocate is used to pre-allocate blocks/size to a files.
To create a swap using fallocate, we will firstly create a file named swap_space in ‘/’.  Next we will allocate 2GB to our file swap_space ,
$ fallocate –l 2G /swap_space
We will then verify the size of the file by running
ls-lh /swap_space.
Next, we will make our /swap_space more secure by changing the file permissions
$ chmod 600 /swap_space
Now only root will be able to read, write on this file. We will now format the swap partition,
$ mkswap /swap_space
& then will turn on our swap
$ swapon -s
This swap partition will need to be remounted after every reboot. So to make it permanent, edit the /etc/fstab, as we did above & enter the following line
/swap_space      swap        swap          sw          0   0
Save & exit the file. Our swap will now be permanently mounted. We can check if your swap is working or not by running “free -m” on your terminal after rebooting the system.