Showing posts with label Users & Groups. Show all posts

Saturday, January 13, 2018

User & Group management : Complete Beginner’s Guide

User & Group management : Complete Beginner’s Guide


One of the major work of a System Administrator is User & Group Management. We have to create new users & groups, delete old ones, providing users access to a group or folder etc etc. So, in this tutorial, we will learn how we can manage users & groups.
Linux systems have two types of users, general/normal user and root/super user . While general users have limited access to the Linux system, root users have access to anything & everything on the Linux system.
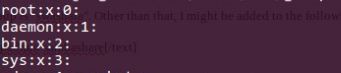
When a user is created a group with the same user name is also created. Every user has its own home directory, for user root its /root & for general users its located in /home/. Records with all the user information for all the users is maintained in /etc/passwd file & records for all the groups are kept /etc/group.
Let’s discuss these files in brief before we discuss the commands for user & group management.

/etc/passwd

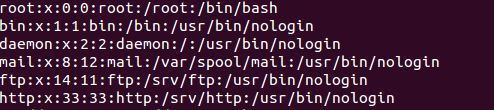
This file contains list of all users with every line of the file containing information regarding single user. Format for each line is
Username:x:UID:GID:Comment:Home Directory: Default shell
Here, x is password for the user in encrypted form (stored in /etc/shadow file)
UID, is the user id
GID is the group id for the user.
/etc/passwd

/etc/group

Just like /etc/passwd, it contains information for groups with each line having information for single group. Format for entries in this file is
Group name:x:GID:members
user management
Where, x again means password in encrypted format.
Now let’s discuss commands for user & group management.

USER Management

Below mentioned are the commands that are used for user management,
Purpose                                                              Command
  • Adding a user                                               useradd dan
  • Assigning password to user                       passwd dan
  • Changing home directory for user             useradd dan –d /home/new
  • Setting expiry for user                                 useradd dan –e 2017-11-25
  • Addding inactive period before expiry      useradd dan –f 2
  • Changing default shell                                useradd dan –s /bin/sh
  • Removing user                                             userdel dan
  • Removing user with home directory         userdel –r dan
We can also modify default settings of a user after it has bee added with usermod command
  • Setting expiry for user                      usermod –e 2017-11-25 dan
  • Changing home directory                 usermod –d /home/new dan
  • Changing default shell                      usermod –s /bin/sh dan
  • Locking an account                           usermod –L dan
  • Unlocking a locked account             usermod –u dan

Group Management

Following are the commands for managing groups
  • Adding a group                                  groupadd  linuxgroup
  • Adding user to group                        usermod –aG linuxgroup dan
  • Changing owner & group of a file    chown dan:linuxgroup newfile.txt
  • Changing only owner of a file          chown dan: newfile.txt
  • Changing only group of a file          chown :linuxgroup newfile.txt
  • Deleting a group                               groupdel linuxgroup

This completes our tutorial on user & group management. 

Tuesday, November 28, 2017

How to rename user in Linux (also rename group & home directory)

How to rename user in Linux (also rename group & home directory)

Rename user in Linux

For renaming user in Linux systems, we will use ‘usermod’ command. Syntax for the command is,
$ usermod -l new_username old_username
For example, if we have a user named ‘dan’ & want to rename it to ‘susan’, execute the following command from terminal;
$ sudo usermod -l susan dan
This will only change the username & everything else, like group, home directory, UID will remain same.
Note:- You should need to logged out from the account you are trying to rename. You can also kill all the processes running for that user, to do so execute the following command,
$ sudo pkill -u dan
$ sudo pkill -9 -u dan

Renaming Home directory

For renaming home directory to correspond to the renamed user, we use ‘-d’ option with ‘usermod’ command.,
$ sudo usermod -d /home/susan -m susan

Changing UID for the user

To change the UID of the user , execute the following command,
$ sudo usermod -u 2000 susan
where ‘2000’ is the new UID for user.

Renaming the group

To rename the group from ‘dan’ to ‘susan‘, we will use ‘groupmod’ command. Use the following command to rename the group,
$ groupmod -n susan dan
Once we have made the required changes, we can than check the changes made using the ‘id’command,
$ id susan

Wednesday, May 31, 2017

Force Users To Use Root Password Instead Of Their Own Password When Using Sudo Command

Force Users To Use Root Password Instead Of Their Own Password When Using Sudo Command


As we all know already, one of the advantages of using ‘sudo’ is we don’t have to give root user password to all users to do administrative actions. The users who are added in the sudo group can perform administrative tasks by simply invoking sudo command. Now, Picture this scenerio. Let us say, you’re the only one system admin who perform all administrative tasks, and your password is compromised by some hacker. Now, the hacker can do all sorts of administrative actions with sudo command, isn’t it? In such cases, we need to force some users (Admins& to use root password instead of their own password. This is just a simple example. The use cases might be different for you.

Disclaimer: Giving out the ROOT password to all users is dangerous. This method is opt for only one system admin who handles the entire systems in the network. Even If the system admin’s password is compromised, the hacker still needs to break the root password to do administrative tasks. So, the admin can immediately change his/her password or re-install the system before the hacker take down the system.
In this guide, We will see how to force users to use root password to do administrative tasks instead of using their own password when using sudo command.

Switch to root user using any one of the following commands:
su
Or,
sudo su
Or,
su root
Edit sudoers file using command:
visudo
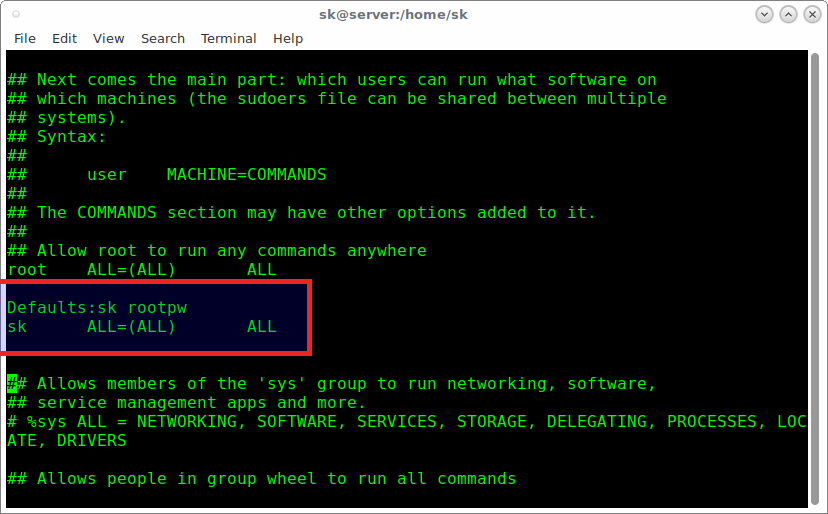
Add/modify as shown below in sudoers file.
Defaults:sk rootpw
sk ALL = (ALL) ALL
This allows the user called sk to run any command using sudo privileges on any system. However, s/he needs to use the root password rather than his/her own password when using sudo command.
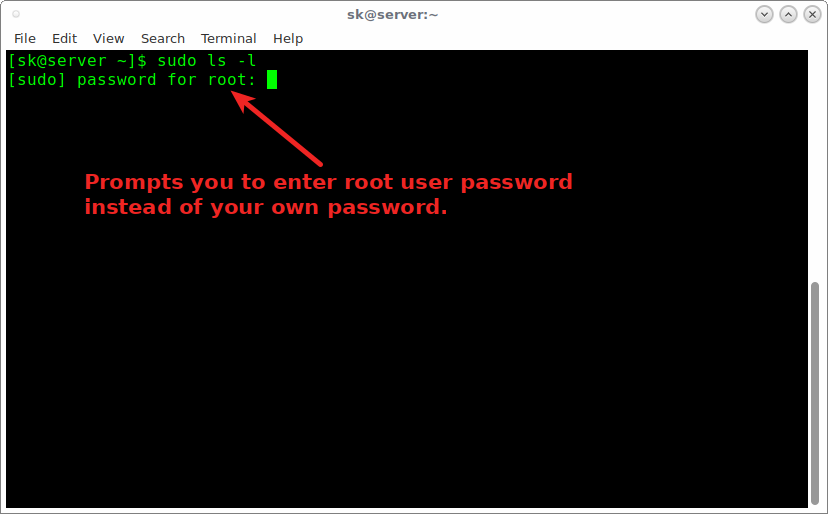
sudo ls -l
[sudo] password for root:
total 0
drwxr-xr-x. 2 sk sk 6 May 17 19:07 ostechnix
drwxr-xr-x. 2 root root 6 May 17 19:11 sk
As you see, it prompts you to enter the root password, not the user’s own password.
Even if your password is hacked, the hacker still need to crack the root user password to get the root access on your system. This will add little bit security to your system.

Tuesday, February 7, 2017

[Quick Tips: Chage]: Password Expiration and Aging

Examples to Manage Linux Password Expiration and Aging Using chage


NAME

chage change user password expiry information

SYNOPSIS

chage [options] [LOGIN] 

DESCRIPTION

The chage command changes the number of days between password changes and the date of the last password change. This information is used by the system to determine when a user must change his/her password.

OPTIONS

TAGDESCRIPTION
-d, --lastday LAST_DAYSet the number of days since January 1st, 1970 when the password was last changed. The date may also be expressed in the format YYYY-MM-DD (or the format more commonly used in your area).
-E, --expiredate EXPIRE_DATESet the date or number of days since January 1, 1970 on which the user's account will no longer be accessible. The date may also be expressed in the format YYYY-MM-DD (or the format more commonly used in your area). A user whose account is locked must contact the system administrator before being able to use the system again.Passing the number -1 as the EXPIRE_DATE will remove an account expiration date.
-h, --helpDisplay help message and exit.
-I, --inactive INACTIVESet the number of days of inactivity after a password has expired before the account is locked. The INACTIVE option is the number of days of inactivity. A user whose account is locked must contact the system administrator before being able to use the system again. Passing the number -1 as the INACTIVE will remove an account's inactivity.
-l, --listShow account aging information.
-m, --mindays MIN_DAYSSet the minimum number of days between password changes to MIN_DAYS. A value of zero for this field indicates that the user may change his/her password at any time.
-M, --maxdays MAX_DAYSSet the maximum number of days during which a password is valid. When MAX_DAYS plus LAST_DAY is less than the current day, the user will be required to change his/her password before being able to use his/her account. This occurrence can be planned for in advance by use of the -W option, which provides the user with advance warning.Passing the number -1 as MAX_DAYS will remove checking a password's validity.
-W, --warndays WARN_DAYSSet the number of days of warning before a password change is required. The WARN_DAYS option is the number of days prior to the password expiring that a user will be warned his/her password is about to expire.

EXAMPLES

EXAMPLE-1:
Use chage command to list the password aging information of a user
$ chage -l testuser

output:

Last password change : May 01, 2016
Password expires : never
Password inactive : never
Account expires : never
Minimum number of days between password change : 0
Maximum number of days between password change : 99999
Number of days of warning before password expires : 15
EXAMPLE-2:
Disable password aging for a user
$ chage -I -1 -m 0 -M 99999 -E -1 testuser
-I -1 : This will set the “Password inactive” to never
-m 0 : This will set the minimum number of days between password change to 0
-M 99999 : This will set the maximum number of days between password change to 99999
-E -1 : This will set “Account expires” to never.
This will disable the password expiry of a user if it is already enabled.

EXAMPLE-3:
Enable password expiry date of a user
$ chage -M 20 testuser

Output
Last password change : May 01, 2016
Password expires : May 21, 2017
Password inactive : never
Account expires : never
Minimum number of days between password change : 0
Maximum number of days between password change : 20
Number of days of warning before password expires : 15

EXAMPLE-4:
Set the Account expiry date in the format YYYY-MM-DD
$ chage -E 2017-05-28

output:
Last password change : May 01, 2016
Password expires : May 28, 2017
Password inactive : never
Account expires : May 28, 2012
Minimum number of days between password change : 0
Maximum number of days between password change : 20
Number of days of warning before password expires : 15

EXAMPLE-5:
Set the password expiry warning message
$ chage -W 10 testuser

User will start getting warning about the password expiry which is set to 10 days.
EXAMPLE-6:
Forcing the users to change the password on next logon
$ chage -d 0 testuser

This will reset “Last Password Change” to “Password must be changed”.

In this article let us review how you can use Linux chage command to perform several practical password aging activities including how-to force users to change their password. On debian, you can install chage by executing the following command:
# apt-get install chage
  Note: It is very easy to make a typo on this command. Instead of chage you may end up typing it as change. Please remember chage stands for “change age”. i.e chage command abbreviation is similar to chmod, chown etc.,

1. List the password and its related details for an user

As shown below, any user can execute the chage command for himself to identify when his password is about to expire.
Syntax: chage –-list username (or) chage -l username

$ chage --list dhinesh
Last password change                                    : Apr 01, 2009
Password expires                                        : never
Password inactive                                       : never
Account expires                                         : never
Minimum number of days between password change          : 0
Maximum number of days between password change          : 99999
Number of days of warning before password expires       : 7
  If user dhinesh tries to execute the same command for user ramesh, he’ll get the following permission denied message.
$ chage --list ramesh
chage: permission denied
  Note: However, a root user can execute chage command for any user account.   When user dhinesh changes his password on Apr 23rd 2009, it will update the “Last password change” value as shown below.   Please refer to our earlier article: Best Practices and Ultimate Guide For Creating Super Strong Password, which will help you to follow the best practices while changing password for your account.
$ date
Thu Apr 23 00:15:20 PDT 2009

$ passwd dhinesh
Enter new UNIX password:
Retype new UNIX password:
passwd: password updated successfully

$ chage --list dhinesh
Last password change                                    : Apr 23, 2009
Password expires                                        : never
Password inactive                                       : never
Account expires                                         : never
Minimum number of days between password change          : 0
Maximum number of days between password change          : 99999
Number of days of warning before password expires       : 7

2. Set Password Expiry Date for an user using chage option -M

Root user (system administrators) can set the password expiry date for any user. In the following example, user dhinesh password is set to expire 10 days from the last password change.   Please note that option -M will update both “Password expires” and “Maximum number of days between password change” entries as shown below.
Syntax: # chage -M number-of-days username

# chage -M 10 dhinesh

# chage --list dhinesh
Last password change                                    : Apr 23, 2009
Password expires                                        : May 03, 2009
Password inactive                                       : never
Account expires                                         : never
Minimum number of days between password change          : 0
Maximum number of days between password change          : 10
Number of days of warning before password expires       : 7

3. Password Expiry Warning message during login

By default the number of days of warning before password expires is set to 7. So, in the above example, when the user dhinesh tries to login on Apr 30, 2009 — he’ll get the following message.
$ ssh dhinesh@testingserver
dhinesh@testingserver's password:
Warning: your password will expire in 3 days

4. User Forced to Change Password after Expiry Date

If the password expiry date reaches and user doesn’t change their password, the system will force the user to change the password before the login as shown below.
$ ssh dhinesh@testingserver
dhinesh@testingserver's password:

You are required to change your password immediately (password aged)
WARNING: Your password has expired.
You must change your password now and login again!
Changing password for dhinesh
(current) UNIX password:
Enter new UNIX password:
Retype new UNIX password:

5. Set the Account Expiry Date for an User

You can also use chage command to set the account expiry date as shown below using option -E. The date given below is in “YYYY-MM-DD” format. This will update the “Account expires” value as shown below.
# chage -E "2009-05-31" dhinesh

# chage -l dhinesh
Last password change                                    : Apr 23, 2009
Password expires                                        : May 03, 2009
Password inactive                                       : never
Account expires                                         : May 31, 2009
Minimum number of days between password change          : 0
Maximum number of days between password change          : 10
Number of days of warning before password expires       : 7

6. Force the user account to be locked after X number of inactivity days

Typically if the password is expired, users are forced to change it during their next login. You can also set an additional condition, where after the password is expired, if the user never tried to login for 10 days, you can automatically lock their account using option -I as shown below. In this example, the “Password inactive” date is set to 10 days from the “Password expires” value.   Once an account is locked, only system administrators will be able to unlock it.
# chage -I 10 dhinesh

# chage -l dhinesh
Last password change                                    : Apr 23, 2009
Password expires                                        : May 03, 2009
Password inactive                                       : May 13, 2009
Account expires                                         : May 31, 2009
Minimum number of days between password change          : 0
Maximum number of days between password change          : 10
Number of days of warning before password expires       : 7

7. How to disable password aging for an user account

To turn off the password expiration for an user account, set the following:
  • -m 0 will set the minimum number of days between password change to 0
  • -M 99999 will set the maximum number of days between password change to 99999
  • -I -1 (number minus one) will set the “Password inactive” to never
  • -E -1 (number minus one) will set “Account expires” to never.
# chage -m 0 -M 99999 -I -1 -E -1 dhinesh

# chage --list dhinesh
Last password change                                    : Apr 23, 2009
Password expires                                        : never
Password inactive                                       : never
Account expires                                         : never
Minimum number of days between password change          : 0
Maximum number of days between password change          : 99999
Number of days of warning before password expires       : 7

Monday, January 30, 2017

[Quick Tips: Limit CPU Usage]: How To Limit CPU Usage Of A Process In Linux

How To Limit CPU Usage Of A Process In Linux

Some times, a particular might consume more CPU usage, and affects the performance of the whole system. Since that particular process consumes more CPU, you couldn’t do other tasks. You need to wait for the particular process to finish before starting a new task. Luckily, this can be now solved by an useful utility called CPULimit. As the name implies, CPULimit limits the CPU usage of a process. This can be really useful to control the batch jobs, when you don’t want them to consume more CPU usage.

The main goal of CPULimit is prevent a process from running for more than a specified time ratio. It does not change the nice value or other scheduling priority settings, but the real CPU usage. Also, it is able to adapt itself to the overall system load, dynamically and quickly. It will work on most Unix-like distributions. In this brief guide, we will see how to limit the CPU usage of a process in Linux.

Limit CPU Usage Of A Process In Linux using CPULimit

Install CPULimit

CPULimit is available on most Unix-like distribution’s default repositories. You can install it using the default package managers in the respective Linux distribution as shown below.

On Arch Linux and its derivatives:
sudo pacman -S cpulimit

On Debian, Ubuntu, Linux Mint:
sudo apt-get install cpulimit

On RHEL, CentOS, Fedora:
Enable EPEL repository first.
sudo yum install epel-release
And then, install cpuclimit using command:
sudo yum install cpulimit
Or,
sudo dnf install cpulimit

On SUSE/openSUSE:
sudo zypper install cpulimit

Usage

Let us run a program that consumes more CPU usage. The following commands should be run as root user.

Create a file called highcpu.sh.
vi highcpu.sh

Add the following contents.
#!/bin/bash
while :; do :; done;

Save and close the file. This short program will loop endlessly and consumes maximum CPU usage. So, I recommend you to test it in a virtual machine.

Make this file executable:
chmod +x highcpu.sh

Then, run the process in the background using command:
./highcpu.sh &

Sample output:
[1] 2331
Here 2331 is PID of the above process.

To view how much CPU it consumes, use “top” command.
top

Sample output:
top - 17:16:34 up 10 min, 2 users, load average: 1.12, 0.53, 0.26
Tasks: 87 total, 4 running, 83 sleeping, 0 stopped, 0 zombie
%Cpu(s): 91.9 us, 2.7 sy, 5.4 ni, 0.0 id, 0.0 wa, 0.0 hi, 0.0 si, 0.0 st
KiB Mem : 630108 total, 274868 free, 85904 used, 269336 buff/cache
KiB Swap: 1343484 total, 1343484 free, 0 used. 428172 avail Mem

 PID USER PR NI VIRT RES SHR S %CPU %MEM TIME+ COMMAND 
 2331 root 20 0 113120 1184 1004 R 97.7 0.2 2:40.91 highcpu.sh 
 2412 root 39 19 244516 11020 4496 R 1.3 1.7 0:00.11 dnf 
 10 root 20 0 0 0 0 S 0.3 0.0 0:00.68 rcu_sched 
 1 root 20 0 43900 6480 3900 S 0.0 1.0 0:01.61 systemd 
 2 root 20 0 0 0 0 S 0.0 0.0 0:00.00 kthreadd 
 3 root 20 0 0 0 0 S 0.0 0.0 0:00.06 ksoftirqd/0 
 6 root 20 0 0 0 0 S 0.0 0.0 0:00.00 kworker/u2:0 
 7 root rt 0 0 0 0 S 0.0 0.0 0:00.00 migration/0 
 8 root 20 0 0 0 0 S 0.0 0.0 0:00.00 rcu_bh 
 9 root 20 0 0 0 0 S 0.0 0.0 0:00.00 rcuob/0 
 11 root 20 0 0 0 0 R 0.0 0.0 0:00.38 rcuos/0 
 12 root rt 0 0 0 0 S 0.0 0.0 0:00.02 watchdog/0 
 13 root 0 -20 0 0 0 S 0.0 0.0 0:00.00 khelper 
 14 root 20 0 0 0 0 S 0.0 0.0 0:00.00 kdevtmpfs 
 15 root 0 -20 0 0 0 S 0.0 0.0 0:00.00 netns 
 16 root 0 -20 0 0 0 S 0.0 0.0 0:00.00 perf 
 17 root 0 -20 0 0 0 S 0.0 0.0 0:00.00 writeb
As you see in the above output, highcpu.sh process consumes more than 97% CPU usage. Since it consumed more CPU usage, It is quite difficult to run other tasks. After a few minutes, you system might hang or freeze. This is where CPULimt comes in help/
Now, let us limit the CPU usage of this process using CPULimit tool. Say for example, we will limit this process by PID to 30% CPU.

To do so, run:
cpulimit -l 30 -p 2331 &
Here,
  • “-l 30” flag limits the process to 30%.
  • “-p 2331” is the PID of highcpu.sh
Now, let us again check the CPU usage of the above process using command:
top
Sample output:
top - 17:29:16 up 5 min, 1 user, load average: 0.61, 0.57, 0.27
Tasks: 86 total, 2 running, 83 sleeping, 1 stopped, 0 zombie
%Cpu(s): 7.2 us, 0.0 sy, 0.0 ni, 92.8 id, 0.0 wa, 0.0 hi, 0.0 si, 0.0 st
KiB Mem : 630108 total, 435348 free, 78052 used, 116708 buff/cache
KiB Swap: 1343484 total, 1343484 free, 0 used. 442040 avail Mem

PID USER PR NI VIRT RES SHR S %CPU %MEM TIME+ COMMAND 
 2331 root 20 0 113120 1180 1004 T 29.7 0.2 3:36.97 highcpu.sh 
 2334 root 9 -11 4324 692 572 S 1.7 0.1 0:00.47 cpulimit 
 1 root 20 0 43900 6480 3900 S 0.3 1.0 0:01.65 systemd 
 2 root 20 0 0 0 0 S 0.0 0.0 0:00.00 kthreadd 
 3 root 20 0 0 0 0 S 0.0 0.0 0:00.02 ksoftirqd/0 
 5 root 0 -20 0 0 0 S 0.0 0.0 0:00.00 kworker/0:0H 
 6 root 20 0 0 0 0 S 0.0 0.0 0:00.01 kworker/u2:0 
 7 root rt 0 0 0 0 S 0.0 0.0 0:00.00 migration/0 
 8 root 20 0 0 0 0 S 0.0 0.0 0:00.00 rcu_bh 
 9 root 20 0 0 0 0 S 0.0 0.0 0:00.00 rcuob/0 
 10 root 20 0 0 0 0 S 0.0 0.0 0:00.44 rcu_sched 
 11 root 20 0 0 0 0 R 0.0 0.0 0:00.37 rcuos/0 
 12 root rt 0 0 0 0 S 0.0 0.0 0:00.05 watchdog/0 
 13 root 0 -20 0 0 0 S 0.0 0.0 0:00.00 khelper 
 14 root 20 0 0 0 0 S 0.0 0.0 0:00.00 kdevtmpfs 
 15 root 0 -20 0 0 0 S 0.0 0.0 0:00.00 netns 
 16 root 0 -20 0 0 0 S 0.0 0.0 0:00.00 perf

As you see in the above output, the CPU usage of highcpu.sh has been dropped to 29.7%, which is very close to 30&%. Now, you can have more CPU resources to run other processes freely.

We have seen how to limit a process by PID. Alternatively, we can run the above command by specifying the name of the executable program file.

For example, the above command would be:
cpulimit -l 30 ./highcpu.sh &

Similarly, You can start any number processes in the background and limit their CPU usage as you wish.

You can bring the processes which are running in the background to foreground at any time using “fg” command:
fg

Sample output:
cpulimit -l 30 -p 2331

Conclusion

CPULimit can be useful while you are running a process that consumes more CPU usage. Next time If you notice a program consumes more CPU usage, just find PID of the process using “top” command and limit its CPU usage to a minimum value using CPULimit command as described above. You can also use this application to test how an application performs under low CPU usage.
Resource: 
[Quick Tips: Limit Users Access]: How To Limit User’s Access To The Linux System

How To Limit User’s Access To The Linux System

One of my Friend asked me how to allow an user to do only certain tasks, and execute certain commands. The user shouldn’t change the environment variables/paths, can’t visit to the other directories except his home directory, can’t switch to other users etc. The user can only be able to execute few commands assigned by the system administrator. Is that possible? Yes! This is where Restricted Shell comes in help. Using Restricted Shell, we can easily limit user’s access to the linux system. Once you put the users in restricted shell mode, they are allowed to execute only limited set of commands.

What is Restricted Shell?

Let me clarify what exactly Restricted Shell is. Don’t think it’s a separate shell such as Bash, Korn Shell. If you start any existing shell using rbash, –restricted, -r options, then It will become Restricted shell. Say for example, The Bourne shell can be started as a restricted shell with the command bsh -r, and the Korn shell with the command ksh -r.
The Restricted Shell will limit the users from executing most commands and from changing the current working directory. The Restricted Shell will impose the following restrictions to the users.
  • It will not allow you to execute cd command. That means you can’t go anywhere, just stay in the current working directory.
  • It will not allow you to modify the values of $PATH, $SHELL, $BASH_ENV, or $ENV environmental variables.
  • It will not allow you to execute a program that contains a /(slash) character. Say for example, you can’t run /usr/bin/uname or ./uname command. You can however execute uname command. It means that you are allowed to run the commands in the current path.
  • You can’t redirect the output using‘>’, ‘>|’, ‘<>’, ‘>&’, ‘&>’, and ‘>>’ redirection operators.
  • It will not allow you to get out of the restricted shell mode within scripts.
  • It will not allow you to Turn off restricted shell mode with ‘set +r’ or ‘set +o restricted’.
This can be very useful when a large number of users are using a shared system. So, If you want to allow the users to execute only specific commands, Restricted Shell is one way to do this.

Using Restricted Shell mode

First, create a symlink called rbash from Bash as shown below. The following commands should be run as root user.
ln -s /bin/bash /bin/rbash

Next, create an user called “ostechnix” with rbash as his/her default login shell.
useradd ostechnix -s /bin/rbash

Set password to the new user.
passwd ostechnix

Create a bin directory inside the home folder of the the new user.
mkdir /home/ostechnix/bin

Now, we need to specify which commands the user can run.

Here, I am going to let they user to run only “ls”, “mkdir”, and “ping” commands. You can assign as many as commands you wish.

To do so, run the following commands:
ln -s /bin/ls /home/ostechnix/bin/ls
ln -s /bin/mkdir /home/ostechnix/bin/mkdir
ln -s /bin/ping /home/ostechnix/bin/ping

Now, you understand why we created the “bin” directory. The users can’t run any commands except the above three commands.

Next, prevent the user from modifying .bash_profile.
chown root. /home/ostechnix/.bash_profile
chmod 755 /home/ostechnix/.bash_profile

Edit /home/ostechnix/.bash_profile file:
vi /home/ostechnix/.bash_profile

Modify the PATH variable like below.
PATH=$HOME/bin

Save and close the file by pressing ESC key followed by !q.

Now when the user logs in, the restricted shell(rbash) will run as the default login shell and read the .bash_profile, which will set PATH to $HOME/bin so that the user will only be able to run the ls, mkdir and ping commands. The restricted shell will not allow the user to change PATH, and the permissions on .bash_profile will not allow the user to alter the environment to bypass the restrictions during the next login session.

Verifying Rbash

Now, log out from root user and log in to the newly created user i.e ostechnix in our case.

Then, run some commands to check whether it works or not. For example, I want to clear the Terminal.

To do so, I ran:
clear

Sample output:
-rbash: clear: command not found
You can’t come use cd command to change to the different directory.
cd /root

Sample output:
-rbash: cd: restricted

You can’t redirect the output using > operator either.
cat > file.txt

Sample output:
-rbash: file.txt: restricted: cannot redirect output

The user “ostechnix” is allowed to use only the commands assigned by you(the system admin, of course). In our case, the user can execute ls, mkdir and ping commands.
 
ls
 
mkdir dir1
 
ping ostechnix.com

Apart from these three commands, the user can’t do anything. S/He is completely under your control. If you want to assign more commands to him/her, log in to the root user again and assign the commands as shown below.

For example, I want to allow him/her to execute rm command, so I ran the following command as root user.
ln -s /bin/mkdir /home/ostechnix/bin/rm

That’s all for today.

For more details, refer the man pages in the link given below.
Hope this helps. If you like guide