Saturday, November 28, 2015

[Squid_Proxy-CentOS]: How to install squid proxy and Advanced Configuration with examples on centos 6

How to install squid proxy with advanced configs with examples.


Squid is a proxy server for caching and filtering web content . Squid proxy is used by various organisation and internet providers to reduce bandwidth and to increase response time .
Squid proxy service will cache the requested web-content and re-using it for the further request of the same content .
squid proxy server
In the above diagram, squid proxy will cache the webcontent of krizna.com from the ISP during the first request and it will deliver the cached content for the further requests of krizna.com without requesting from ISP. This will reduce bandwidth and will increase response time as the content is delivered from the local network.
» Install squid proxy 
» Restricting Access to specific web sites 
» Restricting Access to specific keywords 
» Restricting Access to specific ipaddress 
» Allow Full access to specific ipaddress
» Changing squid proxy port number
» Restricting download size
» Configure squid as transparent proxy

» Install squid proxy on centos 6 :

In this article we can see how to install and configure squid proxy on centos 6 .  After installing Centos 6 (Centos 6 installation step by step screenshots ) and configuring network (How to setup network in centos 6)
Update yum repositories and packages by typing the below command
[root@leela ~]# yum updateStep 1 » Install squid package and dependencies using the below command
[root@leela ~]# yum install squid
» By default squid configuration file “/etc/squid/squid.conf” will contains recommended minimum configuration  and squid caching feature will work without making any changes . Recommended minimum configuration will looks like the below
Step 2» Now start squid service
[root@leela ~]# service squid start
and type this below command to start squid service automatically while booting.
[root@leela ~]# chkconfig --levels 235 squid on
Step 3 » Setup your web browser to access Internet through proxy server on port 3128 .
IE : Tools » Internet options »Connections » LAN settings » Choose “Use a proxy server for your LAN” » Type your Proxy server ip (192.168.1.11 ) and port no 3128
Firefox : Options / Preferences » Advanced » Network » Settings » Choose “Manual proxy configuration ” » Type your Proxy server ip (192.168.1.11 ) and port no 3128
Step 4 » Browse some sites and check the access log file on proxy server

Troubleshooting :

If you not able to browse using proxy settings , Disable the firewall ( iptables ) and selinux service on your squid proxy server .
Disable firewall ( Iptables ) »
[root@leela ~]# service iptables stop
[root@leela ~]# chkconfig iptables off
Disable Selinux  » open the file /etc/selinux/config and find the line
SELINUX=enforcing
and replace with
SELINUX=disabled
now reboot the server and try step 4.

Configure squid proxy as web filter:

You can restrict user access to particular websites or keywords using access control lists (ACLs) .

» Restricting Access to specific web sites :

For example , we can see how to block facebook.com and gmail.com .
Step 1 » create a file ( /etc/squid/blockedsites.squid ) and add the site names one per line.
[root@leela ~]# cat /etc/squid/blockedsites.squid
#blocked sites
www.facebook.com
www.gmail.com
Step 2 » Open the /etc/squid/squid.conf and create a new acl ” blocksites” and acl type “dstdomain” in the acl section like the below .
and add the following line “http_access deny blocksites” to http_section to deny the access to the acl “blocksites” .
Step 3 » Now restart squid service
[root@leela ~]# service squid restart
Step 4 » Try to access facebook.com in your browser . you could see the blocked page as below .
squid proxy server block
and check the log file you can see the facebook request is denied .

» Restricting Access to specific keywords :

Step 1 » create a file ( /etc/squid/blockkeywords.squid ) and add the keywords one per line.
[root@leela ~]# cat /etc/squid/blockkeywords.squid
#blocked keywords
sex
porn
xxx
Step 2 » Open the /etc/squid/squid.conf and create a new acl “blockkeywords” and acl type “url_regex” in the acl section
and add the following line “http_access deny blockkeywords” to http_section to deny the access to the acl “blockkeywords” .

» Restricting Access to specific Ipaddress :

Step 1 » create a file ( /etc/squid/blockip.squid ) and add the ip adresses one per line.
[root@leela ~]# cat /etc/squid/blockip.squid
#blocked ips
192.168.1.20
192.168.1.21
Step 2 » Open the /etc/squid/squid.conf and create a new acl “blockip” and acl type “src” in the acl section
and add the following line “http_access deny blockip” to http_section to deny the access to the acl “blockip” .

» Allow Full access to specific Ipaddress :

You can allow specific ip address to gain full access without blocking sites and keywords . just create a file “/etc/squid/allowip.squid ” and add the ip address one per line and create an acl “allowip”  and acl type “src” in the acl section
and add the “allowip” in the http_access as below

» Changing squid proxy port number:

You can change squid proxy port number , by default it uses 3128 port .
Just find the below line in “/etc/squid/squid.conf”
http_port 3128
and replace with
http_port 8000 # whatever port number you want

» Restricting Download size :

You can restrict download file size  using reply_body_max_size .
Add the below line at the bottom of the http_access section
#Restrict download size
reply_body_max_size 10 MB all
or
#Restrict download size
reply_body_max_size 10 MB !allowip

» Configuring Squid as Transparent Proxy :

You can configure squid as transparent proxy .
Step 1 » just find the below line
# Squid normally listens to port 3128
http_port 3128
and replace with
# Squid normally listens to port 3128
http_port 3128 intercept
Step 2 » Create a file “/root/squidfw.sh” and add the following firewall script ( modify as per your interface configuration ).
Step 3 » just run the script
[root@leela ~]# sh /root/squidfw.sh
and add the below line to “/etc/rc.local” to run the script during startup
sh /root/squidfw.sh
Step 4 (Updated) » Change default gateway ip to squid server ip on the user machines .
Now users can access Internet without setting proxy in the browser settings.
That’s it , hope this article will help you to learn little things about configuring squid proxy on centos 6.


Troubleshooting:

For "hostname lookup failure" .. you need to add hostname in /etc/hosts like below ..
127.0.0.1 localhost localhost.localdomain yourhostname
::1 localhost localhost.localdomain yourhostname
For mail server.. add these lines in squidfw .sh file
#sending mails 
iptables -A OUTPUT -o eth0 -p tcp -m multiport --dport 25,587,465 -m state --state NEW,ESTABLISHED -j ACCEPT
iptables -A INPUT -i eth0 -p tcp -m multiport --sport 25,587,465 -m state --state ESTABLISHED -j ACCEPT
#Receiving mails 
iptables -A INPUT -i eth0 -p tcp -m multiport --dport 110,995 -m state --state NEW,ESTABLISHED -j ACCEPT
iptables -A OUTPUT -o eth0 -p tcp -m multiport --sport 110,995 -m state --state ESTABLISHED -j ACCEPT

# DROP everything and Log it # Before this line
iptables -A INPUT -j LOG
iptables -A INPUT -j DROP
i'm not expert in iptables .. just try it :)
***************************************
For system wide proxy setting in CUI: 

Please issue these commands and try to install/update packages using yum.
export http_proxy=http://squidserverip:3128
export https_proxy=http://squidserverip:3128


***************************************
how can i enable ports such as port 21,22,25,110,etc... and also ping currently the user only access is browsing.
Just add these lines in the iptables script and try again
#iptables -A OUTPUT -i $INTERNET -p tcp -m multiport --dports 21,22,110,25,143 -m state --state NEW -j ACCEPT
#iptables -A INPUT -i $INTERNET -p tcp -m multiport --dports 21,22,110,25,143 -m state --state NEW -j ACCEPT
#iptables -A OUTPUT -p icmp --icmp-type echo-request -j ACCEPT
#iptables -A INPUT -p icmp --icmp-type echo-reply -j ACCEPT



[CentOS - WEBMIN]: How to install webmin on centos 6

How to install webmin on centos 6


Webmin is a web-based graphical tool for unix . It is used to manage services like User management, Disk managemet, Network, Iptables ( Firewall ), Cron, Apache, DNS, File sharing and much more .
In this article, we can see about how to install webmin on centos 6 .

Webmin installation on centos 6.

Let’s start the installation.
Step 1 » Create a new file webmin.repo in /etc/yum/repos.d/ and add the below code.
[Webmin]
name=Webmin Distribution Neutral
#baseurl=http://download.webmin.com/download/yum
mirrorlist=http://download.webmin.com/download/yum/mirrorlist
enabled=1

Step 2 » Install webmin GPG key using below command.
rpm --import http://www.webmin.com/jcameron-key.asc
Step 3 » Update the repositories.
yum check-update
Step 4 » Now install webmin package using yum .
yum install webmin
Step 5 » Start the service and make it start automatically.
chkconfig webmin on
service webmin start
Step 6 » By default, Webmin will listen on port 10000, Allow this port in iptables if it is enabled.
iptables -I INPUT -p tcp --dport 10000 -j ACCEPT
service iptables save
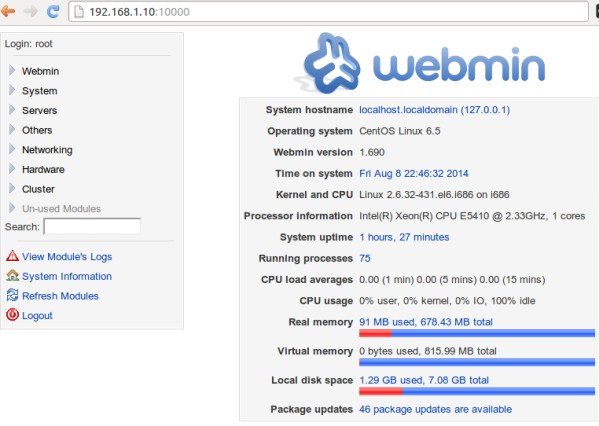
Step 7 » Now open http://serverip:10000 in your browser, you could see the below screen after login ( Use root username and password ).
Install webmin on centos 6

Friday, November 27, 2015

[Ubuntu-DNS]: How To Setup DNS Server In Ubuntu 15.10

How To Setup DNS Server In Ubuntu 15.10


Setup DNS Server In Ubuntu 15.10

Scenario

For the purpose of this tutorial, I will be using three systems. One will be acting as Master DNS server, the second system will be acting as Secondary DNS, and the third will be our DNS client. Here are my three systems details.

Primary (Master) DNS Server Details:

Operating System     : Ubuntu 15.10 64bit minimal server
Hostname             : masterdns.unixmen.local
IP Address           : 192.168.1.101/24

Secondary (Slave) DNS Server Details:

Operating System     : Ubuntu 15.10 64bit minimal server
Hostname             : secondarydns.unixmen.local
IP Address           : 192.168.1.102/24

Client Details:

Operating System     : Ubuntu 14.04 desktop
Hostname             : client.unixmen.local
IP Address           : 192.168.1.103/24

Setup Caching Server

In this configuration, BIND9 will find the answer to name queries and remember the answer for the next query. This can be useful for a slow internet connection. By caching DNS queries, you will reduce bandwidth and (more importantly) latency.
The default configuration is setup to act as a caching server. All that is required is simply adding the IP Addresses of your ISP’s DNS servers. Caching server is opt for low Internet connection.
Install bind9 packages using command:
sudo apt-get install bind9 bind9utils bind9-doc
Then edit /etc/bind/named.conf.options file,
sudo vi /etc/bind/named.conf.options
Simply uncomment and edit the following in /etc/bind/named.conf.options:
forwarders {
8.8.8.8;
};
Restart bind9 service.
sudo systemctl restart bind9

Test Caching Server

Run the following command to test it.
dig -x 127.0.0.1
Sample output:
; <<>> DiG 9.9.5-11ubuntu1-Ubuntu <<>> -x 127.0.0.1
;; global options: +cmd
;; Got answer:
;; ->>HEADER<<- opcode: QUERY, status: NOERROR, id: 60612
;; flags: qr aa rd ra; QUERY: 1, ANSWER: 1, AUTHORITY: 1, ADDITIONAL: 3
;; OPT PSEUDOSECTION:
; EDNS: version: 0, flags:; udp: 4096
;; QUESTION SECTION:
;1.0.0.127.in-addr.arpa.        IN    PTR
;; ANSWER SECTION:
1.0.0.127.in-addr.arpa.    604800    IN    PTR    localhost.
;; AUTHORITY SECTION:
127.in-addr.arpa.    604800    IN    NS    localhost.
;; ADDITIONAL SECTION:
localhost.        604800    IN    A    127.0.0.1
localhost.        604800    IN    AAAA    ::1
;; Query time: 4 msec
;; SERVER: 192.168.1.101#53(192.168.1.101)
;; WHEN: Mon Nov 23 17:48:36 IST 2015
;; MSG SIZE  rcvd: 132

Setup Primary (Master) DNS Server

You can use the same server for both Primary and Caching server.
Install bind9 packages on your server if not installed.
sudo apt-get install bind9 bind9utils bind9-doc

1. Configure Master DNS Server

DNS configuration files are stored in /etc/bind directory. Primary configuration file is /etc/bind/namd.conf.
Edit ‘/etc/bind/named.conf’ file.
sudo vi /etc/bind/named.conf
Make sure it contains the following lines. If not, add them.
include "/etc/bind/named.conf.options";
include "/etc/bind/named.conf.local";
include "/etc/bind/named.conf.default-zones";
Save and close the file.
Then, edit named.conf.local,
sudo vi /etc/bind/named.conf.local
Add the following lines:
zone "unixmen.local" {
        type master;
        file "/etc/bind/forward.unixmen";
        allow-transfer { 192.168.1.102; };
        also-notify { 192.168.1.102; };
 };
zone "1.168.192.in-addr.arpa" {
        type master;
        file "/etc/bind/reverse.unixmen";
        allow-transfer { 192.168.1.102; };
        also-notify { 192.168.1.102; };
 };
Here,
  • forward.unixmen – Forward zone file
  • reverse.unixmen – Reverse zone file
  • 192.168.1.102 – Slave DNS server IP address

2. Create Zone files

Create forward and reverse zone files which we defiend in the ‘/etc/bind/named.conf.local’ file.

2.1 Create Forward Zone

Create Forward Zone file name forward.unixmen in /etc/bind/zones,
sudo vi /etc/bind/forward.unixmen
Add the following lines:
$TTL 86400
@   IN  SOA     masterdns.unixmen.local. root.unixmen.local. (
        2011071001  ;Serial
        3600        ;Refresh
        1800        ;Retry
        604800      ;Expire
        86400       ;Minimum TTL
)
@       IN  NS          masterdns.unixmen.local.
@       IN  NS          secondarydns.unixmen.local.
@       IN  A           192.168.1.101
@       IN  A           192.168.1.102
@       IN  A           192.168.1.103
masterdns       IN  A   192.168.1.101
secondarydns    IN  A   192.168.1.102
client          IN  A   192.168.1.103

2.2 Create Reverse Zone

Create Forward Zone file name reverse.unixmen in /etc/bind/zones,
sudo vi /etc/bind/reverse.unixmen
Add the following lines:
$TTL 86400
@   IN  SOA     masterdns.unixmen.local. root.unixmen.local. (
        2011071002  ;Serial
        3600        ;Refresh
        1800        ;Retry
        604800      ;Expire
        86400       ;Minimum TTL
)
@       IN  NS          masterdns.unixmen.local.
@       IN  NS          secondarydns.unixmen.local.
@       IN  PTR         unixmen.local.
masterdns       IN  A   192.168.1.101
secondarydns    IN  A   192.168.1.102
client          IN  A   192.168.1.103
101     IN  PTR         masterdns.unixmen.local.
102     IN  PTR         secondarydns.unixmen.local.
103     IN  PTR         client.unixmen.local.

3. Configuring Permissions, Ownership for Bind

Run the following commands one by one:
sudo chmod -R 755 /etc/bind
sudo chown -R bind:bind /etc/bind

4. Test DNS configuration and zone files for any syntax errors

Check DNS default configuration file:
sudo named-checkconf /etc/bind/named.conf
sudo named-checkconf /etc/bind/named.conf.local
If it returns nothing, your configuration is valid.
Check Forward zone:
sudo named-checkzone unixmen.local /etc/bind/forward.unixmen
Sample output:
zone unixmen.local/IN: loaded serial 2011071001
OK
Check reverse zone:
sudo named-checkzone unixmen.local /etc/bind/reverse.unixmen 
Sample Output:
zone unixmen.local/IN: loaded serial 2011071002
OK
Restart bind9 service.
sudo systemctl restart bind9
Add the DNS Server details in your network interface config file.
sudo vi /etc/network/interfaces
Add the nameserver IP address:
auto enp0s3
iface enp0s3 inet static
        address 192.168.1.101
        netmask 255.255.255.0
        network 192.168.1.0
        broadcast 192.168.1.255
        gateway 192.168.1.1
        dns-nameservers 192.168.1.101
        dns-search unixmen.local
Reboot your system.

5. Test DNS Server

Method 1:
dig masterdns.unixmen.local
Sample Output:
; <<>> DiG 9.9.5-11ubuntu1-Ubuntu <<>> masterdns.unixmen.local
;; global options: +cmd
;; Got answer:
;; ->>HEADER<<- opcode: QUERY, status: NOERROR, id: 27712
;; flags: qr aa rd ra; QUERY: 1, ANSWER: 1, AUTHORITY: 2, ADDITIONAL: 2
;; OPT PSEUDOSECTION:
; EDNS: version: 0, flags:; udp: 4096
;; QUESTION SECTION:
;masterdns.unixmen.local.    IN    A
;; ANSWER SECTION:
masterdns.unixmen.local. 86400    IN    A    192.168.1.101
;; AUTHORITY SECTION:
unixmen.local.        86400    IN    NS    masterdns.unixmen.local.
unixmen.local.        86400    IN    NS    secondarydns.unixmen.local.
;; ADDITIONAL SECTION:
secondarydns.unixmen.local. 86400 IN    A    192.168.1.102
;; Query time: 4 msec
;; SERVER: 192.168.1.101#53(192.168.1.101)
;; WHEN: Mon Nov 23 17:55:00 IST 2015
;; MSG SIZE  rcvd: 125
Method 2:
nslookup unixmen.local
Sample Output:
Server:        192.168.1.101
Address:    192.168.1.101#53
Name:    unixmen.local
Address: 192.168.1.101
Name:    unixmen.local
Address: 192.168.1.102
Name:    unixmen.local
Address: 192.168.1.103
Now the Primary DNS server is ready to use.
It is time to configure our Secondary DNS server.

Setup Secondary(Slave) DNS Server

Secondary DNS server is optional, but recommended. If the master DNS server goes down, the Secondary DNS server will take charge and answer the queries. You need an additional server to setup Slave DNS server.
Install bind9 packages using the following command:
sudo apt-get install bind9 bind9utils bind9-doc

1. Configure Slave DNS Server

Edit ‘/etc/bind/named.conf’ file.
sudo vi /etc/bind/named.conf
Make sure it contains the following lines. If not, add them.
include "/etc/bind/named.conf.options";
include "/etc/bind/named.conf.local";
include "/etc/bind/named.conf.default-zones";
Save and close the file.
Then, edit named.conf.local,
sudo vi /etc/bind/named.conf.local
Add the lines as shown in bold:
zone "unixmen.local" {
        type slave;
        file "/var/cache/bind/forward.unixmen";
        masters { 192.168.5.101; };
 };
zone "1.168.192.in-addr.arpa" {
        type slave;
        file "/var/cache/bind/reverse.unixmen";
        masters { 192.168.5.101; };
 };
Here,
  • forward.unixmen – Forward zone file
  • reverse.unixmen – Reverse zone file
  • 192.168.1.101 – Master DNS server IP address
The zone file must be in /var/cache/bind/ because, by default, AppArmor only allows write access inside it.

3. Configuring Permissions, Ownership for Bind

Run the following commands one by one:
sudo chmod -R 755 /etc/bind
sudo chown -R bind:bind /etc/bind
Restart bind9 service.
sudo service bind9 restart

4. Add the DNS Server details

Add the DNS Server details in your network interface config file.
sudo vi /etc/network/interfaces
# This file describes the network interfaces available on your system
# and how to activate them. For more information, see interfaces(5).
# The loopback network interface
auto lo
iface lo inet loopback
# The primary network interface
auto enp0s3
iface enp0s3 inet static
address 192.168.1.102
netmask 255.255.255.0
network 192.168.1.0
broadcast 192.168.1.255
gateway 192.168.1.1
dns-nameservers 192.168.1.101
dns-nameservers 192.168.1.102
dns-search home
Save and close the file.
Reboot your system.

5. Test DNS Server

After logging in to your server, run the following commands to check if DNS server is really working or not.
Method 1:
dig masterdns.unixmen.local
Sample Output:
; <<>> DiG 9.9.5-3-Ubuntu <<>> masterdns.unixmen.local
;; global options: +cmd
;; Got answer:
;; ->>HEADER<<- opcode: QUERY, status: NOERROR, id: 20290
;; flags: qr aa rd ra; QUERY: 1, ANSWER: 1, AUTHORITY: 2, ADDITIONAL: 2
;; OPT PSEUDOSECTION:
; EDNS: version: 0, flags:; udp: 4096
;; QUESTION SECTION:
;masterdns.unixmen.local.    IN    A
;; ANSWER SECTION:
masterdns.unixmen.local. 86400    IN    A    192.168.1.101
;; AUTHORITY SECTION:
unixmen.local.        86400    IN    NS    masterdns.unixmen.local.
unixmen.local.        86400    IN    NS    secondarydns.unixmen.local.
;; ADDITIONAL SECTION:
secondarydns.unixmen.local. 86400 IN    A    192.168.1.102
;; Query time: 5 msec
;; SERVER: 192.168.1.101#53(192.168.1.101)
;; WHEN: Mon Nov 23 18:02:38 IST 2015
;; MSG SIZE  rcvd: 125
Method 2:
dig secondarydns.unixmen.local
Sample Output:
; <<>> DiG 9.9.5-3-Ubuntu <<>> secondarydns.unixmen.local
;; global options: +cmd
;; Got answer:
;; ->>HEADER<<- opcode: QUERY, status: NOERROR, id: 53461
;; flags: qr aa rd ra; QUERY: 1, ANSWER: 1, AUTHORITY: 2, ADDITIONAL: 2
;; OPT PSEUDOSECTION:
; EDNS: version: 0, flags:; udp: 4096
;; QUESTION SECTION:
;secondarydns.unixmen.local. IN A
;; ANSWER SECTION:
secondarydns.unixmen.local. 86400 IN A 192.168.1.102
;; AUTHORITY SECTION:
unixmen.local. 86400 IN NS masterdns.unixmen.local.
unixmen.local. 86400 IN NS secondarydns.unixmen.local.
;; ADDITIONAL SECTION:
masterdns.unixmen.local. 86400 IN A 192.168.1.101
;; Query time: 5 msec
;; SERVER: 192.168.1.101#53(192.168.1.101)
;; WHEN: Mon Nov 23 18:10:02 IST 2015
;; MSG SIZE rcvd: 125
Method 3:
nslookup unixmen.local
Sample Output:
Server:        192.168.1.101
Address:    192.168.1.101#53
Name:    unixmen.local
Address: 192.168.1.101
Name:    unixmen.local
Address: 192.168.1.103
Name:    unixmen.local
Address: 192.168.1.102
Note: A zone is only transferred if the Serial Number on the Primary DNS server is larger than the one on the Secondary DNS server.

Client Side Configuration

Add the DNS server details in ‘/etc/resolv.conf’ file in all client systems
vi /etc/resolv.conf
# Generated by NetworkManager
search unixmen.local
nameserver 192.168.1.101
nameserver 192.168.1.102
Restart network service or reboot the system.

Test DNS Server

Now, you can test the DNS server using any one of the following commands:
dig masterdns.unixmen.local
dig secondarydns.unixmen.local
dig client.unixmen.local
nslookup unixmen.local
That’s all about now. The primary and secondary DNS servers are ready to use.