Showing posts with label Remote Desktop. Show all posts

Friday, March 29, 2019

Setup VNC Server on Ubuntu: Complete Ubuntu Remote Desktop Guide

Setup VNC Server on Ubuntu: Complete Ubuntu Remote Desktop Guide

VNC server on Linux servers can greatly simplify remote administration. One of the scariest things about Linux for most people is the use of commandline line work. SSH remains the most commonly used remote administration tool. But if you are not too comfortable with SSH and commandline, you may want to setup VNC Server on Ubuntu or other Linux servers.
Setting up a Linux server is a handy way of managing your files over your home network. Setting up an NFS share or SAMBA share on a home server is a common application, among other home server uses.. However, you might want to be able to access USB drives connected to your server or get access to other Ubuntu programs remotely. For this, we will be using Tight VNC server for Linux. combined with apps such as a Guacamole, you can now have remote desktop access to your server from anywhere using a HTML5 enabled browser.
Sounds exciting? In this post, I will show you how to setup VNC server on Ubuntu 18.04 Bionic Beaver. I will also show you to use VNC viewer in order to access your home server remotely.

What is VNC – Virtualizing with VNC

VNC stands for Virtual Network Computing and is a great way of accessing your server remotely. VNC is platform-independent, having clients and servers for many operating systems using a graphical user interface (GUI). VNC is a protocol like SMB or NFS. Unlike these protocols, VNC has different variations, all with different features and price points.
Since we’re interested in free and open-source here at SmartHomeBeginner, we’ll be using TightVNC for this guide. There are other options such as tigervnc, vnc4server, and x11vnc. But TightVNC is one of the most common ones, it is tried and test low no RAM usage, and generally considered a great solution.
TightVNC is a free VNC software package that allows users to utilize the VNC protocol on their network. In other words, this will allow you to view a desktop GUI on your server from another laptop, on your smartphone, or even on the internet using SSH or Guacamole as shown below. So let’s see how to install VNC Server on Ubuntu.
Setup VNC Server on Ubuntu - Guacamole VNC Viewer
Ubuntu VNC Server Remote Access through Chrome using Guacamole

Step 1: Prepare your System for Ubuntu VNC Setup

Before installing VNC on Ubuntu let’s update the system. First, gain access to your server’s command line. This can be done through SSH remotely, terminal if you are on the server, or whatever method you usually use. Once you’ve gained access to your server, make sure you have the latest packages using the following two commands:
sudo apt-get update
sudo apt-get upgrade

Step 2: Install a Lightweight Desktop Environment

Depending on what flavor of Ubuntu you are using, you may already have a desktop environment. If not, we will have to install a desktop environment. We have previously covered several lightweight desktop options for Ubuntu Server. You only need one of the following options.

Xfce Desktop Environment

Xfce is my favorite desktop environment for home servers. It is very lightweight by nature, easy to use, and is one of the top choices for a VNC server.
sudo apt-get install -y xfce4 xfce4-goodies
Note: adding ‘-y ‘will stop the system giving information about the package sizes, and asking if you want to continue. Remove this if you need to keep an eye on space usage.
Alternatively, you could configure VNC server on Ubuntu with Xubuntu Core. Xubuntu-Core looks visually appealing and yet lightweight without apps such as IM client, mail client, etc. that are not needed on a server.
sudo apt-get install -y xubuntu-core^
Note: The caret(^) at the end of the above command is not a mistake.
Xubuntu-Core is the DE installed on my new Ubuntu 18.04 Server built using Docker.

Gnome Desktop Environment

If you want to go with, Gnome, the default desktop environment that ships with Ubuntu then I suggest installing a lighter version of Gnome using the --no-install-recommends switch.
sudo apt-get install --no-install-recommends ubuntu-desktop gnome-panel gnome-settings-daemon metacity nautilus gnome-terminal -y
If you want the full desktop with all the bells and whistles then you can remove --no-install-recommends switch.

Step 3: Install VNC Server on Ubuntu

Now that our system is updated and has a desktop environment, we are ready to setup VNC Server on Ubuntu. To install VNC server on Ubuntu, use the following command:
sudo apt-get -y install tightvncserver
Once TightVNC installation completes, it’s time to configure VNC server on Ubuntu according to your preferences.

Step 4: Configure VNC Server on Ubuntu

After you setup VNC Server on Ubuntu, there are things that need to be configured: VNC password and VNC session information. To configure VNC server on Ubuntu you need to first start it once using the following command:
vncserver
You will be prompted to enter a password for TightVNC (as shown below), and if you want, a read-only password. A read-only password is great if you want to share your screen with others.
Setup VNC Server on Linux home server
Set password for TightVNC server
Before configuring VNC Server for a specific desktop, you will have to kill all running instances of the TightVNC server. The highlighted number in the image above should be used in place of “X” in the below command
vncserver -kill :X 
X starts at 1, so you’ll need to kill all instances. If you’re unsure how many instances you have running, just enter:
ps -ef | grep Xtightvnc
The results of this output are below. Highlighted in yellow are the X values you will need to use with the vncserver -kill :X command.
Install VNC Server on Ubuntu - Find running instances
How to find all running instances of TightVNC
Before proceeding, lets make a copy of your existing / default VNC configuration using the following command:
cp ~/.vnc/xstartup ~/.vnc/xstartup_backup

Configure VNC Server for Xfce Desktop

This should work for both Xfce or Xubuntu desktop. To configure TightVNC to use Xfce, enter the following:
nano ~/.vnc/xstartup
Then, edit the file to make it look like what is shown below (you can copy-paste):
#!/bin/sh
def
export XKL_XMODMAP_DISABLE=1
unset SESSION_MANAGER
unset DBUS_SESSION_BUS_ADDRESS

xrdb $HOME/.Xresources
xsetroot -solid grey

startxfce4 &
Then hit Ctrl + X, and then Y to save and exit Nano. A grey screen is a commonly encountered issue while setting VNC server on Ubuntu. The 4 lines after the #!/bin/sh should help solve this problem. The last line startxfce4 & starts the full Xfce desktop available through VNC viewer. If you want only specific apps available through VNC, you can replace startxfce4 & with the following:
thunar &
xfce4-panel &
xterm &
You can add any number of Xfce applications to the list above. You may find various packages available for addition here.

Configure VNC Server for Gnome Desktop

If you decided to go with the default Gnome desktop, here is how to configure your ~/.vnc/xtartup file:
For full Gnome Desktop:
#!/bin/sh
def
export XKL_XMODMAP_DISABLE=1
unset SESSION_MANAGER
unset DBUS_SESSION_BUS_ADDRESS

xrdb $HOME/.Xresources
xsetroot -solid grey

gnome-session &
To make only specific applications available through a VNC session, replace gnome-session & with the following:
gnome-panel &
gnome-settings-daemon &
metacity &
nautilus &
Again, you may add or delete applications to the list above. That’s it you are done configuring VNC server.

Step 5: Start VNC Server on Ubuntu

Ubuntu VNC Server setup is now done. To start VNC Server on Ubuntu, use the following command:
vncserver
By default, VNC server shows content in low resolution. If you want a higher resolution, you can specify the resolution while starting VNC Server, as shown below:
vncserver -geometry 1280x720 -depth 24
Replace 1280x720 with whatever resolution you prefer. Note that higher resolution and color depth can degrade performance.

Step 6: Use VNC Viewer

If you want the challenge of using commandline, you may want to read our introduction to SSH And htop. For all others, there is VNC Viewer. Let’s continue to configure VNC.
To connect to your home server through VNC, you need to know the IP address of the VNC server. In the command line on your server, enter:
sudo ifconfig
This will provide you with the information you will need to use VNC Viewer. Make note of the IP address displayed by the output of the above command, as shown below:
Get IP address of TightVNC Server
Viewing your remote VNC server depends on the client platform (Windows, Linux, Mac, Android, etc.). Follow the instructions applicable to your platform. Download the VNC Viewer client for your platform from here. MobaxTerm is my favorite SSH client on Windows and it does VNC too.
There are also iOS and Android apps available from your respective app stores. Alternatively, you can configure Guacamole and access your server through any HTML5 browser.

Insecure VNC Connection – Local Use

Connecting directly using IP address and port is insecure. But this may be acceptable in your home network. Enter the IP address you found in the previous step – the default port is 5901 (for server instance 1). You will then be asked for a password, which you set earlier:
How to use VNC viewer
Configuring VNC Viewer
Once you enter your password, you will have access to desktop and can control and interface your desktop, remotely.
VNC Server for Linux
Xfce Desktop

Secure VNC Connection using Secure Shell – Remote Use

What do you do if you are away from your server’s network and want to connect to your VNC Server through the internet? You can set port forwarding on your router to forward port 5901 to your VNC Server and then connect remotely using the VNC client by providing your VNC Server’s WAN IP address or domain name if you have one. However, it is strongly recommended that you do not make your VNC server directly open to the internet. This is a big security risk. The recommended method is to route your VNC connection through an SSH tunnel.

SSH Tunnel for VNC on Linux Client

Establish an SSH Tunnel using the following command:
ssh -L 5901:localhost:5901 -N -f -l USER IP/DOMAINNAME
Replace USER with the username on your VNC Server and IP/DOMAINNAME with your server’s WAN IP address or a domain name if you have one. What the above command does is that it routes port 5901 on localhost to port 5901 on the remote host (IP/DOMAINNAME) through a secure tunnel. All information is transferred through this secure tunnel, protecting your privacy and security.
The -N option is a security measure to allow only port forwarding and not execute any command on the remote server. The -f option makes SSH go to the background just before command execution.
You should now be able to fire up your Linux or Ubuntu VNC client and establish a VNC session with localhost as hostname and 5901 as port.

SSH Tunnel for VNC on Windows Client

On Windows, you could use PuTTY to setup a VNC session through a secure tunnel. Open PuTTY and (1) create a new SSH session as shown in the picture below. Provide an IP address, hostname, or a domain name (2) and finally provide the SSH port (3).
New SSH Connection on PuTTY
Then navitage to Tunnels (4), provide 5901 as the port on the source VNC server (5), provide localhost:5901 as the port on the local system (6), and finally click Open (7) to create an SSH tunnel for VNC.
SSH Tunnel for VNC using PuTTY
Then open up any VNC Viewer (there are several free ones) and start a new VNC session with localhost as hostname and 5901 as port.

Secure VNC Using HTML5 Browser from Anywhere

There is another option that I really like for remote VNC connections from the internet: Guacamole. I came to know about this app while building my Docker Media Server and I love it. Guacamole not only allows VNC sessions using an HTML5 browser (most modern browsers) but it also allows SSH, SFTP, and RDP (remote desktop to Windows systems). With guacamole, I do not need a VNC client/viewer. All I need is a browser.
Setting up Guacamole is out the scope of this guide. But I will cover this as a separate guide in future. If you take this route, I strongly recommend setting up 2-factor authentication using services such as DUO, for security.

Step 7: Autostart VNC Server

There are two ways to autostart VNC Server on Ubuntu.

Autostart VNC Session using Cron

The easiest way to auto start VNC Server is through crontab and making it start during reboot. To do this, edit your cron list using the following command:
crontab -e
If you are asked to select an editor, choose /bin/nano or any other editor you are comfortable with. Then add the following line to the end of your cron list:
@reboot vncserver -geometry 1280x720 -depth 24 :1
Now, VNC Server should start automatically during boot and be available for you at port 5901.

Autostart VNC Server using SystemD Service

Cron restart method may not work for everybody because it does not create a service, which means you cannot start, stop, or restart VNC server. You will have to kill it and start again. Creating a service, on the other hand, gives you that ability.
Create a service file for VNC server using the following command:
nano /etc/systemd/system/vncserver@.service
Add the following contents to it. Replace USER with your username in two locations. Press Ctrl+X, Y, and finally Enter to save and exit nano editor.
[Unit]
Description=Start TightVNC server at startup
After=syslog.target network.target

[Service]
Type=forking
User=USER
PAMName=login
PIDFile=/home/USER/.vnc/%H:%i.pid
ExecStartPre=-/usr/bin/vncserver -kill :%i > /dev/null 2>&1
ExecStart=/usr/bin/vncserver -depth 24 -geometry 1280x720 :%i
ExecStop=/usr/bin/vncserver -kill :%i

[Install]
WantedBy=multi-user.target
Reload services using the following command:
sudo systemctl daemon-reload
Finally, enable VNC Server using the following command:
sudo systemctl enable vncserver@1.service
Now you will be able to start and stop VNC server using the following commands:
 
systemctl start vncserver@1.service
systemctl stop vncserver@1.service

Setup VNC Server on Ubuntu Linux – Final Thoughts

You may think that reading a 2500-word article to setup VNC Server on Ubuntu is a lot. But if you know what you are doing, it only takes about 5 minutes to install and configure VNC server.
The default resolution that Ubuntu TightVNC server provides is pretty ugly. Today’s internet speeds can support much higher resolutions. Therefore, I strongly suggest running your server at a higher resolution but may be lower depth.
Ubuntu is the most commonly used server OS, so in this guide, we chose to show how to setup VNC Server on Ubuntu. But this guide is essentially the same for most Linux operating systems.
If you do not like the commandline work then the truth you may not enjoy Linux. Once you become a good commandline user, you will appreciate the convenience of administering a server with just the keyboard and without having to move your hand to find a mouse. But if you still prefer a GUI, then I hope this Ubuntu VNC Server guide helped you.

Tuesday, March 13, 2018

RDP: Configuring VNC Server for GUI remote access

Configuring VNC Server for GUI remote access


VNC or Virtual Network Computing is graphical desktop sharing tool. VNC server provides a duplicate of server display for the clients attached to it. A number of clients can be connected to using VNC.
In RHEL/CentOS 7, we use a package named “tigervnc-server” to setup VNC server. We will now start with installation but before we do that make sure that we have graphical version of OS installed. If that’s not the case, we will first install the graphical desktop,
$ yum groupinstall “GNOME Desktop”
If you already have graphical packages installed, skip this step & move onto installation of VNC-server.

Installation

We can install vnc server using the yum,
$ yum install tigervnc-server xorg-x11-fonts-Type1
Once the required packages have been installed, we will move to configuration part,

Configuration

Configuration file for VNC is /lib/systemd/system/vncserver@.service. We need to copy /lib/systemd/system/vncserver@.service to/etc/systemd/system/vncserver@:1.service,  where :1 is used to denote port number 5901 . We can also assign it different port number like :2 or :3 (for 5902, 5903).
$ cp /lib/systemd/system/vncserver@.service /etc/systemd/system/vncserver@:1.service
Next, we will add user information in the configuration file. So we will add a user named ‘vncuser’ for accessing vnc
$ useradd vncuser
Now open /etc/systemd/system/vncserver@:1.service,  & add user information  (see screenshot)
$ vi /etc/systemd/system/vncserver@:1.service
vnc
Next, we will assign a password to access the VNC server,
$ su vncviewer
$ vncserver
You will be asked to enter a password & then confirm it & some files will be created after that.
Our VNC server is now ready to be used, we will restart service & enable it , so it can restart on every reboot,
$ systemctl daemon-reload
$ systemctl start vncserver@:1.service
$ systemctl enable vncserver@:1.service
Note:- If you are getting an error while starting vnc service, reboot your system & try starting service then.

Testing the server

To test the vnc server, we require VNC-viewer to installed on the testing machine. I am using a Windows 10 machine with vnc-viewer installed.
Open vnc –viewer & enter the server address with port number
vnc
Next, you will get a warning if you are using an unencrypted connection, press “continue”
You will now be asked VNC password, enter the password to connect the session & you can see the display of the server.
If you want to add more user, repeat the whole process but change the port number from /etc/systemd/system/vncserver@:1.service to /etc/systemd/system/vncserver@:2.service or /etc/systemd/system/vncserver@:3.service & so on.

This concludes our tutorial on setting up VNC server on CentOS/RHEL 7.

Tuesday, February 27, 2018

SSH : ClusterSSH - Manage multiple ssh session at the same Time

ClusterSSH - Manage multiple ssh session at the same Time

Most of server administrator run SSH for maintaining his servers. When he manages a lot of servers, then he may need to open multiple SSH sessions. If the maintenance activity is using the same commands on each server, typing commands one-by-one for each server may consume more times. Is it possible to run commands on one server and duplicate them to another server? On Linux, you can. We will use ClusterSSH command to solve this situation.

What is ClusterSSH

ClusterSSH is an application which can manage multiple SSH session at the same time. With ClusterSSH, you can perform same commands on the server group (cluster) at the same time. This will ensure that all servers are kept in sync.

Installation

Using package manager

On Debian / Ubuntu based Linux :
$ sudo apt-get install clusterssh
On RedHat / CentOS based Linux :
# yum -y install clusterssh

Using tarball

To make sure that you installed the latest version, you can download ClusterSSH source file and compile it manually. At the moment this article is written, the latest version of ClusterSSH is 3.28. The source can be downloaded from SourceForge sites.
Once you have the download, here are the steps how to install it.
1. Extract the source file
2. Go to the folder where the source file was extracted
3. Type :
$ ./configure
$ make
# make install
4. Done
Please note, that ClusterSSH use Perl and it’s library to run. On my Zorin Linux (Ubuntu based) I found some errors when compile ClusterSSH.
Cannot find X include files via /include
Cannot find X includes files anywhere

Error Library X11
To solve this error, I ran :
$ sudo apt-get install libx11-dev
Once the installation of libx11-dev finished, I tried to compile it again and it worked !
Can’t locate Tk.pm
Error Tk module
ClusterSSH needs some Perl module. The solution for this error is by installing Tk.pm module. The easiest way to install it is using CPAN.
$ cpan -i Tk
After installing Tk.pm is done, try to type cssh via console.
Can’t locate X11/Protocol.pm
Error X11 Protocol
If you experiencing this error, you can install X11/Protocol.pm module via CPAN.
$ cpan -i X11::Protocol
After installing Tk.pm is done, try to type cssh via console.

How to use ClusterSSH

To run ClusterSSH, you can type
$ cssh -l username server_ip_address
But the power of ClusterSSH is to manage multiple SSH session. You can also type :
$ cssh -l username server_ip_address_1 server_ip_address_2 server_ip_address_n
But this might not a good way it you have a lot of servers. Another way to run multiple SSH session is put the address of each server in CSSH configuration file. There are two types of configuration files. First is global configuration file. This file is located in /etc/clusters. Second is .csshrc which located in users home directory.
In this article, we are using .csshrc file to configure ClusterSSH. For example, we add cluster name (group name) called servers. Then we add the member of its group. Here’s the .csshrc file look like :
clusters=servers
servers=10.0.6.12 10.0.14.6 10.0.6.149
To run the cluster, type :
$ cssh -l pungki.arianto servers -T “Server Farm”
Where :
1. pungki.arianto is the login name of those servers
2. -T “Server Farm” will give tags Server Farms to each SSH window.
ClusterSSH in action
The next step, you need to enter password for each server. You will see an administration console which has header Server Farm (3). When you want to run command(s) to all servers, you need to type it in the administration console box. You may not see what you type in the box, but you will see it appear on every servers.
If you don’t want to echo your command to all servers, you can disable host(s) that you want to exclude. Just click Hosts menu in administration console and choose which server you want to exclude.

Important

The advantage of echoing all commands to all servers is to ensure that all servers are kept synced. And of course we will save time from repeating the same commands to all servers. But when you execute the wrong commands, it will impact to all servers. Please make sure that you’re typing a correct command before hit Enter button.

Conclusion

ClusterSSH can help administrators to run the same command across servers at the same time, as long its used with care. As usual, we can always to type man cssh or cssh -h to display its manual page and explore more detail.
,

Thursday, January 11, 2018

How to Install and Enable OpenSSH on Ubuntu 17.04, Ubuntu 16.04

How to Install and Enable OpenSSH on Ubuntu 17.04, Ubuntu 16.04

Before we proceed on how to install and enable OpenSSH on Ubuntu 17.04, Ubuntu 16.04, first we need to understand what OpenSSH (a fork of free SSH) is.
OpenSSH (also known as OpenBSD Secure Shell) is a connectivity tool that enables remote login via the SSH protocol, hence eliminating eavesdropping, connection hijacking, and other attacks. It helps to secure all network communications by encrypting all network traffic over multiple authentication methods through a secured tunnel.
The OpenSSH suite consists of the following tools:
Install and Enable OpenSSH

OpenSSH Key Features

  • Offers strong cryptography (AES, ChaCha20, RSA, ECDSA, Ed25519…)
  • Supports X11 forwarding (which also encrypts X Window System traffic)
  • Port forwarding (encrypted channels for legacy protocols)
  • Strong authentication (public keys, one-time passwords)
  • Agent forwarding
  • Interoperability
  • SFTP client and server support in both SSH1 and SSH2 protocols
  • Optional data compression
  • See list for full details
The most recent release is OpenSSH 7.5 and its mainly bugfix release

Install OpenSSH on Ubuntu 17.04, Ubuntu 16.04

Now lets proceed with how to install and enable OpenSSH

How to enable root password

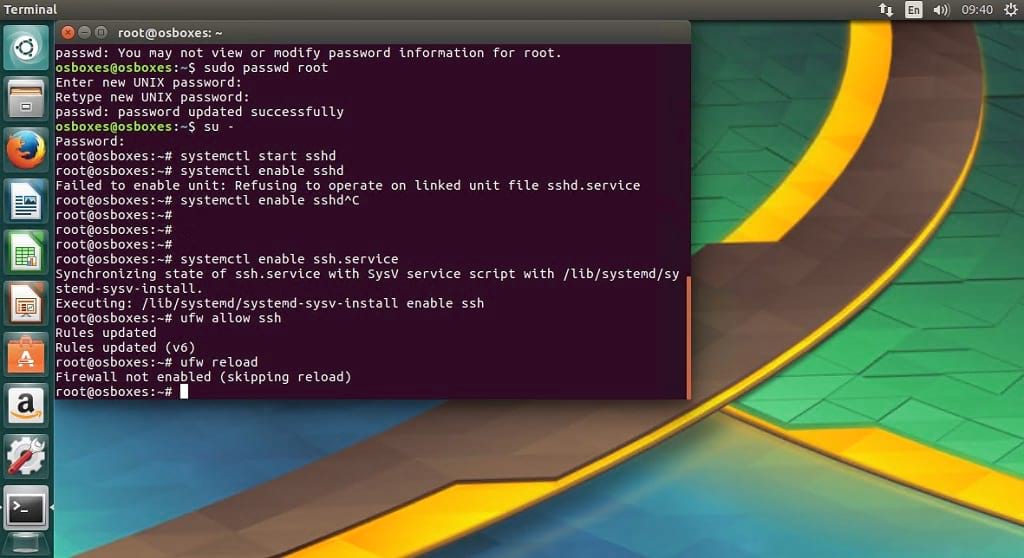
  • First you need to ensure the root password is enabled if not already done, by running the following commands
sudo passwd root
Enter new UNIX password:
Retype new UNIX password:
passwd: password updated successfully

Install OpenSSH on Ubuntu

  • Next we need to install openssh server / client on ubuntu by running the following commands on terminal
su - #enter your root password
sudo apt-get install openssh-server openssh-client
  • Now start and enable SSH service by running following commands
systemctl start sshd
systemctl enable ssh.service
  • Last step is to open up the ssh firewall port
ufw allow ssh
ufw reload

install and enable OpenSSH

Configure OpenSSH Server

  • To configure OpenSSH, you need to edit the file “sshd_config” located in “/etc/ssh”
sudo gedit /etc/ssh/sshd_config
  • There are quite a few config settings in there but for the purpose of this tutorial, we will enable the following settings for a basic setup
 Port 22                    # Tells sshd on what port to listen on
 AddressFamily any          # sshd listens on either IPv4 or IPv6 or both interface
 ListenAddress 0.0.0.0      # Tells sshd to listen on all ip address
 PermitRootLogin no         # For security, allows set this to no
 MaxAuthTries 6             # To prevent DDOS attack, set the desired value to restrict the number of tries allowed during login
 MaxSessions 10             # This sets the maximum number of simultaneous connections
 PasswordAuthentication yes # This will enforce key-based if set to no and ask passwords if set to yes
  • Save changes and reload sshd for changes to take effect
systemctl reload sshd

install and enable OpenSSH

Test run OpenSSH setup

  • For purpose of testing to see if this works as expected, we will enable ssh root access temporary but in a production setup, DO NOT enable it.
  • Edit the file “sshd_config” located in “/etc/ssh” and change “PermitRootLogin without-password” to “PermitRootLogin yes“
  • Restart the SSH server
sudo service ssh restart or
systemctl reload sshd
  • Run the command to connect to it
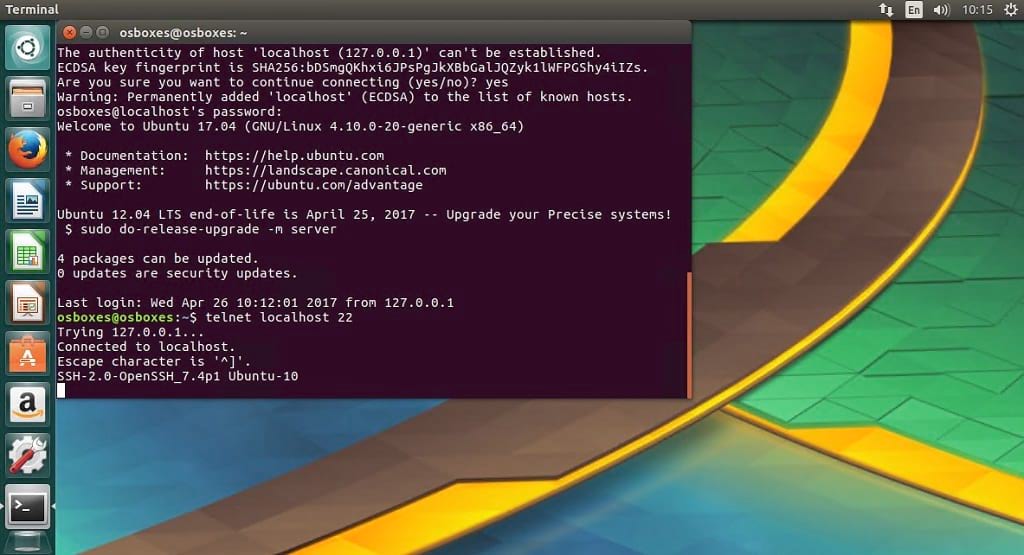
ssh root@localhost


Wednesday, September 6, 2017

Remote/ VNC : Configuring VNC Server for GUI remote access

Configuring VNC Server for GUI remote access


VNC or Virtual Network Computing is graphical desktop sharing tool. VNC server provides a duplicate of server display for the clients attached to it. A number of clients can be connected to using VNC.
In RHEL/CentOS 7, we use a package named “tigervnc-server” to setup VNC server. We will now start with installation but before we do that make sure that we have graphical version of OS installed. If that’s not the case, we will first install the graphical desktop,
$ yum groupinstall “GNOME Desktop”
If you already have graphical packages installed, skip this step & move onto installation of VNC-server.

Installation

We can install vnc server using the yum,
$ yum install tigervnc-server xorg-x11-fonts-Type1
Once the required packages have been installed, we will move to configuration part,

Configuration

Configuration file for VNC is /lib/systemd/system/vncserver@.service. We need to copy /lib/systemd/system/vncserver@.service to /etc/systemd/system/vncserver@:1.service,  where :1 is used to denote port number 5901 . We can also assign it different port number like :2 or :3 (for 5902, 5903).
$ cp /lib/systemd/system/vncserver@.service /etc/systemd/system/vncserver@:1.service
Next, we will add user information in the configuration file. So we will add a user named ‘vncuser’ for accessing vnc
$ useradd vncuser
Now open /etc/systemd/system/vncserver@:1.service,  & add user information  (see screenshot)
$ vi /etc/systemd/system/vncserver@:1.service
vnc

Next, we will assign a password to access the VNC server,
$ su vncviewer
$ vncserver
You will be asked to enter a password & then confirm it & some files will be created after that.
Our VNC server is now ready to be used, we will restart service & enable it , so it can restart on every reboot,
$ systemctl daemon-reload
$ systemctl start vncserver@:1.service
$ systemctl enable vncserver@:1.service
Note:- If you are getting an error while starting vnc service, reboot your system & try starting service then.

Testing the server

To test the vnc server, we require VNC-viewer to installed on the testing machine. I am using a Windows 10 machine with vnc-viewer installed.
Open vnc –viewer & enter the server address with port number
vnc
Next, you will get a warning if you are using an unencrypted connection, press “continue”
You will now be asked VNC password, enter the password to connect the session & you can see the display of the server.
If you want to add more user, repeat the whole process but change the port number from /etc/systemd/system/vncserver@:1.service to /etc/systemd/system/vncserver@:2.service or /etc/systemd/system/vncserver@:3.service & so on.

Thursday, September 8, 2016

[Ubuntu : Remote Access/ VPN]: How to remote login, access and control computers using LogMeIn Hamachi and Haguichi on Ubuntu 12.04

How to remote login, access and control computers using LogMeIn Hamachi and Haguichi on Ubuntu 12.04


This guide is based on various community forum posts.
This guide is intended as a relatively easy step by step guide to:
  • Install LogMeIn Hamachi secure VPN client to create a private network.
  • Install Haguichi GUI frontend to configure Hamachi.
  • Create a new VPN and connect clients to your private network.
  • Login via SSH to remote computer.
  • Browse shared folders on the network of all connected computers. 
  • Create a remote desktop connection and login to computer remotely. 
Requirements:
  • Ubuntu 12.04 or later installed machine to act as local machine and one to act as remote - the remote computer can also be Windows or Mac OSX based as long as you install the relevant Hamachi client on these machines, but that falls outside the scope of this guide.

1. Install LogMeIn Hamachi2 secure VPN client.

  • On each computer you want to be part of your virtual network requires a LogMeIn Hamachi client to be installed.
  • Visit the LogMeIn Hamachi Linux Download page and select the correct .DEB version for your 32bit or 64bit version of Ubuntu.
  • To download the 32bit version click on the download link and install with the Ubuntu Software Center, or open a Terminal Window and enter :
sudo apt-get install lsb-core ncurses-term pax
cd /tmp
sudo wget https://secure.logmein.com/labs/logmein-hamachi_2.1.0.119-1_i386.deb 
sudo chmod +x logmein-hamachi_2.1.0.119-1_i386.deb
sudo dpkg -i logmein-hamachi_2.1.0.119-1_i386.deb
sudo rm logmein-hamachi_2.1.0.119-1_i386.deb
  • To download the 64bit version click on the download link and install with the Ubuntu Software Center, or open a Terminal Window and enter :
sudo apt-get install lib32z1 lsb-core ncurses-term pax
cd /tmp
sudo wget https://secure.logmein.com/labs/logmein-hamachi_2.1.0.119-1_amd64.deb 
sudo chmod +x logmein-hamachi_2.1.0.119-1_amd64.deb
sudo dpkg -i logmein-hamachi_2.1.0.119-1_amd64.deb
sudo rm logmein-hamachi_2.1.0.119-1_amd64.deb
  • Tip: Ubuntu 12.10 users note that lsb has a slight Python version issue and causes many errors during install of certain software like LogMeIn Hamachi. This can be fixed by adding the following to the top of the /usr/lib/lsb/initdutils.py file and re-installing LogMeIn Hamachi :
#!/usr/bin/python

2. Install Haguichi GUI for Hamachi.

  • Install the excelent Haguichi graphical frontend for Hamachi client to configure Hamachi.
  • Add the PPA to your software sources. Open the Terminal Window and enter :
sudo add-apt-repository ppa:webupd8team/haguichi && sudo apt-get update
  • Then search for and install haguichi from your Ubuntu software center or open the Terminal Window and enter :
sudo apt-get install haguichi haguichi-appindicator
  • Reboot the computer to complete the install.

3. Use Haguichi to create a VPN and add computers to a network.

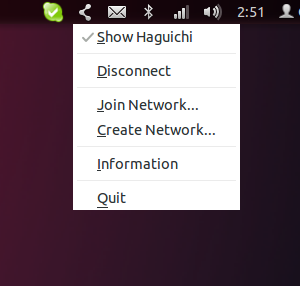
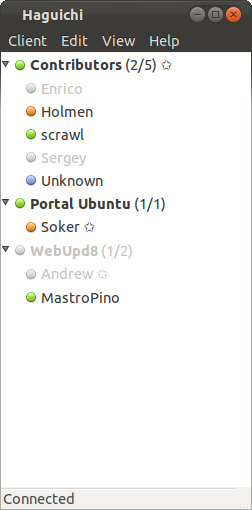
  • Haguichi's application indicator integrates perfectly with Unity desktop. Here you will be able to do the important tasks required to set things up.
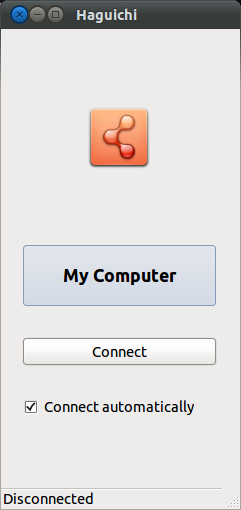
  • Once you launch the main window of Haguichi for the first time you will be prompted to allow Haguichi to configure Hamachi.
  • Allow Haguichi to do the basic configuration of Hamachi and follow the instructions.
  • Once you have selected a nickname for your computer, you will be able to Connect to Hamachi.
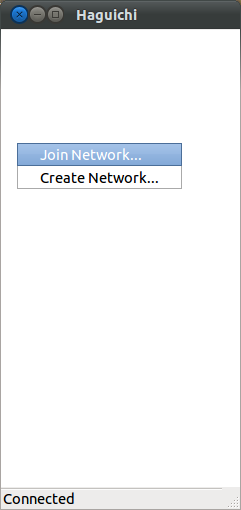
  • Once connected you can right-click on the Haguichi window and Create or Join a VPN Network. 
  

4. Browse Shared Folders, view Remote Desktop, SSH and Webmin with Haguichi.

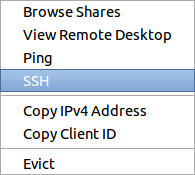
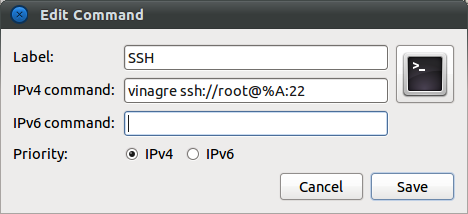
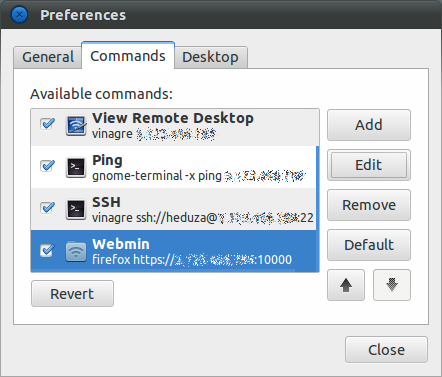
  • If you right click on a computer on your network you will be able to select one of the following options: Browse shares, View remote desktop and Ping. The SSH option we will add.
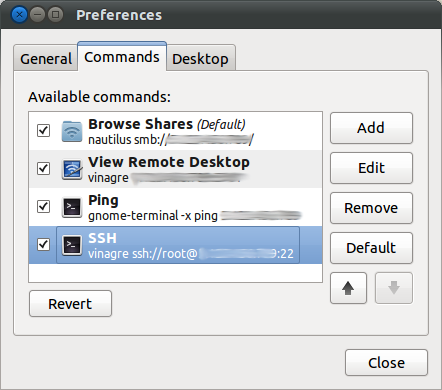
  • To add the SSH option as shown above, simply click on the Edit > Preferences in Haguichi's main menu.
  • Then click on the Add button.
  • Simply enter following line in the IPv4 command box, changing the username root to your ssh user. The standard SSH portnumber is also added at the end with :22, and should be changed as required, or can be left out.
vinagre ssh://root@%A:22
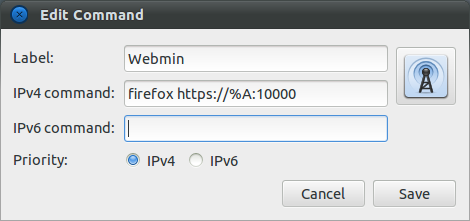
  • To add the Webmin option as shown above, simply click on the Edit > Preferences in Haguichi's main menu.
  • Then click on the Add button.
  • Simply enter following line in the IPv4 command box, The standard Webmin port number is also added at the end with:10000, and should be changed as required.
firefox https://%A:10000