Thursday, July 20, 2017

A Collection Of Useful BASH Scripts For Heavy Commandline Users

A Collection Of Useful BASH Scripts For Heavy Commandline Users

Today, I have stumbled upon a collection of useful BASH scripts for heavy commandline users. These scripts, known as Bash-Snippets, might be quite helpful for those who live in Terminal all day. Want to check the weather of a place where you live? This script will do that for you. Wondering what is the Stock prices? You can run the script that displays the current details of a stock. Feel bored? You can watch some youtube videos. All from commandline. You don’t need to install any heavy memory consumable GUI applications.
Bash-Snippets provides the following 12 useful tools:
  1. currency – Currency converter.
  2. stocks – Provides certain Stock details.
  3. weather – Displays weather details of your place.
  4. crypt – Encrypt and decrypt files.
  5. movies – Search and display a movie details.
  6. taste – Recommendation engine that provides three similar items like the supplied item (The items can be books, music, artists, movies, and games etc).
  7. short – URL Shortner
  8. geo – Provides the details of wan, lan, router, dns, mac, and ip.
  9. cheat – Provides cheat-sheets for various Linux commands.
  10. ytview – Watch YouTube from Terminal.
  11. cloudup – A tool to backup your GitHub repositories to bitbucket.
  12. qrify – Turns the given string into a qr code.

Bash-Snippets – A Collection Of Useful BASH Scripts For Heavy Commandline Users

Installation

You can install these scripts on any OS that supports BASH.
First, clone the GIT repository using command:
git clone https://github.com/alexanderepstein/Bash-Snippets
Sample output would be:
Cloning into 'Bash-Snippets'...
remote: Counting objects: 1103, done.
remote: Compressing objects: 100% (45/45), done.
remote: Total 1103 (delta 40), reused 55 (delta 23), pack-reused 1029
Receiving objects: 100% (1103/1103), 1.92 MiB | 564.00 KiB/s, done.
Resolving deltas: 100% (722/722), done.
Go to the cloned directory:
cd Bash-Snippets/
Git checkout to the latest stable release:
git checkout v1.11.0
Finally, install the Bash-Snippets using command:
sudo ./install.sh
This will ask you which scripts to install. Just type Y and press ENTER key to install the respective script. If you don’t want to install a particular script, type N and hit ENTER.
Do you wish to install currency [Y/n]: y
To install all scripts, run:
sudo ./install.sh all
Sample output would be:
Installing currency: Success
Installing stocks: Success
Installing weather: Success
Installing crypt: Success
Installing movies: Success
Installing taste: Success
Installing short: Success
Installing geo: Success
Installing cheat: Success
Installing ytview: Success
Installing cloudup: Success
Installing qrify: Success
(⌐■_■) 
Bash Snippets version 1.11.0
https://github.com/alexanderepstein/Bash-Snippets
To install a specific script, say currency, run:
sudo ./install.sh currency

Usage

An active Internet connection is required to use these tools. The usage is fairly simple. Let us see how to use all scripts. I assume you have installed all scripts.
1. Currency – Currency Converter
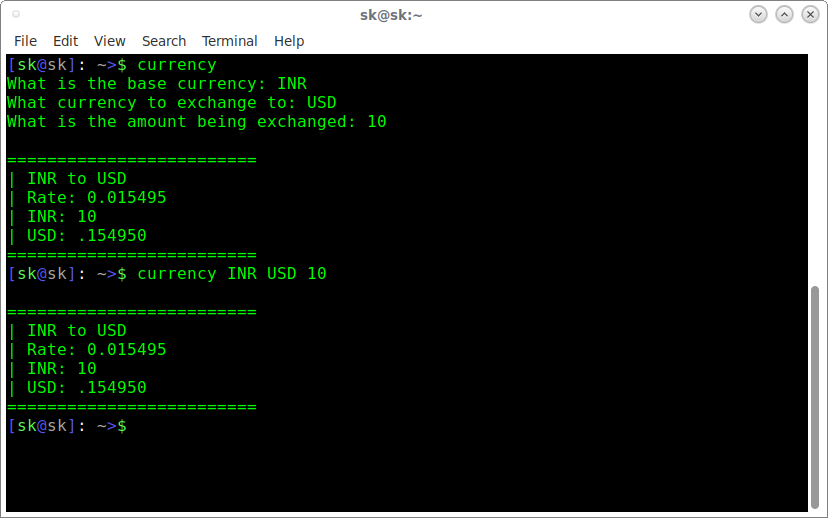
This script converts the currency based on realtime exchange rates. Enter the base currency code and the currency to exchange to, and the amount being exchanged one by one as shown below.
$ currency
What is the base currency: INR
What currency to exchange to: USD
What is the amount being exchanged: 10

=========================
| INR to USD
| Rate: 0.015495
| INR: 10
| USD: .154950
=========================
You can also pass all arguments in a single command as shown below.
currency INR USD 10
Refer the following screenshot.
Bash-Snippets
2. Stocks – Display stock price details
If you want to check a stock price details, mention the stock item as shown below.
$ stocks Intel

INTC stock info
=============================================
| Exchange Name: NASDAQ
| Latest Price: 34.2500
| Close (Previous Trading Day): 34.2500
| Price Change: 0.0000
| Price Change Percentage: 0.00%
| Last Updated: Jul 12, 4:00PM EDT
=============================================
The above output the Intel stock details.
3. Weather – Display Weather details
Let us check the Weather details by running the following command:
weather
Sample output:
Display weather details
As you see in the above screenshot, it provides the 3 day weather forecast. Without any arguments, it will display the weather details based on your IP address. You can also bring the weather details of a particular city or country like below.
weather Chennai
Also, you can view the moon phase by entering the following command:
weather moon
Sample output would be:
moon phase
4. Crypt – Encrypt and Decrypt files
This script is a wrapper for openssl that allows you to encrypt and decrypt files quickly and easily.
To encrypt a file, use the following command:
crypt -e [original file] [encrypted file]
For example, the following command will encrypt a file called ostechnix.txt, and save it as encrypt_ostechnix.txt in the current working directory.
crypt -e ostechnix.txt encrypt_ostechnix.txt
Enter the password for the file twice.
Encrypting ostechnix.txt...
enter aes-256-cbc encryption password:
Verifying - enter aes-256-cbc encryption password:
Successfully encrypted
The above command will encrypt the given file using AES 256 level encryption. The password will not be saved in plain text. You can encrypt .pdf, .txt, .docx, .doc, .png, .jpeg type files.
To decrypt the file, use the following command:
crypt -d [encrypted file] [output file]
Example:
crypt -d encrypt_ostechnix.txt ostechnix.txt
Enter the password to decrypt.
Decrypting encrypt_ostechnix.txt...
enter aes-256-cbc decryption password:
Successfully decrypted
5. Movies – Find Movie details
Using this script, you can find a movie details.
The following command displays the details of a movie called “mother”.
$ movies mother

==================================================
| Title: Mother
| Year: 2009
| Tomato: 95%
| Rated: R
| Genre: Crime, Drama, Mystery
| Director: Bong Joon Ho
| Actors: Hye-ja Kim, Bin Won, Goo Jin, Je-mun Yun
| Plot: A mother desperately searches for the killer who framed her son for a girl's horrific murder.
==================================================
6. Display similar items like the supplied item
To use this script, you need to get the API key here. No worries, it is completely FREE! Once the you got the API,  add the following line to your ~/.bash_profileexport TASTE_API_KEY=”yourAPIKeyGoesHere”
Now, you can view the similar item like the supplied item as shown below:
taste -i Red Hot Chilli Peppers
7. Short – Shorten URLs
This script shortens the given URL.
short <URL>
8. Geo – Display the details of your network
This script helps you to find out the details of your network, such as wan, lan, router, dns, mac, and ip geolocation.
For example, to find out your LAN ip, run:
geo -l
Sample output from my system:
192.168.43.192
To find your Wan IP:
geo -w
For more details, just type ‘geo’ in the Terminal.
$ geo
Geo
Description: Provides quick access for wan, lan, router, dns, mac, and ip geolocation data
Usage: geo [flag]
 -w Returns WAN IP
 -l Returns LAN IP(s)
 -r Returns Router IP
 -d Returns DNS Nameserver
 -m Returns MAC address for interface. Ex. eth0
 -g Returns Current IP Geodata
Examples:
 geo -g
 geo -wlrdgm eth0
Custom Geo Output =>
[all] [query] [city] [region] [country] [zip] [isp]
Example: geo -a 8.8.8.8 -o city,zip,isp
 -o [options] Returns Specific Geodata
 -a [address] For specific ip in -s
 -v Returns Version
 -h Returns Help Screen
 -u Updates Bash-Snippets
9. Cheat – Display cheatsheets of Linux commands
Want to refer the cheatsheet of Linux command? Well, it is also possible. The following command will display the cheatsheet of curl command:
cheat curl
Just replace curl with the command of your choice to display its cheatsheet. This can be very useful for the quick reference to any command you want to use.
10. ytview – Watch YouTube videos
Using this script, you can search or watch youtube videos right from the Terminal.
Let us watch some Ed Sheeran videos.
ytview Ed Sheeran
Choose the video you want to play from the list. The selected will play in your default media player.
ytview Ed Sheeran
To view recent videos by an artist, you can use:
ytview -c [channel name]
To search for videos, just enter:
ytview -s [videoToSearch]
or just,
ytview [videoToSearch]
11. cloudup – Backup GitHub repositories to bitbucket
Have you hosted any project on GitHub? Great! You can backup the GitHub repositories to bitbucket, a web-based hosting service used for source code and development projects, at any time.
You can either backup all github repositories of the designated user at once with the -a option. Or run it with no flags and backup individual repositories.
To backup GitHub repository, run:
cloudup
You will be asked to enter your GitHub username, name of the repository to backup, and bitbucket username and password etc.
12. Qrify – Convert Strings into QR code
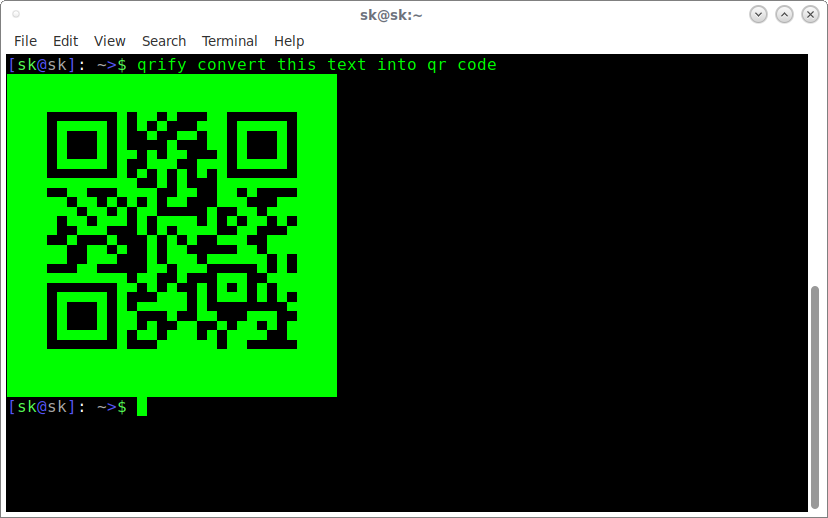
This script converts any given string of text into a QR code. This is useful for sending links or saving a string of commands to your phone
qrify convert this text into qr code
Sample output would be:
Qrify
Cool, isn’t it?

Getting help

If you don’t know how to use a particular script, just type that script’s name and press ENTER. You will see the usage details. The following example displays the help section of Qrify script.
$ qrify
Qrify
Usage: qrify [stringtoturnintoqrcode]
Description: Converts strings or urls into a qr code.
 -u Update Bash-Snippet Tools
 -m Enable multiline support (feature not working yet)
 -h Show the help
 -v Get the tool version
Examples:
 qrify this is a test string
 qrify -m two\\nlines
 qrify github.com # notice no http:// or https:// this will fail

Updating scripts

You can update the installed tools at any time suing -u option. The following command updates “weather” tool.
weather -u

Uninstall

You can uninstall these tools as shown below.
Git clone the repository:
git clone https://github.com/alexanderepstein/Bash-Snippets
Go to the Bash-Snippets directory:
cd Bash-Snippets
And uninstall the scripts by running the following command:
sudo ./uninstall.sh
Type y and hit ENTER to remove each script.
Do you wish to uninstall currency [Y/n]: y
And, that’s all for now folks. I must admit that I’m very impressed when testing this scripts. I really liked the idea of combing all useful scripts into a single package. Kudos to the developer. Give it a try, you won’t be disappointed.
Cheers!
Resource:

Cronopete – An Apple’s Time Machine Clone For Linux

Cronopete – An Apple’s Time Machine Clone For Linux

If you use Mac OS, you certainly have known about or used Time machine. It is a backup software application distributed with the Apple’s Mac OS X. It is used to backup your data to an external drive, so that you can restore them later from the backup. If you are a fan boy/girl of Time Machine, you need to check out “Cronopete”. It is the clone of Time Machine for Linux operating systems. Using Cronopete, we can easily create periodic backups of a Linux system. It supports popular Linux distributions, including Arch Linux, Debian, Fedora, and Ubuntu.

Cronopete – An Apple’s Time Machine Clone For Linux

Install Cronopete

On Arch Linux:
Cronopete is available in AUR, so you can install it using AUR helper programs such as Yaourt or Packer.
yaourt -S cronopete
Or,
packer -S cronopete
On Debian, Ubuntu:
Download the latest version from here depending upon the distribution you use.
For 64bit Debian:
wget http://www.rastersoft.com/descargas/cronopete/cronopete-sid_3.26.0-debian1_amd64.deb
For 32bit Debian:
wget http://www.rastersoft.com/descargas/cronopete/cronopete-sid_3.26.0-debian1_i386.deb
For 64bit Ubuntu:
wget http://www.rastersoft.com/descargas/cronopete/cronopete-zesty_3.26.0-ubuntu1_amd64.deb
For 32bit Ubuntu:
wget http://www.rastersoft.com/descargas/cronopete/cronopete-zesty_3.26.0-ubuntu1_i386.deb
Once downloaded the .DEB file, you can install it as shown below:
sudo apt-get install gdebi
sudo gdebi cronopete*.deb
On Fedora:
Download the RPM file given in the above link.
64bit:
wget http://www.rastersoft.com/descargas/cronopete/cronopete.fedora25-3.26.0-1.x86_64.rpm
32bit:
wget http://www.rastersoft.com/descargas/cronopete/cronopete.fedora25-3.26.0-1.i386.rpm
Then, install it using command:
sudo dnf install cronopete*.rpm

Cronopete Usage

Backup data
Once Cronopete installed, start it by typing the following command from the Terminal:
cronopete
At first launch, you will see the following screen:
cronopete
Click Configure now button. The following wizard will open.
anaCRONOPETE2
As you see in the above screenshot, there is no external drive plugged in to backup. Now, plug your external HDD or USB drive and click Change disk option.
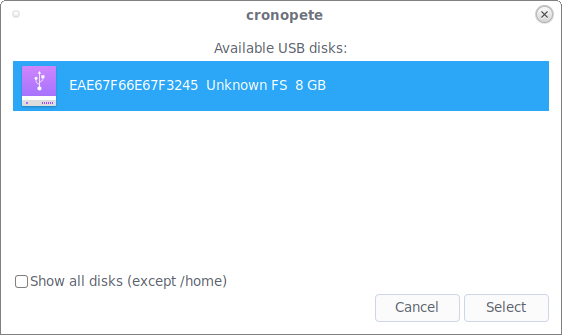
In the next screen, Cronopete will list the available disks. Choose your USB disk and click “Select” option.
cronopete3
Just repeat these steps to add another backup disk. For example, you might use one backup disk while at home, and another backup disk while at work.
Cronopete will format the selected disks to be used for backups. Click Format disk to continue.
cronopete4
Once the format process is completed, you will be redirected to main configuration section again. You will now notice that the USB disk for backups is available.
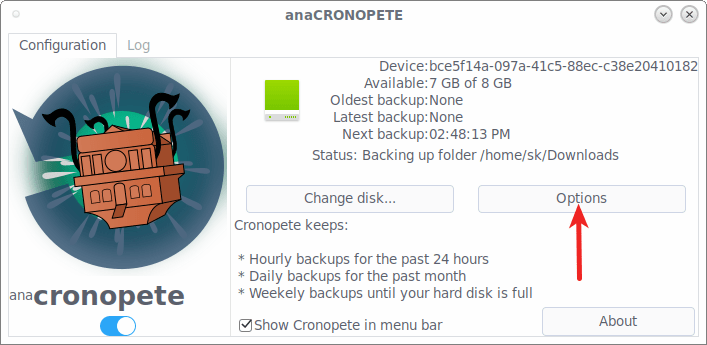
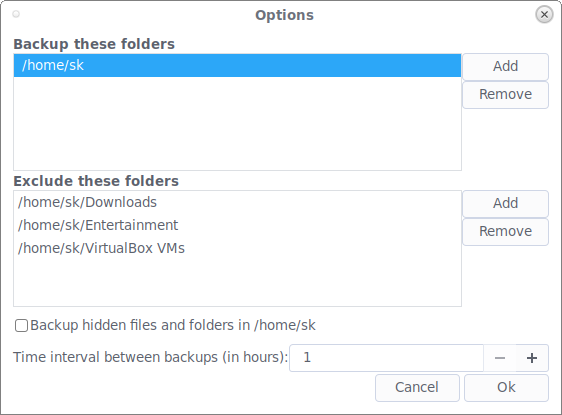
Once you have selected the backup disk, Cronopete will immediately start to backup your data. By default, it will backup the entire $HOME directory. You can define which folders or files should be backed up from the Options section. Choose Optionsto define the backup parameters.
anaCRONOPETE5
Choose what do you want to include or exclude in your backup. Also, you choose the time interval between backups in hours. Default value is 1 hour.
Cronopete-Options8
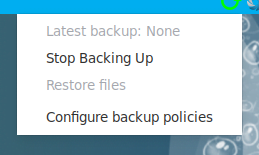
Once you launched Cronopete, you will it on your menu bar (task bar). You can define backup policies or stop the backup process by right clicking on the Cronopete icon in the menu bar.
Cronopete menu
Cronopete usually keeps:
  • Hourly backups for past 24 hours,
  • Daily backups for the past month,
  • Weekly backups until your hard disk is full.
Restore data
To restore the data, right click on the Cronopete icon on the menu bar. Choose Restore files.
cronopete restore
Select the folder or files you want to restore from your backup USB drive and click Restore files on the top left corner.
Cronopete restore1
The selected files or folders will be restored to location where you have originally selected them during backup.


And, that’s all. Hope this helps. I will be soon here with another useful guide. If you find this guide useful, please spend a moment to share it on your social and professional networks, so that everyone can benefit.
Cheers!
Resources: