Thursday, July 20, 2017

DSH – Run A Linux Command On Multiple Hosts At A Time

DSH – Run A Linux Command On Multiple Hosts At A Time

A while ago, we have written a guide that described how to run a single command on multiple remote systems at once using PSSH in Unix-like systems. Today, we are going to discuss about a similar tool called DSH. It stands for Distributed shell (or dancer’s shell). Using DSH, we can run a linux command on multiple hosts at a time. It is free and open source utility written using C programming language.

nstall DSH

On Arch Linux and derivatives:
DSH is available in AUR, so you can install it using AUR helpers such as Yaourt or Packer as shown below.
yaourt -S dsh
Or,
packer -S dsh
On Debian, Ubuntu:
DSH is available in the official repositories of Debian, Ubuntu and other DEB based systems such as Linux Mint, Elementary OS. To install it DSH in any DEB based system, run:
sudo apt-get install dsh
For other Linux distributions, DSH can be manually compiled and installed as described below.
DSH requires libdshconfig in order to work. You can download the latest version of libdshconfig and dsh from this link.
Once downloaded, go to the directory where you have downloaded both both packages.
First compile and install libdshconfig using commands:
tar xfz libdshconfig*.tar.gz
cd libdshconfig-*
./configure ; make
sudo make install
Then, compile and install dsh as well.
tar xfz dsh*.tar.gz
cd dsh-*
./configure ; make
sudo make install

Configure DSH

We have installed dsh. Let us now configure DSH to execute commands over multiple hosts. To do so, first edit DSH configuration file and set the remote shell value from rsh to ssh.
On Arch Linux and derivatives, the default configuration file is /etc/kgname/dsh.conf.
Edit this file:
sudo vi /etc/kgname/dsh.conf
Change remoteshell value from rsh to ssh.
#default configuration file for dsh.
 # suppled as part of dancer's shell

verbose = 0

remoteshell =ssh
 showmachinenames = 0
waitshell=1 # whether to wait for execution

#remoteshellopt=...

# default config file end.
On DEB based systems:
$ sudo vi /etc/dsh/dsh.conf

remoteshell =ssh
On RPM based systems:
$ sudo vi /usr/local/etc/dsh.conf

remoteshell =ssh
Next, we need to add the remote hosts where we want to execute the commands.
To do so, create/edit the machines.list file and add the remote hosts.
On Arch Linux and derivatives:
sudo vi /etc/kgname/machines.list
Add the remote host’s IP or Hostname one by one as shown below.
192.168.43.100 
192.168.43.101
On DEB based systems:
$ sudo vi /etc/dsh/machines.list
192.168.43.100 
192.168.43.101
On RPM based systems:
$ sudo vi /usr/local/etc/machines.list
192.168.43.100
192.168.43.101
You can add any number of remote hosts in the machines.list file.

Usage

Once you have added all remote hosts and created a common user on all your remote systems, you can execute the Linux command on all remote hosts at once. Say for example, the following command will execute the uname -r command on all remote hosts at once.
dsh -a -c uname -r
It will ask you to enter the username and password of the respective remote host. If you don’t want to enter the user credentials each time you run this command, just configure password-less SSH login.
Sample output:
3.10.0-514.16.1.el7.x86_64
4.4.0-34-generic
As you see in the above output, dsh utility displays the Kernel version of my two remote hosts.
For more details, refer the man page.
man dsh
And, that’s all for now folks. Hope this helps. If you find our guides useful, please take a moment to share them on your social and professional networks. We will be posting more useful guides in the days to come. Keep visiting!
Cheers!
Resource:

PSiTransfer – A Simple Open Source Self-hosted File Sharing Solution

PSiTransfer – A Simple Open Source Self-hosted File Sharing Solution

Today, we are about to discuss a similar tool called PSiTransfer, which is a simple and open source file sharing utility. Using PSiTransfer, we can either share our files locally or globally. Unlike transfer.sh, it is not a website. It is actually a self-hosted file sharing platform. You can deploy it on home system to share files over local area network. Or, you can deploy it on a VPS or Cloud, so that you can access or share your files from anywhere, using any Internet-enabled device. Since, it comes with built-in web server, you don’t need to deploy any other extra softwares. All you need is a web browser to access or share your stuffs.

Features

Concerning about features, we can list the following:
  • Upload single or multiple files at once
  • Upload very big files
  • Resume upload or download
  • Set an expire-time for your upload bucket
  • One-time downloads
  • Password protected download list
  • Free and Open Source
  • More yet to come.
In this brief guide, I will show you how to deploy a local file sharing solution using PSiTransfer in Unix-like operating systems.

Installing PSiTransfer

PSiTransfer requires Node >=7.4 or later version in order to function properly. To install Nodejs on your Linux box, refer the following guide.
Once Nodejs, installed, go to PSiTransfer download page, and download the latest version:
wget https://github.com/psi-4ward/psitransfer/releases/download/1.0.0-rc.1/psitransfer-1.0.0-rc.1.tar.gz
Extract it using command:
tar zxvf psitransfer-1.0.0-rc.1.tar.gz
It will extract all contents in a folder called psitransfer-1.0.0-rc.1 in your current working directory. Go to the folder:
cd psitransfer-1.0.0-rc.1
And, Install PSiTransfer using command:
NODE_ENV=production npm install
Finally, run the following command to start PSiTransfer:
npm start
Sample output:
> psitransfer@1.0.0 start /root/psitransfer-1.0.0-rc.1
> NODE_ENV=production node app.js

PsiTransfer listening on http://0.0.0.0:3000
Allow port no 3000 via your firewall or router in order to access the PSiTransfer dashboard from a remote system.
firewall-cmd --permanent --add-port=3000/tcp
Restart firewalld to apply the changes.
firewall-cmd --reload
If you use UFW firewall, then run the following command as sudo user to allow the port 3000.
ufw allow 3000

Usage

Open your web browser and navigate to http://IP-address:3000 or http://domain-name:3000.
This is how PSiTransfer web dashboard looks like
As you can see, PSiTransfer web interface is fairly simple to use. Click on the + (plus) sign to upload the files of your choice. Alternatively, just and drag and drop the files over the Files section. You can upload or multiple files at once. Also, you can upload any size file.
Once the files has been selected, choose the retention period in the Settings section.
Retention period has many options, such as,
  • 1 hour
  • 6 hours
  • 1 day
  • 3 days
  • 1 week
  • 2 weeks
  • 4 weeks
  • 8 weeks
  • one time download
The uploaded files will be kept in the Server depending upon the retention period you chose.
Also, you can set the password to the uploaded files. It will add a bit security to the shared files. The users should enter the password in order to unlock and download the shared files.
Finally, click Upload button to upload your files to your server.
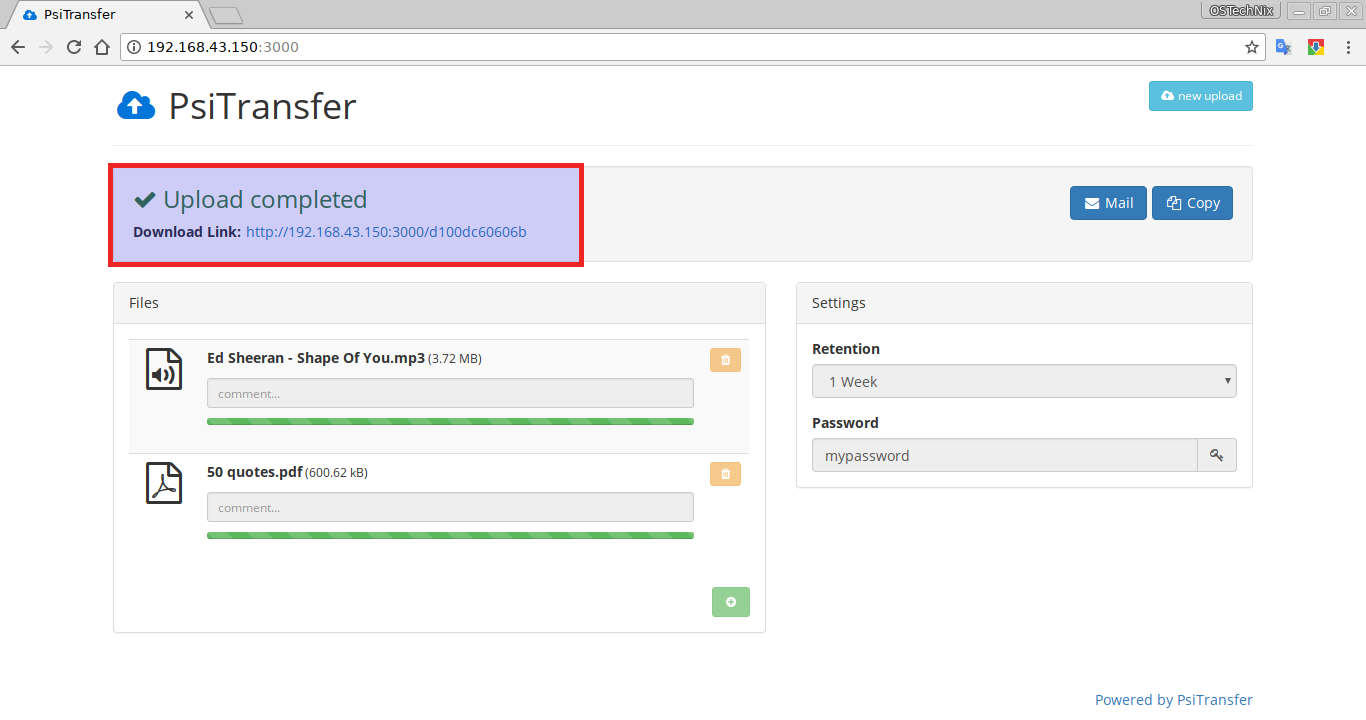
Now, you will get the download link of the uploaded files. You can pass it on to your friends, colleagues or whoever wants to download and use your stuff.
Also, you can mail the download link from the PSiTransfer dashboard itself or just copy/paste it to your mail ID or any other preferred medium (Whatsapp, messenger)  and send it to your recipients.
Once the recipients click the Download link, they will be asked to enter the password to unlock the download link.
If they entered the correct password, they can have the download links for all shared files.
Very simple, isn’t it? You don’t need to be a Linux ninja to deploy a file sharing server. Any one can setup a simple file sharing environment within few minutes using PSiTransfer.
And, that’s all. I hope this helps. We will be posting simple and useful guides every day. Subscribe to our Newsletter and follow our social media links to get updates as soon as possible. If you find our guides useful, please share them on your social, professional networks and support OSTechNix.
Cheers!
Resource:

How To Install Node.js On Linux

How To Install Node.js On Linux

Node.js is an open source, cross-platform, and lightweight JavaScript run-time environment that is used to build scalable network applications. It is fast and efficient server-side software built on Chrome’s V8 JavaScript engine. As you may already know, initially, JavaScript was primarily used for client-side scripting. But, Node.js enables JavaScript to be used for server-side scripting, and runs scripts server-side to produce dynamic web pages. Another notable thing is Node.js has a command-line utility called npm, a package manager to install, manage nodejs libraries and applications. Node.js’ package ecosystem is the largest ecosystem of open source libraries in the world.

In this tutorial, we will see how to install Node.js on major Linux operating systems including Arch Linux, Debian, Ubuntu, RHEL, CentOS, Fedora etc.

Install Nodejs on Linux

There are quite a few ways to install Nodejs. I will explain all of them.

Install Nodejs using your distribution’s package manager

Node.js is available in the default repositories of most Linux distributions. It might not be latest version, but stable. If you want to have a stable Node.js on your Linux, you better install it using your distribution’s package manager as shown below.
On Arch Linux and its derivatives like Antergos, Manajaro Linux, run the following command to install it:
sudo pacman -S nodejs npm
On Debian, Ubuntu, Linux Mint:
sudo apt-get install nodejs npm
On RHEL, CentOS, you need to enable EPEL repository first.
sudo yum install epel-release
And, then install Nodejs using command:
sudo yum install nodejs npm
On Fedora:
sudo dnf install nodejs npm

Install Nodejs from NodeSource

Even though, nodejs is available in the default repositories, it might be bit outdated. To use the most recent version, install the latest version from NodeSource as shown below.
On Debian, Ubuntu distributions:
Add Nodejs 6.x repository:
curl -sL https://deb.nodesource.com/setup_6.x | sudo -E bash -
For Nodejs 7.x:
curl -sL https://deb.nodesource.com/setup_7.x | sudo -E bash -
Then, install Node.js using command:
sudo apt-get install nodejs npm
On RHEL, CentOS:
Run the following command as root user to add Node.js v6 LTS repository:
curl --silent --location https://rpm.nodesource.com/setup_6.x | bash -
To add Node.js v7 repository:
curl --silent --location https://rpm.nodesource.com/setup_7.x | bash -
To add Node.js 0.10 repository:
curl --silent --location https://rpm.nodesource.com/setup | bash -
Then install, as root:
yum install nodejs npm
For Fedora, follow the same instructions above.
Install build tools (Optional)
To compile and install native addons from npm repository, you may also need to install build tools.
To install build tools on Debian, Ubuntu distributions, run the following command:
sudo apt-get install -y build-essential
On RHEL based systems:
sudo yum groupinstall 'Development Tools'
On Fedora:
sudo dnf groupinstall 'Development Tools'

Install Nodejs using NVM

Alternatively, you can install Nodejs using NVM (Node Version Manager). It is a bash script used to manage multiple released Node.js versions. Using NVM, you can install any available Node.js version of your choice. NVM allows us to install, uninstall node.js, and switch from one version to another.
To install nvm, run the following command as root user:
curl -o- https://raw.githubusercontent.com/creationix/nvm/v0.33.2/install.sh | bash
The above command will clone the nvm repository to ~/.nvm and add the source line to your profile (~/.bash_profile, ~/.zshrc, ~/.profile, or ~/.bashrc).
Then, source the .bash_profile as root user:
source ~/.bash_profile
NVM has been installed now. To verify whether NVM is installed or not, run:
command -v nvm
Sample output:
nvm
It should output ‘nvm’ if the installation was successful.
Now, we can install Nodejs and npm.
First, run the following command to view the list of available Nodejs versions:
nvm ls-remote
Sample output:
 [...]
 v7.0.0
 v7.1.0
 v7.2.0
 v7.2.1
 v7.3.0
 v7.4.0
 v7.5.0
 v7.6.0
 v7.7.0
 v7.7.1
 v7.7.2
 v7.7.3
 v7.7.4
 v7.8.0
 v7.9.0
To install the most recent Nodejs version, just run:
nvm install node
Alternatively, you can run the following to install any Nodejs version of your choice.
For example, to install Nodejs v7.9.0, run:
nvm install v7.9.0
Sample output:
Downloading and installing node v7.9.0...
Downloading https://nodejs.org/dist/v7.9.0/node-v7.9.0-linux-x64.tar.xz...
######################################################################## 100.0%
Computing checksum with sha256sum
Checksums matched!
Now using node v7.9.0 (npm v4.2.0)
Creating default alias: default -> v7.9.0
Similarly, you can install any number of versions you want.
To view the list of installed Nodejs versions, run:
nvm list
Sample output:
-> v7.8.0
 v7.9.0
default -> v7.9.0
node -> stable (-> v7.9.0) (default)
stable -> 7.9 (-> v7.9.0) (default)
iojs -> N/A (default)
lts/* -> lts/boron (-> N/A)
lts/argon -> v4.8.2 (-> N/A)
lts/boron -> v6.10.2 (-> N/A)
As you see in the above output, I have installed two versions v7.8.0 and v7.9.0. And, v7.9.0 is the default version, and v7.8.0 is the currently active version.
You can also switch between different Nodejs versions as below.
nvm use node
Or you can just run it to be more specific:
nvm run node v7.9.0
To set a particular Nodejs version as the default, run:
nvm alias default v7.9.0
Sample output would be:
default -> v7.9.0
To remove the particular Nodejs version, run:
nvm uninstall v7.9.0
Sample output:
Uninstalled node v7.9.0
To view the currently installed and default Nodejs version, run:
node --version
Or,
node -v
Sample output:
v7.8.0
Check npm version:
npm -v
Sample output:
4.2.0

And, that’s all. You know now how to install Nodejs on your Linux distribution. As you can see, installing Nodejs is fairly easy. Anyone can install and setup the Nodejs within few minutes.
Cheers!
Resources: