Showing posts with label Gluster File System - GFS. Show all posts

Thursday, April 6, 2017

LVM - How to add an extra second hard drive on Linux LVM and increase the size of storage

How to add an extra second hard drive on Linux LVM and increase the size of storage


have 250GB disk installed on my home Linux server. I just bought a brand new 250GB SATA disk and I want to add a new disk to my existing LVM volume to increase its size total size to 500GB. How do I add a disk to LVM and extend an LVM volume on Linux operating system?

Linux volume management (LVM) creates an easy to use layer over physical disks. You can combine multiple disks and create logical storage volumes. This provides specific benefits such as:

  1. No restriction on disk size
  2. Increased disk throughput
  3. Mirroring volumes for business critical data
  4. Volume snapshots
  5. Easy backups and restores using snapshots
  6. Easy data relocation
  7. Resizing storage pools (add or remove disks) without reformatting disks
This tutorial shows you how to make partitioning, formatting, and add a new disk to LVM volume on Linux. For demo purpose, I am using Ubuntu VM, but the commands remain same for bare metal or any other virtualization technology such as KVM, Xen, VMware and so on.
Warning: Be careful with lvm/mkfs.ext4 and other commands, and device names as wrong device name can wipe out all data. Proceed with caution and always keep full backups.

Step 1 – Find out information about existing LVM

LVM Storage Management divided into three parts:
  1. Physical Volumes (PV) – Actual disks (e.g. /dev/sda, /dev,sdb, /dev/vdb and so on)
  2. Volume Groups (VG) – Physical volumes are combined into volume groups. (e.g. my_vg = /dev/sda + /dev/sdb.)
  3. Logical Volumes (LV) – A volume group is divided up into logical volumes (e.g. my_vg divided into my_vg/data, my_vg/backups, my_vg/home, my_vg/mysqldb and so on)
Type the following commands to find out information about each part.

How to display physical volumes (pv)

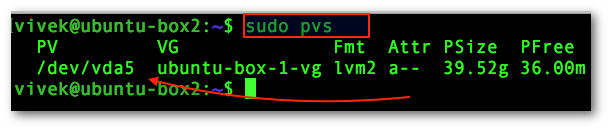
Type the following pvs command to see info about physical volumes:
$ sudo pvs
Sample outputs:
Fig.01: How to display information about LVM physical volumes

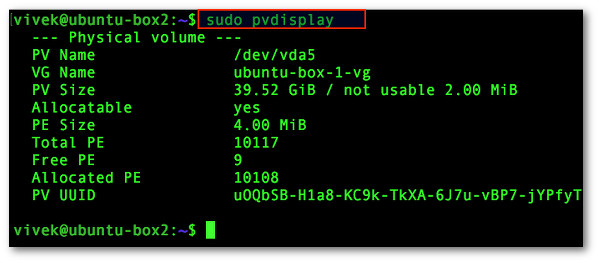
So currently my LVM include a physical volume (actual disk) called /dev/vda5. To see detailed attributes information, type:
$ sudo pvdisplay
Sample outputs:
Fig.02: See attributes of a physical volume (PV)

From above output it is clear that our volume group named ubuntu-box-1-vg is made of a physical volume named /dev/vda5.

How to display information about LVM volume Groups (vg)

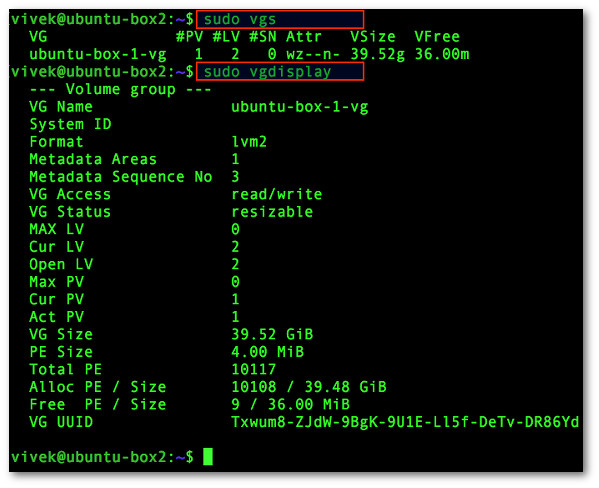
Type any one of the following vgs command/vgdisplay command to see information about volume groups and its attributes:
$ sudo vgs
OR
$ sudo vgdisplay
Sample outputs:
Fig.03: How to see information about LVM volume groups (vg)

How to display information about LVM logical volume (lv)

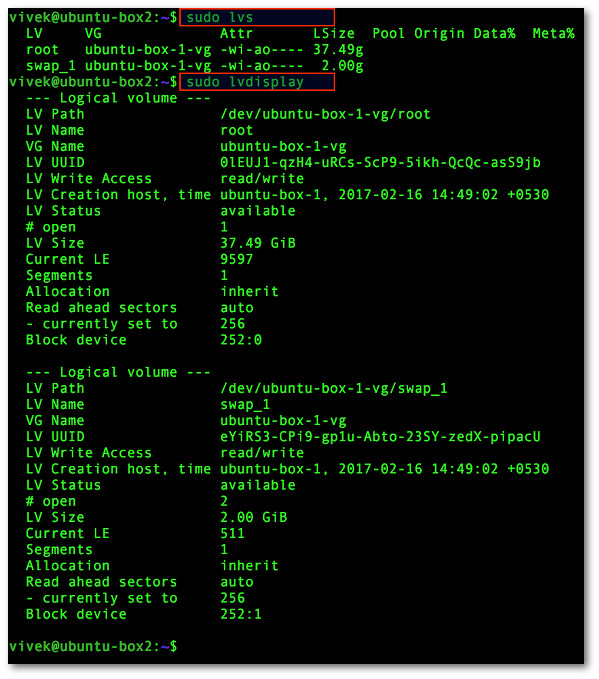
Type any one of the following lvs command/lvdisplay command to see information about volume groups and its attributes:
$ sudo lvs
OR
$ sudo lvdisplay
Sample outputs:
Fig.04: How to display information about logical volumes (lv)

My ubuntu-box-1-vg volume group divided into two logical volumes:
  1. /dev/ubuntu-box-1-vg/root – Root file system
  2. /dev/ubuntu-box-1-vg/swap_1 – Swap space
Based upon above commands, you can get a basic idea how LVM organizes storage device into Physical Volumes (PV), Volume Groups (VG), and Logical Volumes (LV):
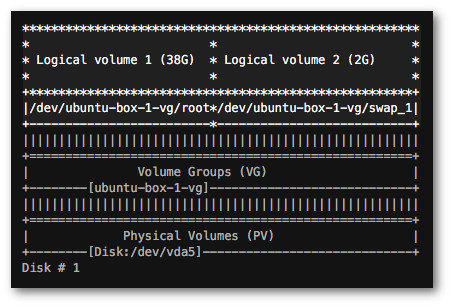
Fig.05: How LVM organizes storage device into Physical Volumes (PV), Volume Groups (VG), & Logical Volumes (LV)

Step 2 – Find out information about new disk

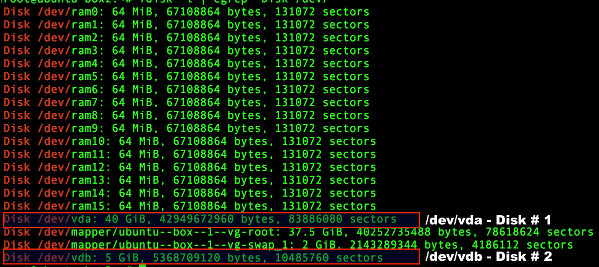
You need to add a new disk to your server. In this example, for demo purpose I added a new disk drive, and it has 5GiB size. To find out information about new disks run:
$ sudo fdisk -l
OR
$ sudo fdisk -l | grep '^Disk /dev/'
Sample outputs:
Fig.06: Find out installed disk names on Linux

Another option is to scan for all devices visible to LVM2:
$ sudo lvmdiskscan
Sample outputs:
  /dev/ram0                   [      64.00 MiB] 
  /dev/ubuntu-box-1-vg/root   [      37.49 GiB] 
  /dev/ram1                   [      64.00 MiB] 
  /dev/ubuntu-box-1-vg/swap_1 [       2.00 GiB] 
  /dev/vda1                   [     487.00 MiB] 
  /dev/ram2                   [      64.00 MiB] 
  /dev/ram3                   [      64.00 MiB] 
  /dev/ram4                   [      64.00 MiB] 
  /dev/ram5                   [      64.00 MiB] 
  /dev/vda5                   [      39.52 GiB] LVM physical volume
  /dev/ram6                   [      64.00 MiB] 
  /dev/ram7                   [      64.00 MiB] 
  /dev/ram8                   [      64.00 MiB] 
  /dev/ram9                   [      64.00 MiB] 
  /dev/ram10                  [      64.00 MiB] 
  /dev/ram11                  [      64.00 MiB] 
  /dev/ram12                  [      64.00 MiB] 
  /dev/ram13                  [      64.00 MiB] 
  /dev/ram14                  [      64.00 MiB] 
  /dev/ram15                  [      64.00 MiB] 
  /dev/vdb                    [       5.00 GiB] 
  2 disks
  18 partitions
  0 LVM physical volume whole disks
  1 LVM physical volume

Step 3 – Create physical volumes (pv) on new disk named /dev/vdb

Type the following command:
$ sudo pvcreate /dev/vdb
Sample outputs:
  Physical volume "/dev/vdb" successfully created
Now run the following command to verify:
$ sudo lvmdiskscan -l
Sample outputs:
  WARNING: only considering LVM devices
  /dev/vda5                   [      39.52 GiB] LVM physical volume
  /dev/vdb                    [       5.00 GiB] LVM physical volume
  1 LVM physical volume whole disk
  1 LVM physical volume

Step 4 – Add newly created pv named /dev/vdb to an existing lv

Type the following command to add a physical volume /dev/vdb to “ubuntu-box-1-vg” volume group:
$ sudo vgextend ubuntu-box-1-vg /dev/vdb
Sample outputs:
  Volume group "ubuntu-box-1-vg" successfully extended
Finally, you need extend the /dev/ubuntu-box-1-vg/root to create total 45GB (/dev/vdb (5G)+ existing /dev/ubuntu-box-1-vg/root (40G))
$ sudo lvm lvextend -l +100%FREE /dev/ubuntu-box-1-vg/root
Sample outputs:
  Size of logical volume ubuntu-box-1-vg/root changed from 37.49 GiB (9597 extents) to 42.52 GiB (10885 extents).
  Logical volume root successfully resized.
However, if you run df -h or any other command you will still see /dev/ubuntu-box-1-vg/root as 40G. You need to run the following command to enlarge the filesystem created inside the “root” volume:
$ sudo resize2fs -p /dev/mapper/ubuntu--box--1--vg-root
Sample outputs:
resize2fs 1.42.13 (17-May-2015)
Filesystem at /dev/mapper/ubuntu--box--1--vg-root is mounted on /; on-line resizing required
old_desc_blocks = 3, new_desc_blocks = 3
The filesystem on /dev/mapper/ubuntu--box--1--vg-root is now 11146240 (4k) blocks long.
Verify it:
$ df -H
Sample outputs:
Filesystem                           Size  Used Avail Use% Mounted on
udev                                 1.1G     0  1.1G   0% /dev
tmpfs                                146M   12M  135M   9% /run
/dev/mapper/ubuntu--box--1--vg-root   45G  2.3G   41G   6% /
tmpfs                                512M     0  512M   0% /dev/shm
tmpfs                                5.3M     0  5.3M   0% /run/lock
tmpfs                                512M     0  512M   0% /sys/fs/cgroup
/dev/vda1                            495M  109M  361M  24% /boot
tmpfs                                103M     0  103M   0% /run/user/0

Adding Swap Space - RHEL/CentOS

You have two options: add a swap partition or add a swap file. It is recommended that you add a swap partition, but that can be difficult if you do not have any free space available.

Adding Swap Partition: 

To add a swap partition (assuming /dev/hdb2 is the swap partition you want to add):
  1. The hard drive can not be in use (partitions can not be mounted, and swap space can not be enabled). The partition table should not be modified while in use because the kernel may not properly recognize the changes. Data could be overwitten by writing to the wrong partition because the partition table and partitions mounted do not match. The easiest way to achieve this is to boot your system in rescue mode. Refer to Chapter 11 Basic System Recovery for instructions on booting into rescue mode. When prompted to mount the file system, select Skip.
    Alternately, if the drive does not contain any partitions in use, you can unmount them and turn off all the swap space on the hard drive with the swapoff command.
  2. Create the swap partition using parted:
    • At a shell prompt as root, type the command parted /dev/hdb, where /dev/hdb is the device name for the hard drive with free space.
    • At the (parted) prompt, type print to view the existing partitions and the amount of free space. The start and end values are in megabytes. Determine how much free space is on the hard drive and how much you want to allocate for a new swap partition.
    • At the (parted) prompt, type mkpartfs part-type linux-swap start end, where part-type is one of primary, extended, or logical, start is the starting point of the partition, and end is the end point of the partition.
      WarningWarning
      Changes take place immediately; be careful when you type.
    • Exit parted by typing quit.
  3. Now that you have created the swap partition, use the command mkswap to setup the swap partition. At a shell prompt as root, type the following:
    mkswap /dev/hdb2
  4. To enable the swap partition immediately, type the following command:
    swapon /dev/hdb2
  5. To enable it at boot time, edit /etc/fstab to include:
    /dev/hdb2               swap                    swap    defaults        0 0
    The next time the system boots, it enables the new swap partition.
  6. After adding the new swap partition and enabling it, verify it is enabled by viewing the output of the command cat /proc/swaps or free.
Adding SWAP File: 
To add a swap file:
  1. Determine the size of the new swap file in megabytes and multiple by 1024 to determine the block size. For example, the block size of a 64 MB swap file is 65536.
  2. At a shell prompt as root, type the following command with count being equal to the desired block size:
    dd if=/dev/zero of=/swapfile bs=1024 count=65536
  3. Setup the swap file with the command:
    mkswap /swapfile
  4. To enable the swap file immediately but not automatically at boot time:
    swapon /swapfile
  5. To enable it at boot time, edit /etc/fstab to include:
    /swapfile               swap                    swap    defaults        0 0
    The next time the system boots, it enables the new swap file.
  6. After adding the new swap file and enabling it, verify it is enabled by viewing the output of the command cat /proc/swaps or free.


Monday, October 24, 2016

[CentOS - iSCSI Server / Client]: iSCSI Server installation Providing Remote block storage

iSCSI Server installation Providing Remote block storage

iSCSI Server installation and configuration RHEL7 Providing Remote Block Storage
iSCSI means Internet Small SCSI System Interface, We will use iSCSI connectivity because it is cost effective compare to FC connection. Fibre Connection required separate Hardware such as like FC switch (SAN Switch) FC switch is more cost compare to normal network switch. To provide iSCSI based storage we do not required any extra environment because we can make use of existing Network switches. Let’s see how this technology is going to work for us iscsi server installation and configuration RHEL 7 providing remote block storage.
We have different types of storage’s such as
  1. DAS – Directly attache storage
  2. NAS – Network Attached Storage
  3. SAN – Storage Area Network
iSCSI protocol comes under SAN (Storage Area Network) To allocate remote block storage to clients below are the steps we have to follow
  1. Create one Partition
  2. Create LVM using that partition (Don’t format)
  3. Install iSCSI Utilities if not available
  4. Create LUN and Map to iSCSI client
  5. iSCSI server = Target. iSCSI Client = Initiator.
Let’s see below is the process of creating and mapping the iSCSI LUN from iSCSI server to Client.
Environment
Server IP =192.168.4.27
Client IP = 192.168.4.13
By Installing and configuring this iSCSI Server, We are Turing Linux box as SAN.  

Creating Partition

Here i have new HDD called /dev/sdb 10GB with no partitions
[root@iSCSIServer ~]# fdisk -l /dev/sdb

Disk /dev/sdb: 10.7 GB, 10737418240 bytes, 20971520 sectors
Units = sectors of 1 * 512 = 512 bytes
Sector size (logical/physical): 512 bytes / 512 bytes
I/O size (minimum/optimal): 512 bytes / 512 bytes
Disk label type: dos
Disk identifier: 0xea9e3f19

Device Boot Start End Blocks Id System
Standard partition creation and converting standard to LVM
[root@iSCSIServer ~]# fdisk /dev/sdb
Welcome to fdisk (util-linux 2.23.2).

Changes will remain in memory only, until you decide to write them.
Be careful before using the write command.


Command (m for help): n
Partition type:
 p primary (0 primary, 0 extended, 4 free)
 e extended
Select (default p):↵
Using default response p
Partition number (1-4, default 1):↵
First sector (2048-20971519, default 2048): ↵
Using default value 2048
Last sector, +sectors or +size{K,M,G} (2048-20971519, default 20971519): +2G
Partition 1 of type Linux and of size 2 GiB is set

Command (m for help): p

Disk /dev/sdb: 10.7 GB, 10737418240 bytes, 20971520 sectors
Units = sectors of 1 * 512 = 512 bytes
Sector size (logical/physical): 512 bytes / 512 bytes
I/O size (minimum/optimal): 512 bytes / 512 bytes
Disk label type: dos
Disk identifier: 0xea9e3f19

Device Boot Start End Blocks Id System
/dev/sdb1 2048 4196351 2097152 83 Linux

Command (m for help): t
Selected partition 1
Hex code (type L to list all codes): 8e
Changed type of partition 'Linux' to 'Linux LVM'

Command (m for help): p

Disk /dev/sdb: 10.7 GB, 10737418240 bytes, 20971520 sectors
Units = sectors of 1 * 512 = 512 bytes
Sector size (logical/physical): 512 bytes / 512 bytes
I/O size (minimum/optimal): 512 bytes / 512 bytes
Disk label type: dos
Disk identifier: 0xea9e3f19

Device Boot Start End Blocks Id System
/dev/sdb1 2048 4196351 2097152 8e Linux LVM

Command (m for help): wq
The partition table has been altered!

Calling ioctl() to re-read partition table.
Syncing disks.
Update to Kernel when we create new partition, partition table should be up-to date other wise partition will not be listed, use below command to update
[root@iSCSIServer ~]# partprobe /dev/sdb
Creating Physical Volume, Volume Group and Logical Volume
[root@iSCSIServer ~]# pvcreate /dev/sdb1
 Physical volume "/dev/sdb1" successfully created

[root@iSCSIServer ~]# vgcreate VG0 /dev/sdb1
 Volume group "VG0" successfully created
[root@iSCSIServer ~]# vgs
 VG #PV #LV #SN Attr VSize VFree
 VG0 1 0 0 wz--n- 2.00g 2.00g
 rhel 1 2 0 wz--n- 39.51g 44.00m

[root@iSCSIServer ~]# lvcreate -l 100%FREE -n iscsilv VG0
WARNING: ext4 signature detected on /dev/VG0/iscsilv at offset 1080. Wipe it? [y/n]: y
 Wiping ext4 signature on /dev/VG0/iscsilv.
 Logical volume "iscsilv" created.

iSCSI Server Installation Providing Remote block storage

As per above output we just created Logical Volume but we did no formatted, Means we did not created any file system in it.
[root@iSCSIServer ~]# yum install targetcli*

Installed:
 targetcli.noarch 0:2.1.fb37-3.el7

Dependency Installed:
 pyparsing.noarch 0:1.5.6-9.el7 python-configshell.noarch 1:1.1.fb14-1.el7 python-kmod.x86_64 0:0.9-4.el7 python-rtslib.noarch 0:2.1.fb50-1.el7 python-urwid.x86_64 0:1.1.1-3.el7

Complete!
Targetcli is the command to enter into iscsi console
targetcli command
targetcli command
Create Storage Object and Create IQN (iSCSI Qualified Name) to map LUN. This IQN we should take from iSCSI client machine, either we can create our own.
/> /backstores/block create LUN /dev/VG0/iscsilv

/> /iscsi create iqn.2017-03.com.arkit:iSCSIClient1
Creating Storage Object

Go to iSCSI Client Side

Client side we have to install iscsi utilities to connect iscsi server. 
Install iscsi-initiator-utils-iscsiuio-6.2.0.873-29.el7.x86_64 rpm in iSCSI client
[root@iSCSIClient ~]# yum install iscsi*
Get IQN number from Client machine and add to server for mapping disk from server.
[root@iSCSIClient ~]# cat /etc/iscsi/initiatorname.iscsi
InitiatorName=iqn.1994-05.com.redhat:ba1abe3b1a4
Enable and Start iscsid service
[root@iSCSIClient ~]# systemctl enable iscsid.service
ln -s '/usr/lib/systemd/system/iscsid.service' '/etc/systemd/system/multi-user.target.wants/iscsid.service'
[root@iSCSIClient ~]# systemctl start iscsid.service

[root@iSCSIClient ~]# systemctl status iscsid.service
iscsid.service - Open-iSCSI
 Loaded: loaded (/usr/lib/systemd/system/iscsid.service; enabled)
 Active: active (running) since Sun 2016-10-23 19:19:49 IST; 11s ago
 Docs: man:iscsid(8)
 man:iscsiadm(8)
 Process: 4144 ExecStart=/usr/sbin/iscsid (code=exited, status=0/SUCCESS)
 Main PID: 4146 (iscsid)
 CGroup: /system.slice/iscsid.service
 ├─4145 /usr/sbin/iscsid
 └─4146 /usr/sbin/iscsid

Oct 23 19:19:49 iSCSIClient iscsid[4145]: iSCSI daemon with pid=4146 started!
Oct 23 19:19:49 iSCSIClient systemd[1]: Started Open-iSCSI.

Come Back to iSCSI Server side

Now add client IQN in server so that we can map LUN
/> /iscsi create iqn.1994-05.com.redhat:ba1abe3b1a4
Created target iqn.1994-05.com.redhat:ba1abe3b1a4.
Created TPG 1.
Global pref auto_add_default_portal=true
Created default portal listening on all IPs (0.0.0.0), port 3260.
/> /iscsi/iqn.1994-05.com.redhat:ba1abe3b1a4/tpg1/acls create iqn.1994-05.com.redhat:ba1abe3b1a4
Created Node ACL for iqn.1994-05.com.redhat:ba1abe3b1a4
Create New LUN using existing LVM and map to client
/> /iscsi/iqn.1994-05.com.redhat:ba1abe3b1a4/tpg1/luns create /backstores/block/LUN
Created LUN 0.
Created LUN 0->0 mapping in node ACL iqn.1994-05.com.redhat:ba1abe3b1a4
Portal Creation in Server to map
/> /iscsi/iqn.1994-05.com.redhat:ba1abe3b1a4/tpg1/portals create 192.168.4.14
Using default IP port 3260
Could not create NetworkPortal in configFS.
If your able to see above error while creating portal then do delete default port 0.0.0.0 then create new
/> /iscsi/iqn.2017-03.com.arkit:iscsiclient1/tpg1/portals delete 0.0.0.0 ip_port=3260
Deleted network portal 0.0.0.0:3260
/> /iscsi/iqn.1994-05.com.redhat:ba1abe3b1a4/tpg1/portals create 192.168.4.14
Using default IP port 3260
Created network portal 192.168.4.14:3260.
Save the configuration 
/> saveconfig
Last 10 configs saved in /etc/target/backup.
Configuration saved to /etc/target/saveconfig.json
Exit from the Console
/> exit
Global pref auto_save_on_exit=true
Last 10 configs saved in /etc/target/backup.
Configuration saved to /etc/target/saveconfig.json

Allow Firewall Port to communicate with iSCSI Client

3260 iscsi default port 
[root@iSCSIServer ~]# firewall-cmd --permanent --add-port=3260/tcp
success
[root@iSCSIServer ~]# firewall-cmd --permanent --add-port=3260/udp
success
[root@iSCSIServer ~]# firewall-cmd --reload
success

Client Side to connect iSCSI LUN

[root@desktop4 ~]# iscsiadm -m discovery -t st -p 192.168.4.27
192.168.4.27:3260,1 iqn.1994-05.com.redhat:ba1abe3b1a4

[root@desktop4 ~]# iscsiadm -m node -T iqn.1994-05.com.redhat:ba1abe3b1a4 -p 192.168.4.27 -l
Logging in to [iface: default, target: iqn.1994-05.com.redhat:ba1abe3b1a4, portal: 192.168.4.27,3260] (multiple)
Login to [iface: default, target: iqn.1994-05.com.redhat:ba1abe3b1a4, portal: 192.168.4.27,3260] successful.
After successful mapping of LUN now you can create file system on LUN, To Create file system repeat Step 1 (Creating Partition)
[root@iSCSIClient ~]# partprobe /dev/sda
[root@iSCSIClient ~]# mkfs.ext4 /dev/sda1
mke2fs 1.42.9 (28-Dec-2013)
Filesystem label=
OS type: Linux
Block size=4096 (log=2)
Fragment size=4096 (log=2)
Stride=0 blocks, Stripe width=1024 blocks
327680 inodes, 1308672 blocks
65433 blocks (5.00%) reserved for the super user
First data block=0
Maximum filesystem blocks=1340080128
40 block groups
32768 blocks per group, 32768 fragments per group
8192 inodes per group
Superblock backups stored on blocks: 
 32768, 98304, 163840, 229376, 294912, 819200, 884736

Allocating group tables: done 
Writing inode tables: done 
Creating journal (32768 blocks): done
Writing superblocks and filesystem accounting information: done

[root@iSCSIClient ~]# mkdir /ravi


[root@iSCSIClient ~]# vim /etc/fstab 
[root@iSCSIClient ~]# cat /etc/fstab |grep sda
/dev/sda1 /ravi ext4 _netdev 0 0
[root@iSCSIClient ~]# mount -a
[root@iSCSIClient ~]# df -h |grep ravi
/dev/sda1 2.0G 20M 2.0G 1% /ravi
Enjoy…………….

Friday, May 15, 2015

[Quick Information]: Introduction to GlusterFS (File System) and Installation on RHEL/CentOS and Fedora

Introduction to GlusterFS (File System) and Installation on RHEL/CentOS and Fedora

We are living in a world where data is growing in an unpredictable way and it our need to store this data, whether it is structured or unstructured, in an efficient manner. Distributed computing systems offer a wide array of advantages over centralized computing systems. Here data is stored in a distributed way with several nodes as servers.
GlusterFS Storage
GlusterFS Storage
The concept of a metadata server is no longer needed in a distributed file system. In distributed file systems, it offers a common view point of all the files separated among different servers. Files/directories on these storage servers are accessed in normal ways.
For example, the permissions for files/directories can be set as in usual system permission model, i.e. the owner, group and others. The access to the file system basically depends on how the particular protocol is designed to work on the same.

What is GlusterFS?

GlusterFS is a distributed file system defined to be used in user space, i.e. File System in User Space (FUSE). It is a software based file system which accounts to its own flexibility feature.
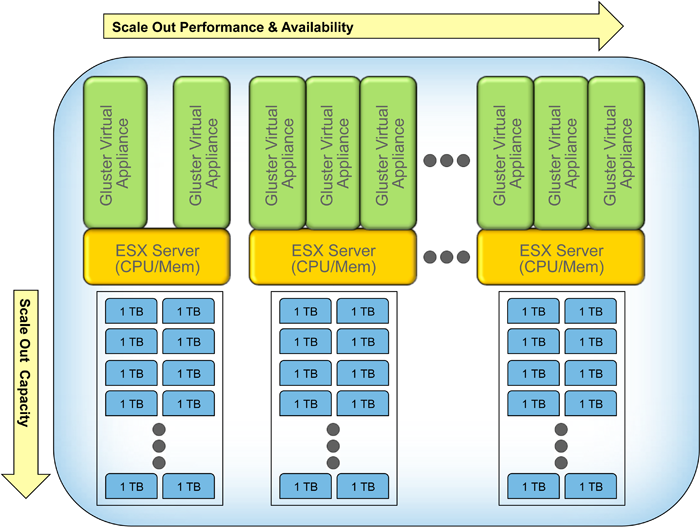
Look at the following figure which schematically represents the position of GlusterFS in a hierarchical model. By default TCP protocol will be used by GlusterFS.
GlusterFS Design
GlusterFS Design

Advantages to GlusterFS

  1. Innovation – It eliminates the metadata and can dramtically improve the performance which will help us to unify data and objects.
  2. Elasticity – Adapted to growth and reduction of size of the data.
  3. Scale Linearly – It has availability to petabytes and beyond.
  4. Simplicity – It is easy to manage and independent from kernel while running in user space.

What makes Gluster outstanding among other distributed file systems?

  1. Salable – Absence of a metadata server provides a faster file system.
  2. Affordable – It deploys on commodity hardware.
  3. Flexible – As I said earlier, GlusterFS is a software only file system. Here data is stored on native file systems like ext4, xfs etc.
  4. Open Source – Currently GlusterFS is maintained by Red Hat Inc, a billion dollar open source company, as part of Red Hat Storage.

Storage concepts in GlusterFS

  1. Brick – Brick is basically any directory that is meant to be shared among the trusted storage pool.
  2. Trusted Storage Pool – is a collection of these shared files/directories, which are based on the designed protocol.
  3. Block Storage – They are devices through which the data is being moved across systems in the form of blocks.
  4. Cluster – In Red Hat Storage, both cluster and trusted storage pool convey the same meaning of collaboration of storage servers based on a defined protocol.
  5. Distributed File System – A file system in which data is spread over different nodes where users can access the file without knowing the actual location of the file. User doesn’t experience the feel of remote access.
  6. FUSE – It is a loadable kernel module which allows users to create file systems above kernel without involving any of the kernel code.
  7. glusterd – glusterd is the GlusterFS management daemon which is the backbone of file system which will be running throughout the whole time whenever the servers are in active state.
  8. POSIX – Portable Operating System Interface (POSIX) is the family of standards defined by the IEEE as a solution to the compatibility between Unix-variants in the form of an Application Programmable Interface (API).
  9. RAID – Redundant Array of Independent Disks (RAID) is a technology that gives increased storage reliability through redundancy.
  10. Subvolume – A brick after being processed by least at one translator.
  11. Translator – A translator is that piece of code which performs the basic actions initiated by the user from the mount point. It connects one or more sub volumes.
  12. Volume – A volumes is a logical collection of bricks. All the operations are based on the different types of volumes created by the user.
Different Types of Volumes
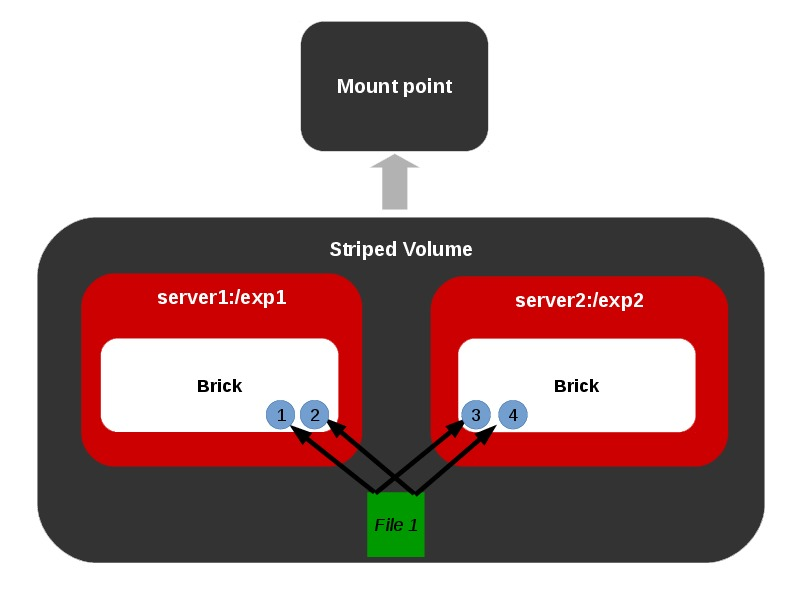
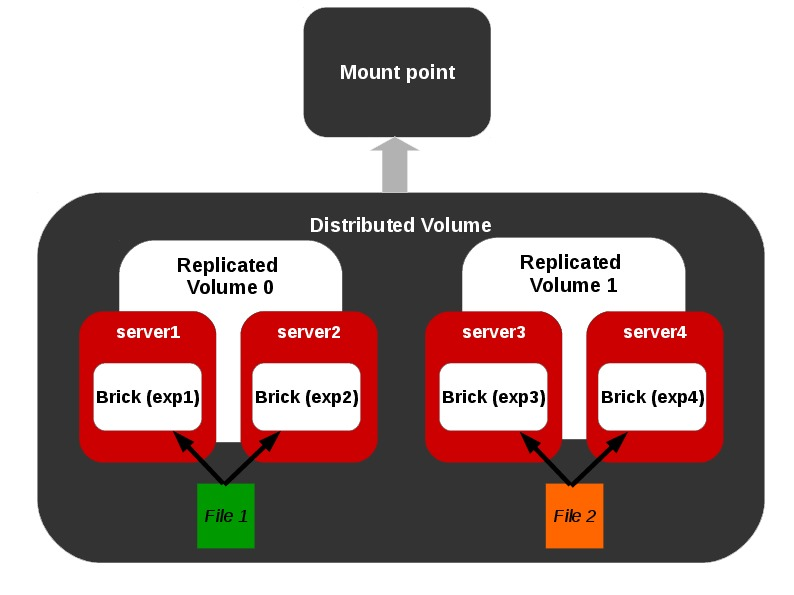
Representations of different types of volumes and combinations among these basic volume types are also allowed as shown below.
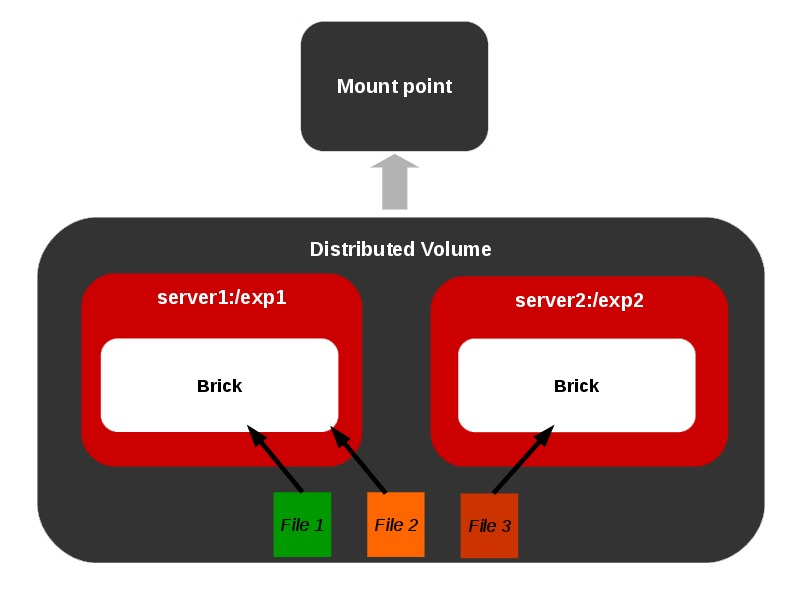
Distributed Volume
Distributed Volume
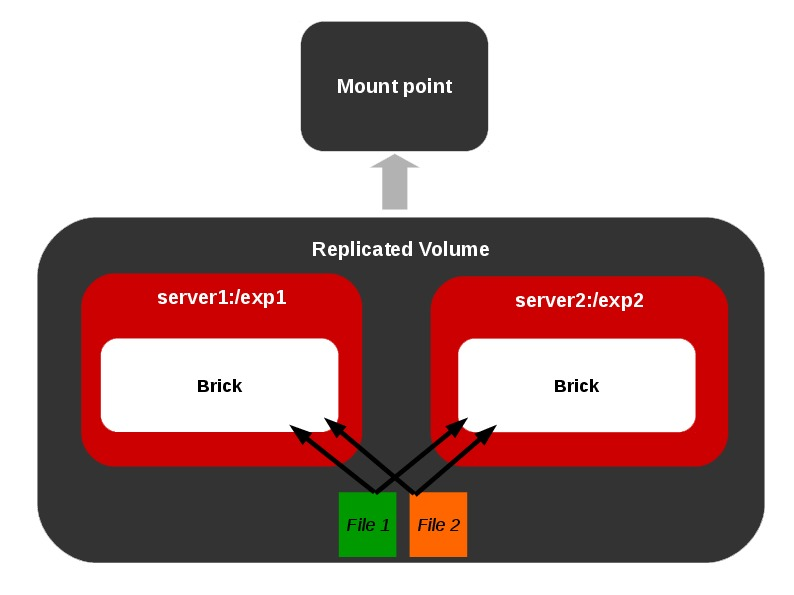
Replicated Volume
Replicated Volume
Striped Volume
Striped Volume
Distributed Replicated Volume
Representation of a distributed-replicated volume.
Distributed Replicated Volume

Installation of GlusterFS in RHEL/CentOS and Fedora

In this article, we will be installing and configuring GlusterFS for the first time for high availability of storage. For this, we’re taking two servers to create volumes and replicate data between them.

Step :1 Have at least two nodes

  1. Install CentOS 6.5 (or any other OS) on two nodes.
  2. Set hostnames named “server1” and “server2“.
  3. A working network connection.
  4. Storage disk on both nodes named “/data/brick“.

Step 2: Enable EPEL and GlusterFS Repository

Before Installing GlusterFS on both the servers, we need to enable EPEL and GlusterFS repositories in order to satisfy external dependencies. Use the following link to install and enable epel repository under both the systems.
  1. How to Enable EPEL Repository in RHEL/CentOS
Next, we need to enable GlusterFs repository on both servers.
# wget -P /etc/yum.repos.d http://download.gluster.org/pub/gluster/glusterfs/LATEST/EPEL.repo/glusterfs-epel.repo

Step 3: Installing GlusterFS

Install the software on both servers.
# yum install glusterfs-server
Start the GlusterFS management daemon.
# service glusterd start
Now check the status of daemon.
# service glusterd status
Sample Output
service glusterd start
  service glusterd status
  glusterd.service - LSB: glusterfs server
      Loaded: loaded (/etc/rc.d/init.d/glusterd)
     Active: active (running) since Mon, 13 Aug 2012 13:02:11 -0700; 2s ago
    Process: 19254 ExecStart=/etc/rc.d/init.d/glusterd start (code=exited, status=0/SUCCESS)
     CGroup: name=systemd:/system/glusterd.service
      ├ 19260 /usr/sbin/glusterd -p /run/glusterd.pid
      ├ 19304 /usr/sbin/glusterfsd --xlator-option georep-server.listen-port=24009 -s localhost...
      └ 19309 /usr/sbin/glusterfs -f /var/lib/glusterd/nfs/nfs-server.vol -p /var/lib/glusterd/...

Step 4: Configure SELinux and iptables

Open ‘/etc/sysconfig/selinux‘ and change SELinux to either “permissive” or “disabled” mode on both the servers. Save and close the file.
# This file controls the state of SELinux on the system.
# SELINUX= can take one of these three values:
#     enforcing - SELinux security policy is enforced.
#     permissive - SELinux prints warnings instead of enforcing.
#     disabled - No SELinux policy is loaded.
SELINUX=disabled
# SELINUXTYPE= can take one of these two values:
#     targeted - Targeted processes are protected,
#     mls - Multi Level Security protection.
SELINUXTYPE=targeted
Next, flush the iptables in both nodes or need to allow access to the other node via iptables.
# iptables -F

Step 5: Configure the Trusted Pool

Run the following command on ‘Server1‘.
gluster peer probe server2
Run the following command on ‘Server2‘.
gluster peer probe server1
Note: Once this pool has been connected, only trusted users may probe new servers into this pool.

Step 6: Set up a GlusterFS Volume

On both server1 and server2.
# mkdir /data/brick/gv0
Create a volume On any single server and start the volume. Here, I’ve taken ‘Server1‘.
# gluster volume create gv0 replica 2 server1:/data/brick1/gv0 server2:/data/brick1/gv0
# gluster volume start gv0
Next, confirm the status of volume.
# gluster volume info
Note: If in-case volume is not started, the error messages are logged under ‘/var/log/glusterfs‘ on one or both the servers.

Step 7: Verify GlusterFS Volume

Mount the volume to a directory under ‘/mnt‘.
# mount -t glusterfs server1:/gv0 /mnt
Now you can create, edit files on the mount point as a single view of the file system.

Features of GlusterFS

  1. Self-heal – If any of the bricks in a replicated volume are down and users modify the files within the other brick, the automatic self-heal daemon will come into action as soon as the brick is up next time and the transactions occurred during the down time are synced accordingly.
  2. Rebalance – If we add a new brick to an existing volume, where large amount of data was previously residing, we can perform a rebalance operation to distribute the data among all the bricks including the newly added brick.
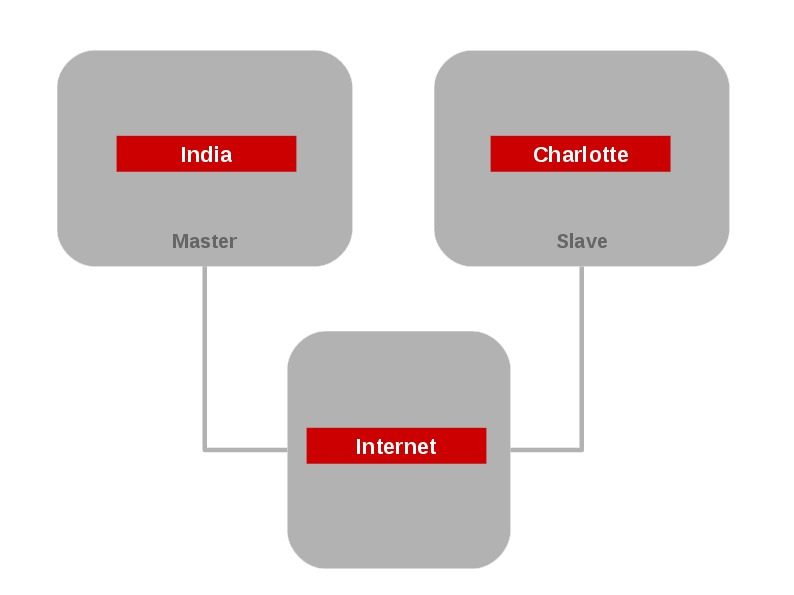
  3. Geo-replication – It provides back-ups of data for disaster recovery. Here comes the concept of master and slave volumes. So that if master is down whole of the data can be accessed via slave. This feature is used to sync data between geographically separated servers. Initializing a geo-replication session requires a series of gluster commands.
Here, is the following screen grab that shows the Geo-replication module.
Geo Replication
Geo Replication

Reference Links