How to add an extra second hard drive on Linux LVM and increase the size of storage
have 250GB disk installed on my home Linux server. I just bought a brand new 250GB SATA disk and I want to add a new disk to my existing LVM volume to increase its size total size to 500GB. How do I add a disk to LVM and extend an LVM volume on Linux operating system?
Linux volume management (LVM) creates an easy to use layer over physical disks. You can combine multiple disks and create logical storage volumes. This provides specific benefits such as:
- No restriction on disk size
- Increased disk throughput
- Mirroring volumes for business critical data
- Volume snapshots
- Easy backups and restores using snapshots
- Easy data relocation
- Resizing storage pools (add or remove disks) without reformatting disks
This tutorial shows you how to make partitioning, formatting, and add a new disk to LVM volume on Linux. For demo purpose, I am using Ubuntu VM, but the commands remain same for bare metal or any other virtualization technology such as KVM, Xen, VMware and so on.
Warning: Be careful with lvm/mkfs.ext4 and other commands, and device names as wrong device name can wipe out all data. Proceed with caution and always keep full backups.
Step 1 – Find out information about existing LVM
LVM Storage Management divided into three parts:
- Physical Volumes (PV) – Actual disks (e.g. /dev/sda, /dev,sdb, /dev/vdb and so on)
- Volume Groups (VG) – Physical volumes are combined into volume groups. (e.g. my_vg = /dev/sda + /dev/sdb.)
- Logical Volumes (LV) – A volume group is divided up into logical volumes (e.g. my_vg divided into my_vg/data, my_vg/backups, my_vg/home, my_vg/mysqldb and so on)
Type the following commands to find out information about each part.
How to display physical volumes (pv)
Type the following pvs command to see info about physical volumes:
Sample outputs:
$ sudo pvsSample outputs:
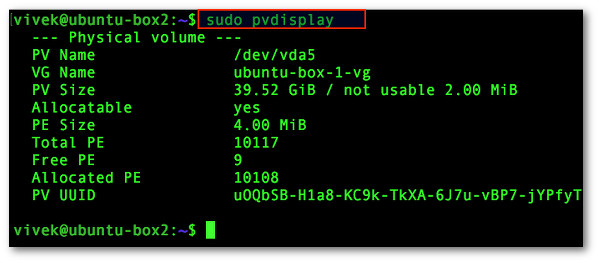
So currently my LVM include a physical volume (actual disk) called /dev/vda5. To see detailed attributes information, type:
$ sudo pvdisplaySample outputs:
From above output it is clear that our volume group named ubuntu-box-1-vg is made of a physical volume named /dev/vda5.
How to display information about LVM volume Groups (vg)
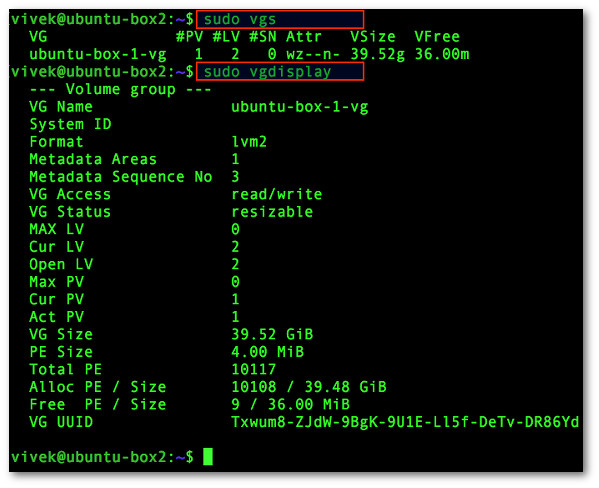
Type any one of the following vgs command/vgdisplay command to see information about volume groups and its attributes:
OR
Sample outputs:
$ sudo vgsOR
$ sudo vgdisplaySample outputs:
How to display information about LVM logical volume (lv)
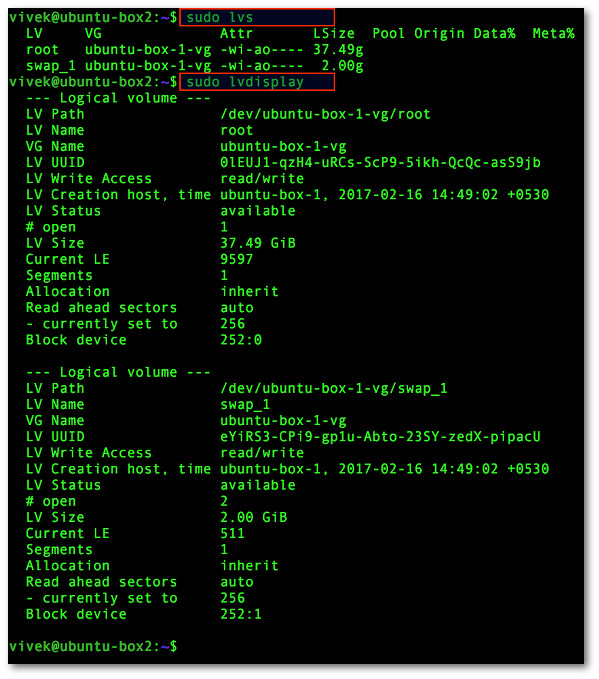
Type any one of the following lvs command/lvdisplay command to see information about volume groups and its attributes:
OR
Sample outputs:
$ sudo lvsOR
$ sudo lvdisplaySample outputs:
My ubuntu-box-1-vg volume group divided into two logical volumes:
- /dev/ubuntu-box-1-vg/root – Root file system
- /dev/ubuntu-box-1-vg/swap_1 – Swap space
Based upon above commands, you can get a basic idea how LVM organizes storage device into Physical Volumes (PV), Volume Groups (VG), and Logical Volumes (LV):
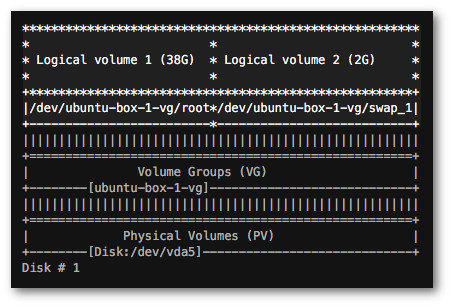
Fig.05: How LVM organizes storage device into Physical Volumes (PV), Volume Groups (VG), & Logical Volumes (LV)
Step 2 – Find out information about new disk
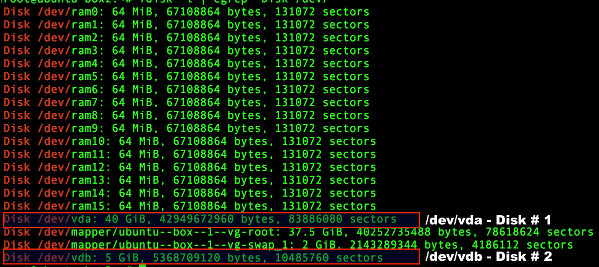
You need to add a new disk to your server. In this example, for demo purpose I added a new disk drive, and it has 5GiB size. To find out information about new disks run:
OR
Sample outputs:
$ sudo fdisk -lOR
$ sudo fdisk -l | grep '^Disk /dev/'Sample outputs:
Another option is to scan for all devices visible to LVM2:
$ sudo lvmdiskscanSample outputs:
  /dev/ram0                   [      64.00 MiB]
  /dev/ubuntu-box-1-vg/root   [      37.49 GiB]
  /dev/ram1                   [      64.00 MiB]
  /dev/ubuntu-box-1-vg/swap_1 [       2.00 GiB]
  /dev/vda1                   [     487.00 MiB]
  /dev/ram2                   [      64.00 MiB]
  /dev/ram3                   [      64.00 MiB]
  /dev/ram4                   [      64.00 MiB]
  /dev/ram5                   [      64.00 MiB]
  /dev/vda5                   [      39.52 GiB] LVM physical volume
  /dev/ram6                   [      64.00 MiB]
  /dev/ram7                   [      64.00 MiB]
  /dev/ram8                   [      64.00 MiB]
  /dev/ram9                   [      64.00 MiB]
  /dev/ram10                  [      64.00 MiB]
  /dev/ram11                  [      64.00 MiB]
  /dev/ram12                  [      64.00 MiB]
  /dev/ram13                  [      64.00 MiB]
  /dev/ram14                  [      64.00 MiB]
  /dev/ram15                  [      64.00 MiB]
  /dev/vdb                    [       5.00 GiB]
  2 disks
  18 partitions
  0 LVM physical volume whole disks
  1 LVM physical volume
Step 3 – Create physical volumes (pv) on new disk named /dev/vdb
Type the following command:
Sample outputs:
$ sudo pvcreate /dev/vdbSample outputs:
Physical volume "/dev/vdb" successfully created
Now run the following command to verify:
Sample outputs:
$ sudo lvmdiskscan -lSample outputs:
  WARNING: only considering LVM devices
  /dev/vda5                   [      39.52 GiB] LVM physical volume
  /dev/vdb                    [       5.00 GiB] LVM physical volume
  1 LVM physical volume whole disk
  1 LVM physical volume
Step 4 – Add newly created pv named /dev/vdb to an existing lv
Type the following command to add a physical volume /dev/vdb to “ubuntu-box-1-vg” volume group:
Sample outputs:
$ sudo vgextend ubuntu-box-1-vg /dev/vdbSample outputs:
Volume group "ubuntu-box-1-vg" successfully extended
Finally, you need extend the /dev/ubuntu-box-1-vg/root to create total 45GB (/dev/vdb (5G)+ existing /dev/ubuntu-box-1-vg/root (40G))
Sample outputs:
$ sudo lvm lvextend -l +100%FREE /dev/ubuntu-box-1-vg/rootSample outputs:
  Size of logical volume ubuntu-box-1-vg/root changed from 37.49 GiB (9597 extents) to 42.52 GiB (10885 extents).
  Logical volume root successfully resized.
However, if you run df -h or any other command you will still see /dev/ubuntu-box-1-vg/root as 40G. You need to run the following command to enlarge the filesystem created inside the “root” volume:
Sample outputs:
$ sudo resize2fs -p /dev/mapper/ubuntu--box--1--vg-rootSample outputs:
resize2fs 1.42.13 (17-May-2015)
Filesystem at /dev/mapper/ubuntu--box--1--vg-root is mounted on /; on-line resizing required
old_desc_blocks = 3, new_desc_blocks = 3
The filesystem on /dev/mapper/ubuntu--box--1--vg-root is now 11146240 (4k) blocks long.
Verify it:
Sample outputs:
$ df -HSample outputs:
Filesystem                           Size  Used Avail Use% Mounted on
udev                                 1.1G     0  1.1G   0% /dev
tmpfs                                146M   12M  135M   9% /run
/dev/mapper/ubuntu--box--1--vg-root   45G  2.3G   41G   6% /
tmpfs                                512M     0  512M   0% /dev/shm
tmpfs                                5.3M     0  5.3M   0% /run/lock
tmpfs                                512M     0  512M   0% /sys/fs/cgroup
/dev/vda1                            495M  109M  361M  24% /boot
tmpfs                                103M     0  103M   0% /run/user/0

No comments:
Post a Comment