How To Setup an Iptables Firewall to Enable Remote Access to Services in Linux
In this article we will discuss how to implement basic packet filtering and how to configure the firewall with iptables, a frontend to netfilter, which is a native kernel module used for firewalling.
Please note that firewalling is a vast subject and this article is not intended to be a comprehensive guide to understanding all that there is to know about it, but rather as a starting point for a deeper study of this topic. However, we will revisit the subject in Part 10 of this series when we explore a few specific use cases of a firewall in Linux.
You can think of a firewall as an international airport where passenger planes come and go almost 24/7. Based on a number of conditions, such as the validity of a person’s passport, or his / her country of origin (to name a few examples) he or she may, or may not, be allowed to enter or leave a certain country.
At the same time, airport officers can instruct people to move from one place of the airport to another if necessary, for example when they need to go through Customs Services.
We may find the airport analogy useful during the rest of this tutorial. Just keep in mind the following relations as we proceed:
- Persons = Packets
- Firewall = Airport
- Country #1 = Network #1
- Country #2 = Network #2
- Airport regulations enforced by officers = firewall rules
Iptables – The Basics
At the low level, it is the kernel itself which “decides” what to do with packets based on rules grouped inchains, or sentences. These chains define what actions should be taken when a package matches the criteria specified by them.
The first action taken by iptables will consist in deciding what to do with a packet:
- Accept it (let it go through into our network)?
- Reject it (prevent it from accessing our network)?
- Forward it (to another chain)?
Just in case you were wondering why this tool is called iptables, it’s because these chains are organized in tables, with the filter table being the most well know and the one that is used to implement packet filtering with its three default chains:
1. The INPUT chain handles packets coming into the network, which are destined for local programs.
2. The OUTPUT chain is used to analyze packets originated in the local network, which are to be sent to the outside.
3. The FORWARD chain processes the packets which should be forwarded to another destination (as in the case of a router).
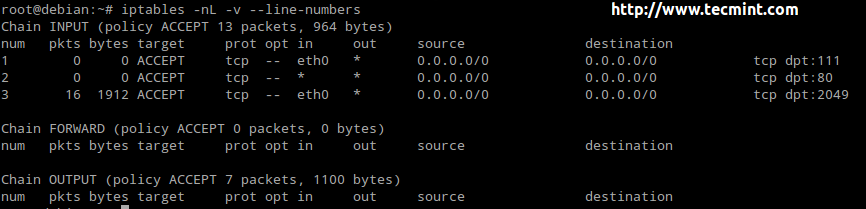
For each of these chains there is a default policy, which dictates what should be done by default when packets do not match any of the rules in the chain. You can view the rules created for each chain and the default policy by running the following command:
The available policies are as follows:
- ACCEPT → lets the packet through. Any packet that does not match any rules in the chain is allowed into the network.
- DROP → drops the packet quietly. Any packet that does not match any rules in the chain is prevented from entering the network.
- REJECT → rejects the packet and returns an informative message. This one in particular does not work as a default policy. Instead, it is meant to complement packet filtering rules.

Linux Iptables Policies
When it comes to deciding which policy you will implement, you need to consider the pros and cons of each approach as explained above – note that there is no one-size-fits-all solution.
Adding Rules
To add a rule to the firewall, invoke the iptables command as follows:
where,
- -A stands for Append (append the current rule to the end of the chain).
- chain_name is either INPUT, OUTPUT, or FORWARD.
- target is the action, or policy, to apply in this case (ACCEPT, REJECT, or DROP).
- criteria is the set of conditions against which the packets are to be examined. It is composed of at least one (most likely more) of the following flags. Options inside brackets, separated by a vertical bar, are equivalent to each other. The rest represents optional switches:
Our Testing Environment
Let’s glue all that in 3 classic examples using the following test environment for the first two:
And this for the last example
EXAMPLE 1: Analyzing the difference between the DROP and REJECT policies
We will define a DROP policy first for input pings to our firewall. That is, icmp packets will be dropped quietly.
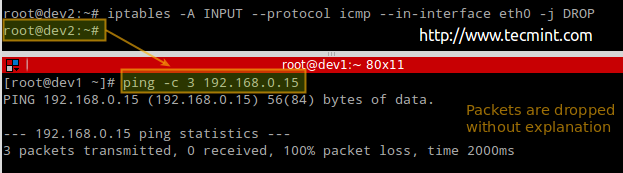
Drop ICMP Ping Request
Before proceeding with the REJECT part, we will flush all rules from the INPUT chain to make sure our packets will be tested by this new rule:
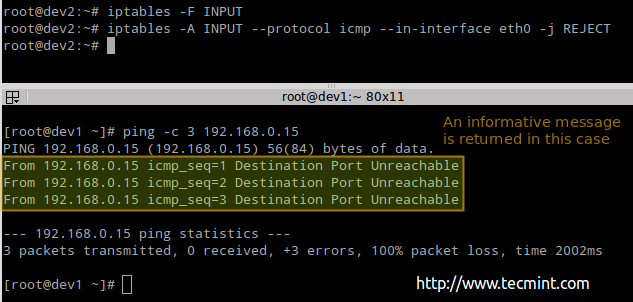
Reject ICMP Ping Request in Firewall
EXAMPLE 2: Disabling / re-enabling ssh logins from dev2 to dev1
We will be dealing with the OUTPUT chain as we’re handling outgoing traffic:

Block SSH Login in Firewall
EXAMPLE 3: Allowing / preventing NFS clients (from 192.168.0.0/24) to mount NFS4 shares
Run the following commands in the NFSv4 server / firewall to close ports 2049 and 111 for all kind of traffic:
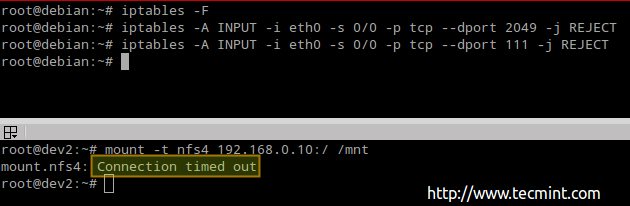
Block NFS Ports in Firewall
Now let’s open those ports and see what happens.

Open NFS Ports in Firewall
As you can see, we were able to mount the NFSv4 share after opening the traffic.
Inserting, Appending and Deleting Rules
In the previous examples we showed how to append rules to the INPUT and OUTPUT chains. Should we want to insert them instead at a predefined position, we should use the -I (uppercase i) switch instead.
You need to remember that rules will be evaluated one after another, and that the evaluation stops (or jumps) when a DROP or ACCEPT policy is matched. For that reason, you may find yourself in the need to move rules up or down in the chain list as needed.
We will use a trivial example to demonstrate this:
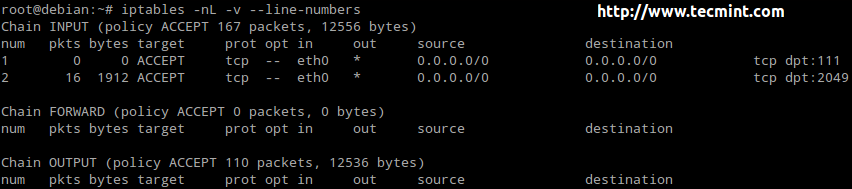
Check Rules of Iptables Firewall
Let’s place the following rule,
at position 2) in the INPUT chain (thus moving previous #2 as #3)
Iptables Accept Rule
Using the setup above, traffic will be checked to see whether it’s directed to port 80 before checking for port 2049.
Alternatively, you can delete a rule and change the target of the remaining rules to REJECT (using the -Rswitch):
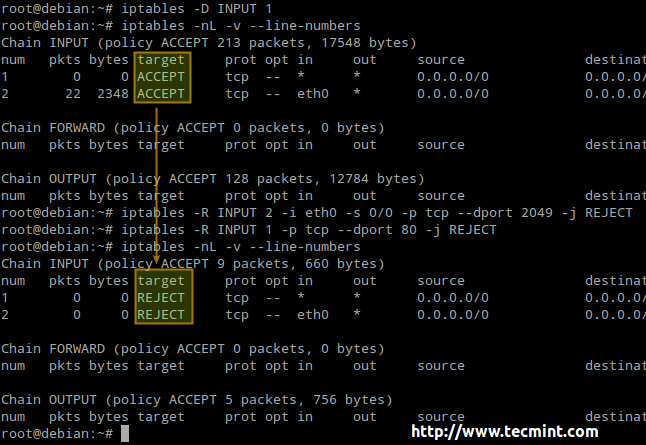
Iptables Drop Rule
Last, but not least, you will need to remember that in order for the firewall rules to be persistent, you will need to save them to a file and then restore them automatically upon boot (using the preferred method of your choice or the one that is available for your distribution).
Saving firewall rules:
Restoring rules:
Here we can see a similar procedure (saving and restoring firewall rules by hand) using a dummy file called iptables.dump instead of the default one as shown above.
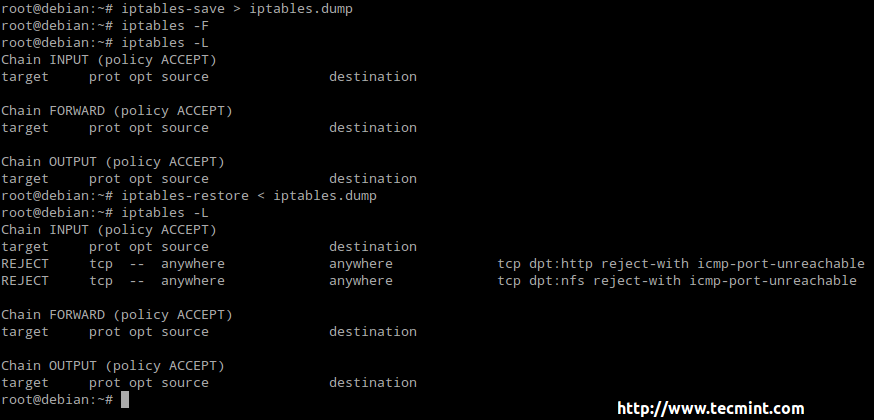
Dump Linux Iptables
To make these changes persistent across boots:
Ubuntu: Install the iptables-persistent package, which will load the rules saved in the/etc/iptables/rules.v4 file.
CentOS: Add the following 2 lines to /etc/sysconfig/iptables-config file.
OpenSUSE: List allowed ports, protocols, addresses, and so forth (separated by commas) in/etc/sysconfig/SuSEfirewall2.
For more information refer to the file itself, which is heavily commented.
Conclusion
The examples provided in this article, while not covering all the bells and whistles of iptables, serve the purpose of illustrating how to enable and disable traffic incoming or outgoing traffic.
No comments:
Post a Comment