Managing Users & Groups, File Permissions & Attributes and Enabling sudo Access on Accounts
here in this section, we will guide you on how to manage users and groups permissions in Linux system, that are required for the LFCS certification exam.
Since Linux is a multi-user operating system (in that it allows multiple users on different computers or terminals to access a single system), you will need to know how to perform effective user management: how to add, edit, suspend, or delete user accounts, along with granting them the necessary permissions to do their assigned tasks.
Adding User Accounts
To add a new user account, you can run either of the following two commands as root.
When a new user account is added to the system, the following operations are performed.
1. His/her home directory is created (/home/username by default).
2. The following hidden files are copied into the user’s home directory, and will be used to provide environment variables for his/her user session.
3. A mail spool is created for the user at /var/spool/mail/username.
4. A group is created and given the same name as the new user account.
Understanding /etc/passwd
The full account information is stored in the /etc/passwd file. This file contains a record per system user account and has the following format (fields are delimited by a colon).
- Fields [username] and [Comment] are self explanatory.
- The x in the second field indicates that the account is protected by a shadowed password (in/etc/shadow), which is needed to logon as [username].
- The [UID] and [GID] fields are integers that represent the User IDentification and the primary Group IDentification to which [username] belongs, respectively.
- The [Home directory] indicates the absolute path to [username]’s home directory, and
- The [Default shell] is the shell that will be made available to this user when he or she logins the system.
Understanding /etc/group
Group information is stored in the /etc/group file. Each record has the following format.
- [Group name] is the name of group.
- An x in [Group password] indicates group passwords are not being used.
- [GID]: same as in /etc/passwd.
- [Group members]: a comma separated list of users who are members of [Group name].

Add User Accounts
After adding an account, you can edit the following information (to name a few fields) using theusermod command, whose basic syntax of usermod is as follows.
Setting the expiry date for an account
Use the –expiredate flag followed by a date in YYYY-MM-DD format.
Adding the user to supplementary groups
Use the combined -aG, or –append –groups options, followed by a comma separated list of groups.
Changing the default location of the user’s home directory
Use the -d, or –home options, followed by the absolute path to the new home directory.
Changing the shell the user will use by default
Use –shell, followed by the path to the new shell.
Displaying the groups an user is a member of
Now let’s execute all the above commands in one go.

usermod Command Examples
Read Also:
For existing accounts, we can also do the following.
Disabling account by locking password
Use the –l (lowercase L) or the –lock option to lock a user’s password.
Unlocking user password
Use the –u or the –unlock option to unlock a user’s password that was previously blocked.
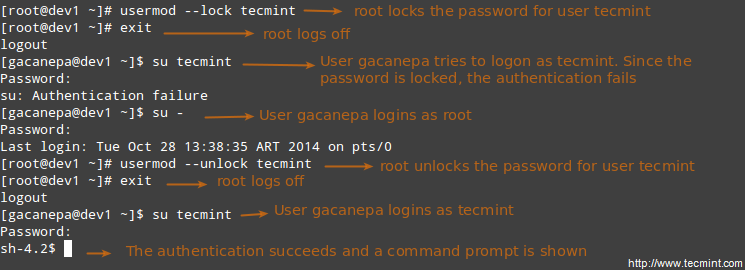
Lock User Accounts
Creating a new group for read and write access to files that need to be accessed by several users
Run the following series of commands to achieve the goal.
Deleting a group
You can delete a group with the following command.
If there are files owned by group_name, they will not be deleted, but the group owner will be set to theGID of the group that was deleted.
Linux File Permissions
Besides the basic read, write, and execute permissions that we discussed in Setting File Attributes – Part 3 of this series, there are other less used (but not less important) permission settings, sometimes referred to as “special permissions”.
Like the basic permissions discussed earlier, they are set using an octal file or through a letter (symbolic notation) that indicates the type of permission.
Deleting user accounts
You can delete an account (along with its home directory, if it’s owned by the user, and all the files residing therein, and also the mail spool) using the userdel command with the –remove option.
Group Management
Every time a new user account is added to the system, a group with the same name is created with the username as its only member. Other users can be added to the group later. One of the purposes of groups is to implement a simple access control to files and other system resources by setting the right permissions on those resources.
For example, suppose you have the following users.
- user1 (primary group: user1)
- user2 (primary group: user2)
- user3 (primary group: user3)
All of them need read and write access to a file called common.txt located somewhere on your local system, or maybe on a network share that user1 has created. You may be tempted to do something like,
However, this will only provide read and write access to the owner of the file and to those users who are members of the group owner of the file (user1 in this case). Again, you may be tempted to add user2and user3 to group user1, but that will also give them access to the rest of the files owned by user user1and group user1.
This is where groups come in handy, and here’s what you should do in a case like this.
Understanding Setuid
When the setuid permission is applied to an executable file, an user running the program inherits the effective privileges of the program’s owner. Since this approach can reasonably raise security concerns, the number of files with setuid permission must be kept to a minimum. You will likely find programs with this permission set when a system user needs to access a file owned by root.
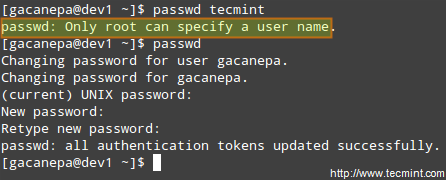
Summing up, it isn’t just that the user can execute the binary file, but also that he can do so with root’s privileges. For example, let’s check the permissions of /bin/passwd. This binary is used to change the password of an account, and modifies the /etc/shadow file. The superuser can change anyone’s password, but all other users should only be able to change their own.

passwd Command Examples
Thus, any user should have permission to run /bin/passwd, but only root will be able to specify an account. Other users can only change their corresponding passwords.
Change User Password
Understanding Setgid
When the setgid bit is set, the effective GID of the real user becomes that of the group owner. Thus, any user can access a file under the privileges granted to the group owner of such file. In addition, when the setgid bit is set on a directory, newly created files inherit the same group as the directory, and newly created subdirectories will also inherit the setgid bit of the parent directory. You will most likely use this approach whenever members of a certain group need access to all the files in a directory, regardless of the file owner’s primary group.
To set the setgid in octal form, prepend the number 2 to the current (or desired) basic permissions.
Setting the SETGID in a directory

Add Setgid to Directory
Understanding Sticky Bit
When the “sticky bit” is set on files, Linux just ignores it, whereas for directories it has the effect of preventing users from deleting or even renaming the files it contains unless the user owns the directory, the file, or is root.
To set the sticky bit in octal form, prepend the number 1 to the current (or desired) basic permissions.
Without the sticky bit, anyone able to write to the directory can delete or rename files. For that reason, the sticky bit is commonly found on directories, such as /tmp, that are world-writable.
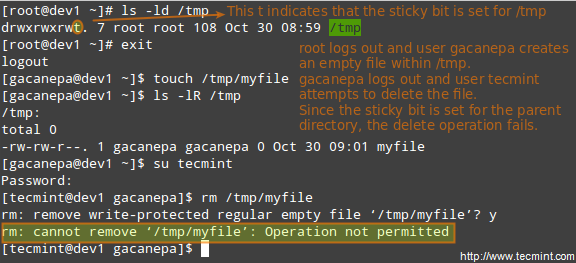
Add Stickybit to Directory
Special Linux File Attributes
There are other attributes that enable further limits on the operations that are allowed on files. For example, prevent the file from being renamed, moved, deleted, or even modified. They are set with thechattr command and can be viewed using the lsattr tool, as follows.
After executing those two commands, file1 will be immutable (which means it cannot be moved, renamed, modified or deleted) whereas file2 will enter append-only mode (can only be open in append mode for writing).
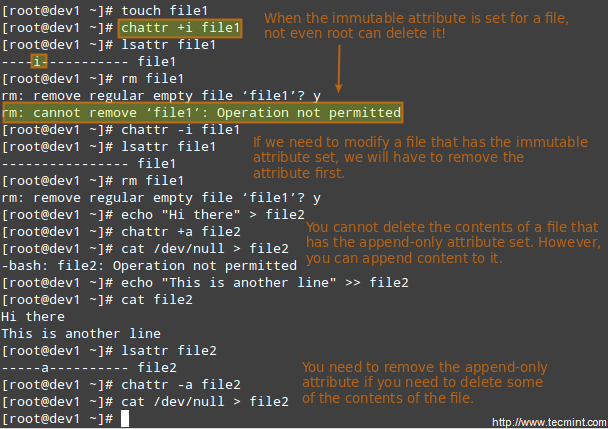
Chattr Command to Protect Files
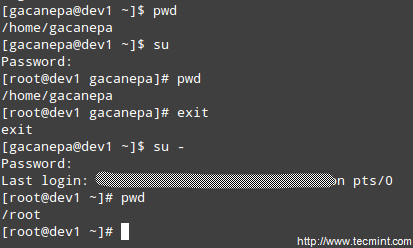
Accessing the root Account and Using sudo
One of the ways users can gain access to the root account is by typing.
and then entering root’s password.
If authentication succeeds, you will be logged on as root with the current working directory as the same as you were before. If you want to be placed in root’s home directory instead, run.
and then enter root’s password.
Enable Sudo Access on Users
The above procedure requires that a normal user knows root’s password, which poses a serious security risk. For that reason, the sysadmin can configure the sudo command to allow an ordinary user to execute commands as a different user (usually the superuser) in a very controlled and limited way. Thus, restrictions can be set on a user so as to enable him to run one or more specific privileged commands and no others.
Read Also: Difference Between su and sudo User
To authenticate using sudo, the user uses his/her own password. After entering the command, we will be prompted for our password (not the superuser’s) and if the authentication succeeds (and if the user has been granted privileges to run the command), the specified command is carried out.
To grant access to sudo, the system administrator must edit the /etc/sudoers file. It is recommended that this file is edited using the visudo command instead of opening it directly with a text editor.
This opens the /etc/sudoers file using vim (you can follow the instructions given in Install and Use vim as Editor – Part 2 of this series to edit the file).
These are the most relevant lines.
Let’s take a closer look at them.
This line lets you specify the directories that will be used for sudo, and is used to prevent using user-specific directories, which can harm the system.
The next lines are used to specify permissions.
- The first ALL keyword indicates that this rule applies to all hosts.
- The second ALL indicates that the user in the first column can run commands with the privileges of any user.
- The third ALL means any command can be run.
If no user is specified after the = sign, sudo assumes the root user. In this case, user tecmint will be able to run yum update as root.
The NOPASSWD directive allows user gacanepa to run /bin/updatedb without needing to enter his password.
The % sign indicates that this line applies to a group called “admin”. The meaning of the rest of the line is identical to that of an regular user. This means that members of the group “admin” can run all commands as any user on all hosts.
To see what privileges are granted to you by sudo, use the “-l” option to list them.

Sudo Access Rules
Summary
Effective user and file management skills are essential tools for any system administrator. In this article we have covered the basics and hope you can use it as a good starting to point to build upon. Feel free to leave your comments or questions below, and we’ll respond quickly.
No comments:
Post a Comment