Tuesday, December 15, 2015

[Rsync (Graphical)- Ubuntu]: Grsync And GAdmin-Rsync: The Graphical Front-end Applications For Rsync Tool

Grsync And GAdmin-Rsync: The Graphical Front-end Applications For Rsync Tool


1. Grsync

Grsync is a graphical user interface front-end for the rsync tool. Its a cross platform tool, works on Linux, Windows OS and Mac OS. Grsync can be use to synchronize a music collection with removable devices, backup personal files to a networked drive, replication of a partition to another one, mirroring of files, etc. In this article, let me teach you how to synchronize files/folders from one system to another system using Grsync.

Install Grsync

On Ubuntu/Debian/Linux Mint:
Grsync is available in the default repositories. So, you install it using the following command:
sudo apt-get install grsync
On RHEL based systems:
yum install grsync
Now, start Grsync either from the Menu or Dash. The default Grsync interface will look like below.
Grsync: default _001
There are three options in the Grsync interface called Basic, Advanced and Extra. Most of these options are self-explanatory. Just place the mouse cursor over the items, a popup help screen will open and you will know what it really does.

Usage

In this tutorial, I will be using two Ubuntu 14.04 systems. My source system(local system) IP address is 192.168.1.200/24, and my destination system(remote system) IP address is 192.168.1.250/24.
Now, I am going to backup the /home/sk/Downloads/ directory of the source system(192.168.1.200) to /home/sk/sync/ directory of the destination system(192.168.1.250) using Grsync.
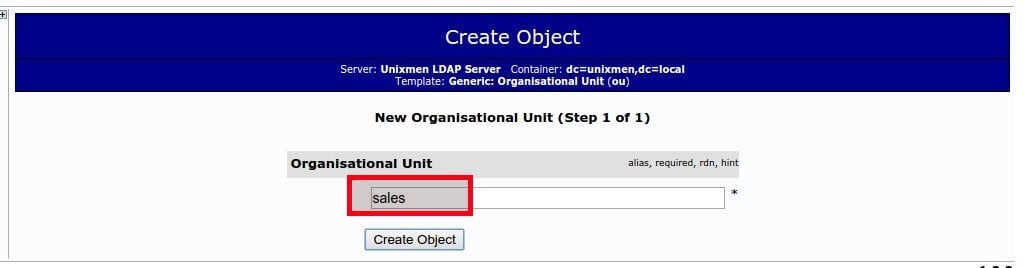
Enter the source and destination paths.
Grsync: default 0-_003
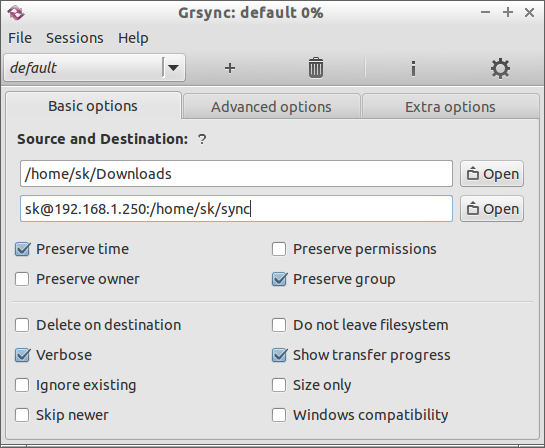
Make sure you have entered the correct path in the destination path as shown in the above figure.
Now, click on the Simulation button from the File menu. It will show you if you’re selected the correct options. Also, it will ask you to enter the remote system user password.
Menu_004
You’ll be asked to enter the password of the remote user.
Menu_007
If everything OK, a “Completed successfully” message will appear.
rsync: default stopped_008
Now, click Execute to save the changes from the File menu to start transferring the files.
rsync: default running_009
It will take a while depending upon the contents of your folder. After successful transfer, a “Completed successfully” message will appear.
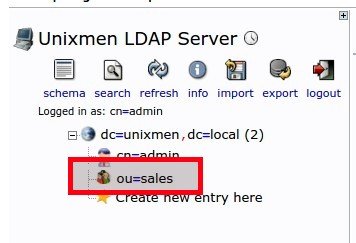
rsync: default stopped_010

Verify the output

Go to your remote system folder (i.e. /home/sk/sync), and check for the backup files. The files of the local folder will be found on the remote folder.
ls /home/sk/sync/
Sample output:
sk@server: ~_011

Synchronize files

We have transfered the files/folders manually in the above steps. If you want to synchronize files automatically at a particular interval, follow the steps below.
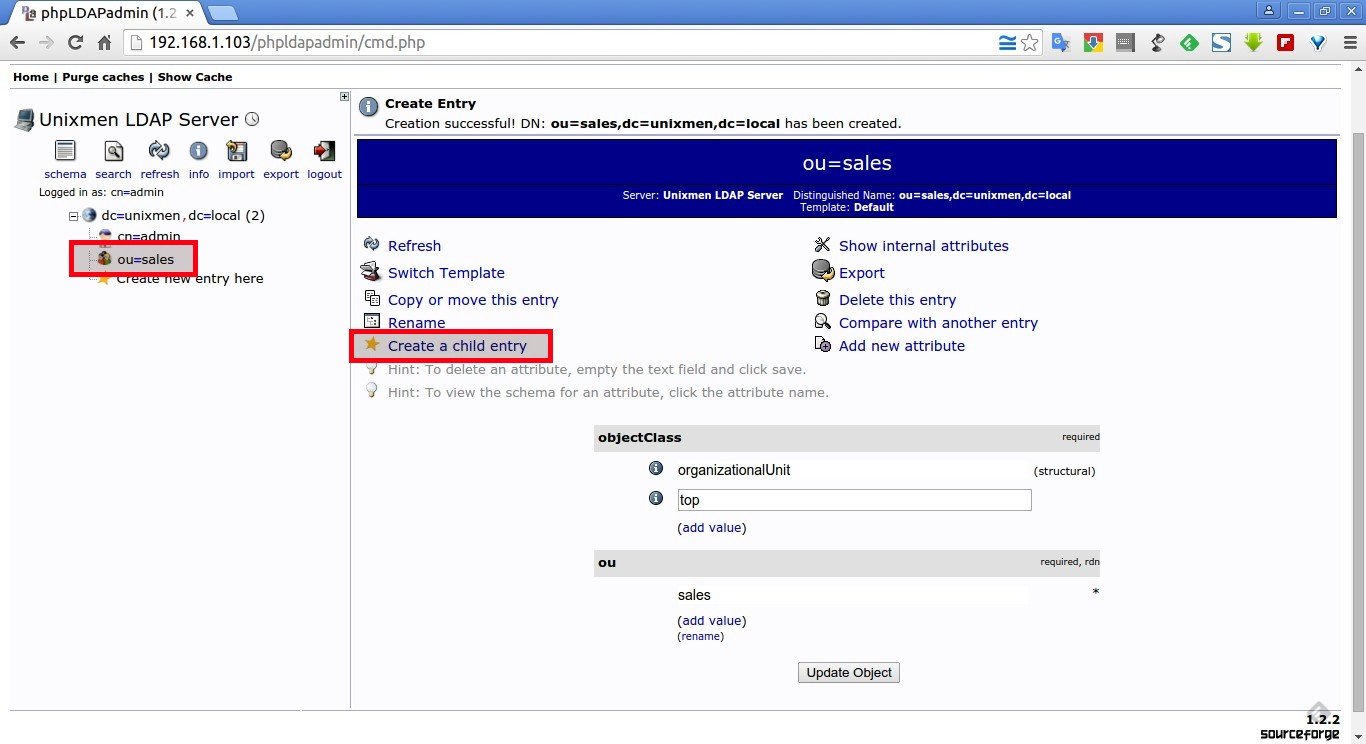
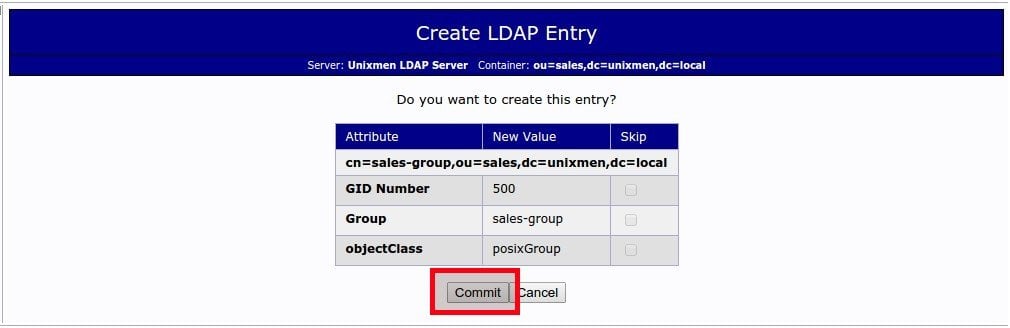
We have to create a new session to synchronize files. Let us name the session as Synchronize. Click on the (+) sign in the Grsync interface.
Grsync: default 0-_012
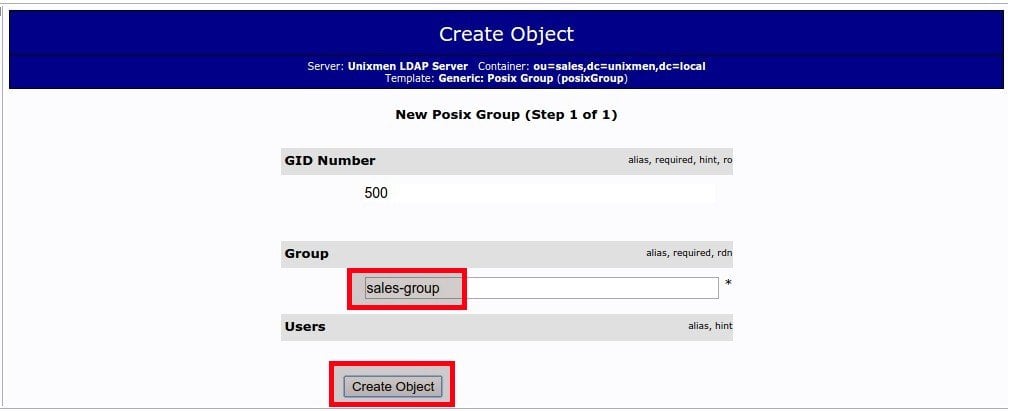
It will create a new session called Synchronize. Here, you have to enter the network folder (192.168.1.250:/home/s/sync) as source path and local system folder(/home/sk/Downloads) as destination path. Please note that you don’t have to enter the full path in the destination path. Say for example, if you want to synchronize the contents of the folder /home/sk/sync from your remote server to local system, just enter the destination location where exactly the /home/sk/sync folder exists. In my case the sync folder is in my remote server Home folder (i.e./home/sk/). So, I entered my destination path as /home/sk.
Grsync: Synchronize 0-_014
Check for any errors by clicking on the Simulation button from the File menu. If everything seems OK, click on the Execute button to start the process.

Add Scheduling jobs in the Cron job

To schedule backups, add the both sessions in your crontab file in your local system:
sudo crontab -e
Add the both sessions (i.e. default and Synchronize sessions one by one)
[...]
# m h dom mon dow command
0 11 * * * grsync -e "default"
0 12 * * * grsync -e "Synchronize"
The above cron job will perform the backup from local to remote folder at 11am, and synchronization process will be done at 12am respectively. Save your crontab file, and you’re done.

2. Gadmin-Rsync

GAdmin-Rsync is a C/GTK+ GUI front-end of Rsync command. This tool allows us to take backup of files/directories from local-to-local, local-to-remote systems and vice versa.

Installation

To install GAdmin-Rsync on Debian/Ubuntu based systems, enter the following command:
sudo apt-get install gadmin-rsync
Alternatively, you compile the source as shown below:
Download gadmin-rsync-x.x.x.tar.gz and unpack and install it as shown below:
tar -zxvf gadmin-rsync-x.x.x.tar.gz
cd gadmin-rsync-x.x.x
./Autoinstall
Now you should be able to start it by typing gadmin-rsync at the Terminal or from GNOME or KDE’s program menus and you’re ready to go.

Usage

Open it up either from Terminal, Dash or Menu. At the first launch, you”ll be asked to given a name for the new backup. Enter the name and click Apply.
Gadmin-Rsync 0.1.7 - Create new backup_002
Then, Select the backup type like Local backup, Local to remote backup and Remote to local backup. Here, I want to do local to remote backup. Click Forward button.
GAdmin-Rsync 0.1.7 backup selection_004
Select the source directory you want to backup.
Select source directory or file._010
Enter the remote server IP address, enter path on the remote machine you want to backup to, remote user name and password etc.
GAdmin-Rsync 0.1.7 destination server selection_014
GAdminRsync 0.1.7 information_008
Now, click on the button that says: Run selected backup on the top right corner to start the backup.
Gadmin-Rsync 0.1.7_016
Now, the backup process will start.
Gadmin-Rsync 0.1.7_015
After a couple of minutes, you’ll see the successful message that says the backup has been done.

Scheduling Backups

In version 0.1.7, I can’t schedule the backup process at a particular interval. When I try to save the schedule option, It gives an error like below:
Error: The time schedule server "cron(d)" does not seem to be running.
But, somebody from the Askubuntu forum has found the solution for this error. Hope it helps.
That’s it!
Cheers!!


Thursday, December 10, 2015

[OpenLDAP Client - Ubuntu]: Configure Linux Clients To Authenticate Using OpenLDAP

Configure Linux Clients To Authenticate Using OpenLDAP


This is the second part of our previous tutorial, titled how to install and configure OpenLDAP server on Debian and Ubuntu systems. In this guide let us see how to configure Linux clients to authenticate using OpenLDAP server. I have tested this Guide on Debian 8 desktop and Ubuntu 15.04 desktop, it worked perfectly without any issues. And also, this guide should on other Debian and Ubuntu distributions. If you find any problems, feel free to let me know. I will check and update this tutorial ASAP.
For the purpose of this tutorial, we will be using Debian 8 MATE desktop as LDAP client.
My client system’s details:
  • Operating system: Debian 8 MATE desktop
  • IP Address: 192.168.1.150/24
My LDAP Server’s details:
  • Operating system: Ubuntu 15.04 server
  • IP Address: 192.168.1.100/24

Configure Linux Clients To Authenticate Using OpenLDAP

Here, I am going to split this tutorial into two sections. First, we’ll see how to install LDAP client on Debian 8, and then we’ll see how to configure Debian 8 desktop to authenticate.

1. Install LDAP client

I assume that you’ve had a working LDAP server already. If not, refer the above link to setup OpenLDAP server in Debian and Ubuntu and its derivatives.
Now let us install the required packages in our LDAP client.
Switch to root user:
sudo su
Or
su
Run the following command from your Terminal to install LDAP client packages.
apt-get install libnss-ldap libpam-ldap nscd
During installation, you will be asked a variety of questions. Read them carefully and enter the appropriate values.
First enter the ldap server IP address as shown in the below screenshot.
sk@debian: ~_001
Note that you should enter LDAP server URI as ldap://ip-address-of-ldapserver/. Using IP address is always recommended to avoid failures when domain name services are unavailable.
Then enter the distinguished name of the search base. This value should match with your LDAP server’s/etc/phpldaadmin/config.php file values. In my case it’s dc=unixmen, dc=local.
sk@debian: ~_002
Select Ldap version to use as 3. It is recommended to use highest available version.
sk@debian: ~_003
Enter LDAP administrative account details.
In our case, it was: cn=admin, dc=unixmen.com, dc=local.
sk@debian: ~_005
Enter LDAP administrative password:
sk@debian: ~_006
The next window will say that you have to manually edit nsswitch.conf file. Click Ok to continue.
sk@debian: ~_007
Now the libnss-ldap package has been installed. Now, we should enter the same answers for libpam-ldap, i.e the above questions will be repeated for libpam-ldap.
We don’t need to act the client LDAP admin account as local root, hence we will select No.
sk@debian: ~_008
Select No.
sk@debian: ~_009
Now, let us reconfigure libnss-ldap to improve debconf configuration by entering the following command:
dpkg-reconfigure libnss-ldap
Make sure that the LDAP server URI is correct.
sk@debian: ~_010
Make sure that the LDAP server search base:
sk@debian: ~_011
LDAP version to use:
sk@debian: ~_012
LDAP database doesn’t require login, hence we select No.
sk@debian: ~_013
Select No.
sk@debian: ~_014
Select No.
sk@debian: ~_015
Finally, Select Ok.
sk@debian: ~_016
That’s it. Now we have installed ldap client packages. 

2. Configure LDAP Client

We must update our client system to look for LDAP server by adjusting their configuration files.
To do so, First edit file /etc/ldap/ldap.conf,
nano /etc/ldap/ldap.conf
Uncomment the following lines and Enter your LDAP server search BASE and URI as shown below.
[...]
BASE    dc=unixmen,dc=local
URI     ldap://192.168.1.100
[...]
Edit file /etc/nsswitch.conf,
nano /etc/nsswitch.conf
Find the following three lines and adjust them as shown below.
[...]
passwd:         compat ldap
group:          compat ldap
shadow:         compat ldap
[...]
netgroup:       ldap
[...]
Now restart nscd service:
systemctl restart nscd
On Ubuntu 14.10/Debian 7 and previous versions:
service nscd restart

PAM Configuration

Now we should verify the PAM configuration. The PAM configuration is modified during libnss-ldap installation. But it is advisable to verify the PAM configuration files as look like below.
Edit file /etc/pam.d/common-auth,
nano /etc/pam.d/common-auth
Make sure this file contains the following lines.
[...]
auth    [success=2 default=ignore]      pam_unix.so nullok_secure try_first_pass
auth    [success=1 default=ignore]      pam_ldap.so use_first_pass
[...]
auth    requisite                       pam_deny.so
[...]
auth    required                        pam_permit.so
[...]
Edit file /etc/pam.d/common-account,
nano /etc/pam.d/common-account
[...]
account [success=2 new_authtok_reqd=done default=ignore]        pam_unix.so
account [success=1 default=ignore]      pam_ldap.so
[...]
account requisite                       pam_deny.so
[...]
account required                        pam_permit.so
[...]
Edit file nano /etc/pam.d/common-password,
nano /etc/pam.d/common-password
[...]
password        [success=2 default=ignore]      pam_unix.so obscure sha512
password        [success=1 user_unknown=ignore default=die]     pam_ldap.so use_authtok try_first_pass
[...]
password        requisite                       pam_deny.so
[...]
password        required                        pam_permit.so
[...]
Edit file /etc/pam.d/common-session,
nano /etc/pam.d/common-session
Add the following line at the bottom.
[...]
session  required                                         pam_mkhomedir.so
The above line will create a HOME directory for LDAP users who does not have home directory when login to LDAP server.
Edit file /etc/pam.d/common-session-noninteractive,
nano /etc/pam.d/common-session-noninteractive
[...]
session [default=1]                     pam_permit.so
[...]
session requisite                       pam_deny.so
[...]
session required                        pam_permit.so
[...]
session required        pam_unix.so
session optional                        pam_ldap.so
Restart nscd service to save changes.
systemctl restart nscd
On Debian 7/Ubuntu 14.10 and lower versions:
service nscd restart
Reboot your client system and try to login with your LDAP user from client system.

Log In To LDAP Server

Now, we have configured our client to be able to log in to our OpenLDAP server. Let us try to login using any ldap users created in the openldap server. Please note that this LDAP user doesn’t exist in the local client system. Don’t be confused.
I have already created a user named “kumar” in my OpenLDAP server. Refer the section Sample Configuration in my previous tutorial.
So, now let us login with user “kumar”.
Enter your LDAP user name and password.
Debian 8 Desktop [Running] - Oracle VM VirtualBox_004
Please note that the user named “kumar” is not a local user. We have created this user in our previous guide using phpLDAPAdmin tool..
Congratulations! Now, you will be able to log in to your client system with LDAP user.
Debian 8 Desktop [Running] - Oracle VM VirtualBox_005
Let us check who exactly is this user.
Open Terminal, and run:
whoami
Sample output:
kumar
Selection_006
Run pwd command from the Terminal to know the user’s present working directory:
pwd
Sample output:
/home/users/kumar
Selection_007
You should see that the home directory you selected for your user on the LDAP server is being used on this machine. It has been created on-demand to serve the LDAP user.
You should now be able to authenticate multiple computers using a centralized LDAP server. Your LDAP users will be allowed to use any of the machines you configure in this way, as long as they have the valid login credentials.
Initially this how-to will look bit difficult, but if you follow the steps carefully you will be able to setup the complete LDAP server/client.
Good Luck!

[OpenLDAP Server - UBUNTU]: Install OpenLDAP In Ubuntu 15.10 And Debian 8

Install OpenLDAP In Ubuntu 15.10 And Debian 8


About OpenLDAP

OpenLDAP is a free open source Light Weight Directory Access protocol developed by the OpenLDAP project. It is a platform independent protocol, so that it runs on all Linux/Unix like systems, Windows, AIX, Solaris and Android.
OpenLDAP includes:
  • slapd – stand-alone LDAP daemon (server)
  • libraries implementing the LDAP protocol, and utilities, tools, and sample clients.
In this tutorial, let us see how to install OpenLDAP and how to configure it in Ubuntu / Debian server. I tested this tutorial in Ubuntu 15.10, however this steps should work on Debian 7/8 and previous versions of Ubuntu, including Ubuntu 15.04/14.10/14.04 etc.
Here is my testing system’s details:
  • Operating System : Ubuntu 15.10 64 bit server
  • Hostname : server.unixmen.local
  • IP Address : 192.168.1.103/24
First let us see how to install openLDAP.

1. Install OpenLDAP in Ubuntu 15.10 / Debian 8

Enter the following command in Terminal to install openldap.
Switch to root user:
sudo su
Or
su
Run the following command to install OpenLDAP.
apt-get install slapd ldap-utils
During the installation, you’ll be asked to set password for the LDAP admin account. Enter your admin password here.
root@server: -home-sk_001
Re-enter the password.
root@server: -home-sk_002
OpenLDAP is installed now. Let’s go to the configuration task.

2. Configure OpenLDAP

Edit “/etc/ldap/ldap.conf” file,
vi /etc/ldap/ldap.conf
Find, uncomment and replace ‘BASE’ and ‘ URI’ values with your domain name and IP Address as shown below.
#
# LDAP Defaults
#
# See ldap.conf(5) for details
# This file should be world readable but not world writable.
BASE    dc=unixmen,dc=local
URI     ldap://server.unixmen.local ldap://server.unixmen.local:666
#SIZELIMIT      12
#TIMELIMIT      15
#DEREF          never
# TLS certificates (needed for GnuTLS)
TLS_CACERT      /etc/ssl/certs/ca-certificates.crt
Save and close the file.
Next, we should reconfigure the slapd with the updated values.
dpkg-reconfigure slapd
The following screen should appear. Select “No” and press Enter.
root@server: -home-sk_003
Enter the DNS domain name.
root@server: -home-sk_004
Enter the Organization name (i.e your company name).
root@server: -home-sk_005
Enter the LDAP admin password which you created in the earlier step.
root@server: -home-sk_006
Re-enter the password.
root@server: -home-sk_007
Select the backend database. I go with defaults.
root@server: -home-sk_003
Select whether you want to delete the database automatically or keep it when slapd is removed. Here I want to keep my old database, so I clicked No.
root@server: -home-sk_009
Select Yes to move old database.
root@server: -home-sk_010
Select No and Press Enter.
root@server: -home-sk_011
That’s it. We have successfully configured OpenLDAP. Let us go ahead and check whether it’s working or not.

Test LDAP Server

Run the following command to test OpenLDAP:
ldapsearch -x
Sample output:
# extended LDIF
#
# LDAPv3
# base <dc=unixmen,dc=local> (default) with scope subtree
# filter: (objectclass=*)
# requesting: ALL
#

# unixmen.local
dn: dc=unixmen,dc=local
objectClass: top
objectClass: dcObject
objectClass: organization
o: unixmen
dc: unixmen

# admin, unixmen.local
dn: cn=admin,dc=unixmen,dc=local
objectClass: simpleSecurityObject
objectClass: organizationalRole
cn: admin
description: LDAP administrator

# search result
search: 2
result: 0 Success

# numResponses: 3
# numEntries: 2
If you see the ‘Success’ message in your output, then Congratulations! LDAP Server is working!!

LDAP Server Administration

Administration of LDAP server from command line mode is bit difficult. We can’t memorize all LDAP commands. So, we will use an easier GUI administration tool called “phpldapadmin” to manage, configure, and administer LDAP server.

Install phpLDAPadmin

phpLDAPadmin is a web-based LDAP administration tool for managing your LDAP server. Using phpLDAPadmin, you can browse your LDAP tree, view LDAP schema, perform searches, create, delete, copy and edit LDAP entries. You can even copy entries between servers.
Enter the following command to install phpLDAPAdmin:
apt-get install phpldapadmin
Create a symbolic link for phpldapadmin directory.
ln -s /usr/share/phpldapadmin/ /var/www/html/phpldapadmin
On Ubuntu 14.10 and lower versions, run:
ln -s /usr/share/phpldapadmin/ /var/www/phpldapadmin
Edit “/etc/phpldapadmin/config.php” file,
vi /etc/phpldapadmin/config.php
Set the correct timezone. To do that, find and uncomment the following line and set your Timezone.
[...]
$config->custom->appearance['timezone'] = 'Asia/Kolkata';
[....]
Scroll down further and Replace the domain names with your own values.
To do that, Find “Define LDAP Servers” section in the config file and edit the following lines as shown below.
[...]
// Set your LDAP server name //
$servers->setValue('server','name','Unixmen LDAP Server');
[...]
// Set your LDAP server IP address // 
$servers->setValue('server','host','192.168.1.103');
[...]
// Set Server domain name //
$servers->setValue('server','base',array('dc=unixmen,dc=local'));
[...]
// Set Server domain name again//
$servers->setValue('login','bind_id','cn=admin,dc=unixmen,dc=local');
[...]
Restart the apache service.
systemctl restart apache2
On Ubuntu 14.10 and older versions, run:
service apache2 restart
Make sure that you have opened apache server port “80” and LDAP default port “389” in your firewall/router configuration.
ufw allow 80
Sample output:
Rules updated
Rules updated (v6)
ufw allow 389
Sample output:
Rules updated
Rules updated (v6)
The above steps are not necessary for Debian systems.

Test phpLDAPadmin

Open your web browser and navigate to: “http://IP-Address/phpldapadmin”.
The following screen should appear.
phpLDAPadmin (1.2.2) – – Google Chrome_004
Click “login” on the left pane. Enter the LDAP admin password that you have created during OpenLDAP installation, and click“Authenticate”.
phpLDAPadmin (1.2.2) – – Google Chrome_005
Now the main console screen of phpldapadmin will open.
You can see the LDAP domain “unixmen.local” and other details on the left.
phpLDAPadmin (1.2.2) – – Google Chrome_006
From here, you can add additional objects, such as Organizational Unit, Users and groups etc.

Creating Objects

1. Create Organizational Unit(OU):

Lets create some sample objects from the phpldapadmin console. First, we will create an OU.
Click on the “+” sign near the line “dc=unixmen” and click “Create new entry here” link.
Selection_007
Scroll down and Select “Generic-Organizational Unit”.
Selection_008
Enter the name of the Organizational unit (Ex.sales) and Click “Create Object”.
Selection_009
Finally, click “Commit”.
Selection_010
Now, you will see the newly created OU in main LDAP section on the left pane.
Selection_011

2. Create Group:

Click on the sales OU on the left pane and click on “Create a child entry” link.
phpLDAPadmin (1.2.2) – – Google Chrome_012
In the next window, Select “Generic: Posix Group”.
Selection_013
Enter the name of the group and click Create Object button. For example, here i enter the group name as “sales-group”.
Selection_014
Click Commit to save changes.
Selection_015
Now you can see that the newly created group called “sales-group” under the sales OU.
Selection_016

3. Create User:

Now, let us create a new user under sales-group.
Click on the sales-group on the left. Select Create a child entry link button.
phpLDAPadmin (1.2.2) – – Google Chrome_017
In the next window, Select “Generic: User Account”.
Selection_018
Enter the user details such as common name, GID number, last name, Login shell, user password and user id etc., as shown in the below screen shot and click Create object. For example. here I am going to create a user called “kumar”.
phpldapadmin_cmd
And then Click “Commit” to save the changes.
Selection_019
Now the newly created user “kumar” will be found under “sales-group” object.
Selection_020
Also, you can verify the newly created objects are really existing with command:
ldapsearch -x
Sample output:
# extended LDIF
#
# LDAPv3
# base <dc=unixmen,dc=local> (default) with scope subtree
# filter: (objectclass=*)
# requesting: ALL
#

# unixmen.local
dn: dc=unixmen,dc=local
objectClass: top
objectClass: dcObject
objectClass: organization
o: unixmen
dc: unixmen

# admin, unixmen.local
dn: cn=admin,dc=unixmen,dc=local
objectClass: simpleSecurityObject
objectClass: organizationalRole
cn: admin
description: LDAP administrator

# sales, unixmen.local
dn: ou=sales,dc=unixmen,dc=local
objectClass: organizationalUnit
objectClass: top
ou: sales

# sales-group, sales, unixmen.local
dn: cn=sales-group,ou=sales,dc=unixmen,dc=local
gidNumber: 500
cn: sales-group
objectClass: posixGroup
objectClass: top

# kumar, sales-group, sales, unixmen.local
dn: cn=kumar,cn=sales-group,ou=sales,dc=unixmen,dc=local
cn:: IGt1bWFy
gidNumber: 500
homeDirectory: /home/users/kumar
sn: kumar
loginShell: /bin/sh
objectClass: inetOrgPerson
objectClass: posixAccount
objectClass: top
uidNumber: 1000
uid: kumar

# search result
search: 2
result: 0 Success

# numResponses: 6
# numEntries: 5
As you see in the above output, the new objects, namely ‘sales’‘sales-group’, and ‘kumar’ have been successfully created under the main LDAP domain. Similarly, you can create as many as objects you wanted.
Installing and configuring OpenLDAP in Debian and Ubuntu and derivatives is really easy and straight forward. Even a novice users can easily setup a working LDAP server within an hour.
Now OpenLDAP Server is ready to use.