How to create an iSCSI Target in CentOS7
An iSCSI target can be a dedicated physical device in a network, or it can be an iSCSI software-configured logical device on a networked storage server. The target is the end point in SCSI bus communication. Storage on the target, accessed by an initiator, is defined by LUNs. (Redhat)
Lets start
Lets know the status of the machine
Server    =   Centos 7
IP = 192.168.183.129
[root@storage-unixmen ~]# fdisk  -l

Disk /dev/sda: 32.2 GB, 32212254720 bytes, 62914560 sectors
Units = sectors of 1 * 512 = 512 bytes
Sector size (logical/physical): 512 bytes / 512 bytes
I/O size (minimum/optimal): 512 bytes / 512 bytes
Disk label type: dos
Disk identifier: 0x00047725

   Device Boot      Start         End      Blocks   Id  System
/dev/sda1   *        2048     1026047      512000   83  Linux
/dev/sda2         1026048    62914559    30944256   8e  Linux LVM

Disk /dev/sdb: 5368 MB, 5368709120 bytes, 10485760 sectors
Units = sectors of 1 * 512 = 512 bytes
Sector size (logical/physical): 512 bytes / 512 bytes
I/O size (minimum/optimal): 512 bytes / 512 bytes


Disk /dev/mapper/centos-root: 29.5 GB, 29490151424 bytes, 57597952 sectors
Units = sectors of 1 * 512 = 512 bytes
Sector size (logical/physical): 512 bytes / 512 bytes
I/O size (minimum/optimal): 512 bytes / 512 bytes


Disk /dev/mapper/centos-swap: 2147 MB, 2147483648 bytes, 4194304 sectors
Units = sectors of 1 * 512 = 512 bytes
Sector size (logical/physical): 512 bytes / 512 bytes
I/O size (minimum/optimal): 512 bytes / 512 bytes

[root@storage-unixmen ~]#
lets use /dev/sdb like iscsi target
make file system Ext4 on this device
[root@storage-unixmen ~]# mkfs.ext4   /dev/sdb
 mke2fs 1.42.9 (28-Dec-2013)
 /dev/sdb is entire device, not just one partition!
 Proceed anyway? (y,n) y
 Filesystem label=
 OS type: Linux
 Block size=4096 (log=2)
 Fragment size=4096 (log=2)
 Stride=0 blocks, Stripe width=0 blocks
 327680 inodes, 1310720 blocks
 65536 blocks (5.00%) reserved for the super user
 First data block=0
 Maximum filesystem blocks=1342177280
 40 block groups
 32768 blocks per group, 32768 fragments per group
 8192 inodes per group
 Superblock backups stored on blocks:
 32768, 98304, 163840, 229376, 294912, 819200, 884736Allocating group tables: done
 Writing inode tables: done
 Creating journal (32768 blocks): done
 Writing superblocks and filesystem accounting information: done[root@storage-unixmen ~]#
you can also use fdisk /dev/sdb to created separated partitions
Create /storage directory and mount the sdb device to this partition
mkdir   /storage
mount  -t ext4  /deb/sdb  /storage
Lets check the directory mounted
root@storage-unixmen ~]# df  -h
Filesystem               Size  Used Avail Use% Mounted on
/dev/mapper/centos-root   28G  1.1G   27G   4% /
devtmpfs                 479M     0  479M   0% /dev
tmpfs                    489M     0  489M   0% /dev/shm
tmpfs                    489M  6.8M  483M   2% /run
tmpfs                    489M     0  489M   0% /sys/fs/cgroup
/dev/sda1                497M  168M  330M  34% /boot
tmpfs                     98M     0   98M   0% /run/user/0
/dev/sdb                 4.8G   20M  4.6G   1% /storage
[root@storage-unixmen ~]#
to make this mount permanant . please add to /etc/fstab
/dev/sdb /storage ext4 defaults 0 0
I- Lets start Iscsi admin tool
[root@storage-unixmen ~]# yum -y install targetcli
II- Access Admin console
[root@storage-unixmen ~]# targetcli
Warning: Could not load preferences file /root/.targetcli/prefs.bin.
targetcli shell version 2.1.fb41
Copyright 2011-2013 by Datera, Inc and others.
For help on commands, type 'help'.
/>

and go  to this directory
cd backstores/fileio
> cd  /backstores/fileio
III- create a disk-image with the name “disk01” on /storage/disk01.img with 3G
/>/backstores/fileio> create disk01 /storage/disk01.img 3G
Created fileio disk01 with size 3221225472
/backstores/fileio>
IV-create Target iqn.2016-02.unixmen.com:storage.target00
/backstores/fileio> cd   /iscsi
/iscsi> ls
o- iscsi .............................................................................................................. [Targets: 0]
/iscsi> create iqn.2016-02.unixmen.com:storage.target00
Created target iqn.2016-02.unixmen.com:storage.target00.
Created TPG 1.
Global pref auto_add_default_portal=true
Created default portal listening on all IPs (0.0.0.0), port 3260.
/iscsi>
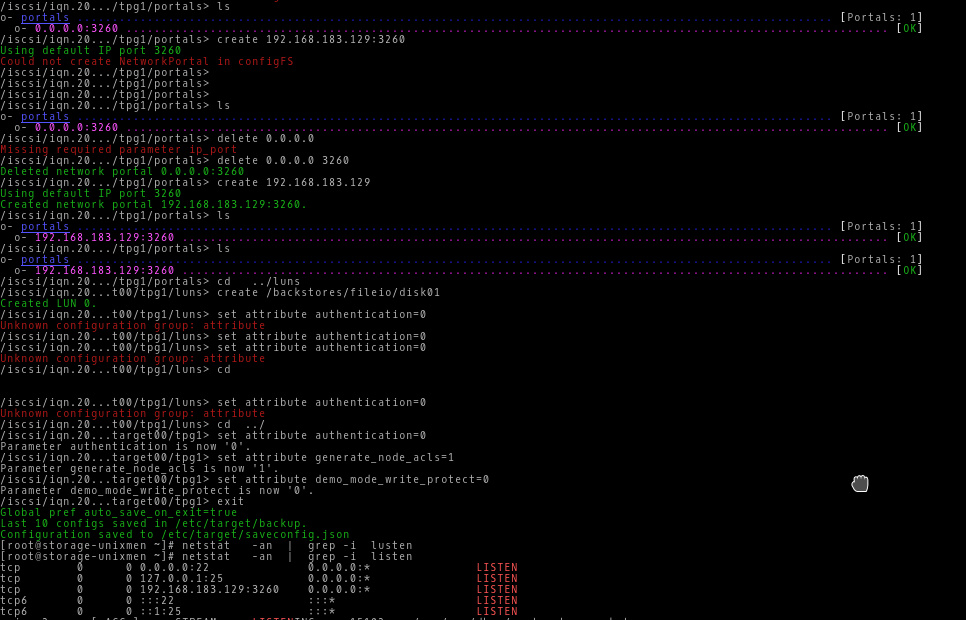
V- Set ip adres of the target under Portals folder
/iscsi> cd  iqn.2016-02.unixmen.com:storage.target00/tpg1/portals/
/iscsi/iqn.20.../tpg1/portals>
iscsi/iqn.20.../tpg1/portals> delete 0.0.0.0 3260
Deleted network portal 0.0.0.0:3260
/iscsi/iqn.20.../tpg1/portals> create 192.168.183.129
Using default IP port 3260
Created network portal 192.168.183.129:3260.
/iscsi/iqn.20.../tpg1/portals> ls
o- portals .................................................................................... [Portals: 1]
  o- 192.168.183.129:3260.................................................................................. [OK]
/iscsi/iqn.20.../tpg1/portals>
VI- Set LUN
/iscsi/iqn.20…/tpg1/portals> cd ../luns
/iscsi/iqn.20…t00/tpg1/luns> create /backstores/fileio/disk01
Created LUN 0.
/iscsi/iqn.20…t00/tpg1/luns>
/iscsi/iqn.20…t00/tpg1/luns> create /backstores/fileio/disk01
Created LUN 0.
/iscsi/iqn.20…t00/tpg1/luns>
VII authorize access .
in this method , we will open access for every machine and without identification
set attribute authentication=0
set attribute generate_node_acls=1
set attribute demo_mode_write_protect=0
exit

/iscsi/iqn.20...t00/tpg1/luns> cd  ../
/iscsi/iqn.20...target00/tpg1> set attribute authentication=0
Parameter authentication is now '0'.
/iscsi/iqn.20...target00/tpg1> set attribute generate_node_acls=1
Parameter generate_node_acls is now '1'.
/iscsi/iqn.20...target00/tpg1> set attribute demo_mode_write_protect=0
Parameter demo_mode_write_protect is now '0'.
/iscsi/iqn.20...target00/tpg1> exit
Global pref auto_save_on_exit=true
Last 10 configs saved in /etc/target/backup.
Configuration saved to /etc/target/saveconfig.json
[root@storage-unixmen ~]#
VIII- the machine is ready
[root@storage-unixmen ~]# netstat   -an  |  grep -i    3260
tcp        0      0 192.168.183.129:3260    0.0.0.0:*               LISTEN
[root@storage-unixmen ~]#


[root@storage-unixmen ~]# lsblk
NAME            MAJ:MIN RM  SIZE RO TYPE MOUNTPOINT
sda               8:0    0   30G  0 disk
├─sda1            8:1    0  500M  0 part /boot
└─sda2            8:2    0 29.5G  0 part
  ├─centos-root 253:0    0 27.5G  0 lvm  /
  └─centos-swap 253:1    0    2G  0 lvm  [SWAP]
sdb               8:16   0    5G  0 disk /storage
sr0              11:0    1    4G  0 rom
[root@storage-unixmen ~]#
IX- Connect from the Clietnt
Server is also centos7 with IP 192.168.183.21
first iscsi initiator
yum install iscsi-initiator-utils.x86_64
My actual Disks
[root@node1 ~]# df  -h
Filesystem               Size  Used Avail Use% Mounted on
/dev/mapper/centos-root   28G  1.1G   27G   4% /
devtmpfs                 479M     0  479M   0% /dev
tmpfs                    489M     0  489M   0% /dev/shm
tmpfs                    489M  6.7M  483M   2% /run
tmpfs                    489M     0  489M   0% /sys/fs/cgroup
/dev/sda1                497M  168M  330M  34% /boot
/dev/sdb                 5.0G   33M  5.0G   1% /glusterfs/storage1
tmpfs                     98M     0   98M   0% /run/user/0
Connect the ISCSCI target
Discover the target
[root@node1 ~]# iscsiadm   --mode discoverydb --type sendtargets --portal  192.168.183.129   --discover
192.168.183.129:3260,1 iqn.2016-02.unixmen.com:storage.target00
Add the disk
[root@node1 ~]# iscsiadm   --mode node --targetname  iqn.2016-02.unixmen.com:storage.target00 --portal  192.168.183.129:3260   --login

Logging in to [iface: default, target: iqn.2016-02.unixmen.com:storage.target00, portal: 192.168.183.129,3260] (multiple)
Login to [iface: default, target: iqn.2016-02.unixmen.com:storage.target00, portal: 192.168.183.129,3260] successful.
Congratulation you have now an extra disk
[root@node1 ~]# fdisk  -l

Disk /dev/sdb: 5368 MB, 5368709120 bytes, 10485760 sectors
Units = sectors of 1 * 512 = 512 bytes
Sector size (logical/physical): 512 bytes / 512 bytes
I/O size (minimum/optimal): 512 bytes / 512 bytes


Disk /dev/sda: 32.2 GB, 32212254720 bytes, 62914560 sectors
Units = sectors of 1 * 512 = 512 bytes
Sector size (logical/physical): 512 bytes / 512 bytes
I/O size (minimum/optimal): 512 bytes / 512 bytes
Disk label type: dos
Disk identifier: 0x00047725

   Device Boot      Start         End      Blocks   Id  System
/dev/sda1   *        2048     1026047      512000   83  Linux
/dev/sda2         1026048    62914559    30944256   8e  Linux LVM

Disk /dev/mapper/centos-root: 29.5 GB, 29490151424 bytes, 57597952 sectors
Units = sectors of 1 * 512 = 512 bytes
Sector size (logical/physical): 512 bytes / 512 bytes
I/O size (minimum/optimal): 512 bytes / 512 bytes


Disk /dev/mapper/centos-swap: 2147 MB, 2147483648 bytes, 4194304 sectors
Units = sectors of 1 * 512 = 512 bytes
Sector size (logical/physical): 512 bytes / 512 bytes
I/O size (minimum/optimal): 512 bytes / 512 bytes


Disk /dev/sdc: 3221 MB, 3221225472 bytes, 6291456 sectors
Units = sectors of 1 * 512 = 512 bytes
Sector size (logical/physical): 512 bytes / 512 bytes
I/O size (minimum/optimal): 512 bytes / 8388608 bytes

[root@node1 ~]# lsblk
NAME            MAJ:MIN RM  SIZE RO TYPE MOUNTPOINT
sda               8:0    0   30G  0 disk
├─sda1            8:1    0  500M  0 part /boot
└─sda2            8:2    0 29.5G  0 part
  ├─centos-root 253:0    0 27.5G  0 lvm  /
  └─centos-swap 253:1    0    2G  0 lvm  [SWAP]
sdb               8:16   0    5G  0 disk /glusterfs/storage1
sdc               8:32   0    3G  0 disk
sr0              11:0    1    4G  0 rom
[root@node1 ~]#
Now you can fdisk /dev/sdc to make partitions
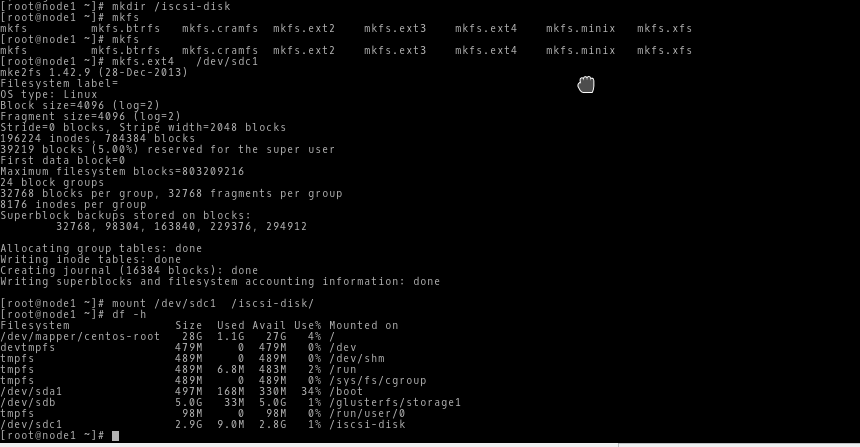
[root@node1 ~]# fdisk    /dev/sdc
Welcome to fdisk (util-linux 2.23.2).

Changes will remain in memory only, until you decide to write them.
Be careful before using the write command.

Device does not contain a recognized partition table
Building a new DOS disklabel with disk identifier 0xcc2a4d65.

Command (m for help): n
Partition type:
   p   primary (0 primary, 0 extended, 4 free)
   e   extended
Select (default p):
Using default response p
Partition number (1-4, default 1):
First sector (16384-6291455, default 16384):
Using default value 16384
Last sector, +sectors or +size{K,M,G} (16384-6291455, default 6291455):
Using default value 6291455
Partition 1 of type Linux and of size 3 GiB is set

Command (m for help): t
Selected partition 1
Hex code (type L to list all codes): 83
Changed type of partition 'Linux' to 'Linux'

Command (m for help): p

Disk /dev/sdc: 3221 MB, 3221225472 bytes, 6291456 sectors
Units = sectors of 1 * 512 = 512 bytes
Sector size (logical/physical): 512 bytes / 512 bytes
I/O size (minimum/optimal): 512 bytes / 8388608 bytes
Disk label type: dos
Disk identifier: 0xcc2a4d65

   Device Boot      Start         End      Blocks   Id  System
/dev/sdc1           16384     6291455     3137536   83  Linux

Command (m for help): w
The partition table has been altered!

Calling ioctl() to re-read partition table.
Syncing disks.
[root@node1 ~]#
create a folder /iscsi-disk
root@node1 ~]# mkdir /iscsi-disk
Format the disk /dev/sdc1 with ext4
[root@node1 ~]# mkfs.ext4   /dev/sdc1
mke2fs 1.42.9 (28-Dec-2013)
Filesystem label=
OS type: Linux
Block size=4096 (log=2)
Fragment size=4096 (log=2)
Stride=0 blocks, Stripe width=2048 blocks
196224 inodes, 784384 blocks
39219 blocks (5.00%) reserved for the super user
First data block=0
Maximum filesystem blocks=803209216
24 block groups
32768 blocks per group, 32768 fragments per group
8176 inodes per group
Superblock backups stored on blocks:
        32768, 98304, 163840, 229376, 294912

Allocating group tables: done
Writing inode tables: done
Creating journal (16384 blocks): done
Writing superblocks and filesystem accounting information: done

[root@node1 ~]#
Mount the dormated partion to /iscsi-disk
[root@node1 ~]# mount /dev/sdc1  /iscsi-disk/
[root@node1 ~]# df -h
Filesystem               Size  Used Avail Use% Mounted on
/dev/mapper/centos-root   28G  1.1G   27G   4% /
devtmpfs                 479M     0  479M   0% /dev
tmpfs                    489M     0  489M   0% /dev/shm
tmpfs                    489M  6.8M  483M   2% /run
tmpfs                    489M     0  489M   0% /sys/fs/cgroup
/dev/sda1                497M  168M  330M  34% /boot
/dev/sdb                 5.0G   33M  5.0G   1% /glusterfs/storage1
tmpfs                     98M     0   98M   0% /run/user/0
/dev/sdc1                2.9G  9.0M  2.8G   1% /iscsi-disk
[root@node1 ~]#
To make mount htis disk permanntly every reboot please add this to your /etc/fstab file
/dev/sdc1 /iscsi-disk/ ext4 defaults,_netdev 0 0
save and exit
Done


