The Linux and open source community provides countless user and server applications. They also provide solutions to help support these and other applications, even to support non-technical departments. You'll find here many help desk or customer service, etc.
Best suited for Linux Administrator, Linux Newbies, etc... Hope my efforts helps u solving your problems!!!!!!!!
This tutorial answers your question i.e. How to setup Passwordless SSH?
SSH is a protocol to communicate a server with the client in an encrypted manner. It has replaced telnet protocol, which was not at all secure at all. Almost all the Linux system admins know about it because they use it to connect to Linux servers as the physical access to the server is very limited.
SSH is installed by default on most Linux distribution. & to access a server through ssh is very easy, you use the following command
$ ssh {Server IP address or FQDN}
and then you enter the credentials. But in this tutorial, we will learn to access ssh session securely with the help of Public/Private keys authentication aka passwordless ssh setup. Advantages of using Public/Private keys authentication are
You won’t be asked for a password every time you access the server (unless you are using a passphrase to decrypt the keys)
No-one can gain unauthorized access to your server unless they have the right key.
Now let’s create Public/Private keys for passwordless ssh setup to access our servers.
Setup PasswordLess SSH
Creating keys on the Local machine
Remember this, keys are to be created on each host that you wish to gain access from. So if there are 10-20 hosts from where you want to access a server, we must create keys on all those 10-20 servers.
To create keys, run the following command
$ ssh-keygen –t rsa
It will then ask you to select a location for the generated keys. By default, the keys will be stored in the ~/.ssh which is a hidden directory in your home folder (/home/dan/.ssh). The private key will be called id_rsa and the associated public key will be called id_rsa.pub.
It will also ask you to enter a passphrase, which is used to decrypt the keys. If you don’t wish to use any pass-phrase just leave it empty & press enter or else provide a pass-phrase.
Next, set permissions on your private keys,
$ chmod 700 ~/.ssh $ chmod 600 ~/.ssh/id_rsa
Configuration on Remote Server
Now copy the Public key (id_rsa.pub) & move it to the remote server at /home/user/.ssh/authorized_keys folder. Now that the public keys have imported to server, remove them from local machine.
Next, we will also have to set permissions on the server as well
All the settings for Public/Private keys authentication are now complete.
Testing the Public/Private keys authentication
Now log back into the local machine to access the server & enter
$ ssh {Server IP address or FQDN}
& hit enter. You will notice that you won’t be asked for the credentials & are logged directly into the server.
Once you have tested your passwordless ssh setup, you can also disable the use of password authentication so that everyone uses only keys to access the server. Thus making your servers more secure. To disable password authentication , open /etc/sshd/sshd_config& change the following parameter
PasswordAuthentication no
That’s it, this completes our tutorial on how to setup PasswordLess SSH on Linux machines.
SSH is one of the most widely used methods to access Linux & Unix servers. SSH provides an encrypted method to access & communicate between servers over insecure networks. In technical term, it’s a cryptographic protocol that allows for secured, encrypted communication between a host & a client.
In most of the Linux distributions, SSH comes installed & we can access those servers using ssh command but with Ubuntu Desktop (& based distros) that is not the case. We are required to install SSH on Ubuntu to be able access it.
Though we have an ssh client available on Ubuntu, it’s the ssh server that we need to install on Ubuntu. It means we can access other servers from Ubuntu using ssh but other machines will not be able to access our Ubuntu systems.
Install SSH on Ubuntu
SSH server is available with default Ubuntu repositories & we are not required to add any other repos to install it. We only need to run the following command to install it,
Once installed, the ssh server will start on it’s own, but it required we can start it using the following command,
$ sudo systemctl start ssh
Check status with,
$ sudo systemctl status ssh
Note:If you have your firewall enabled on your Ubuntu system, then you would also be required to enable the ssh connections through the firewall. Run the following command to do so,
$ sudo ufw allow ssh
We can now access our Ubuntu system from other servers. Just open a ssh client & run the ssh command to access it,
How To Configure X11 Forwarding Using SSH In Linux
Today, we are going to learn a lesser known, interesting and useful feature about Linux. I am sure most of you know about SSH. We can access remote Linux systems securely via SSH. But, did you know that it is possible to forward X over SSH to run graphical applications remotely? Yes! This mechanism is known as X11 forwarding. In this guide, we are going to configure X11 forwarding using SSH in Linux.
What is X11 forwarding?
X11 forwarding is method of allowing a user to start a graphical applications installed on a remote Linux system and forward that application windows (screen) to the local system. The remote system need not to have X server or graphical desktop environment. Hence configuring X11 forwarding using SSH enables the users to securely run graphical applications over SSH session.
To put this in layman terms,
We connect to a remote system via SSH,
And then we launch a GUI application (which is installed in the remote system) from that SSH session,
Now, the GUI application runs on the remote system, but the application window appears on our local system. So we can use this remote GUI program on your local system as the way we use a locally installed program.
Clear? Now let us go ahead and see how to run remote GUI applications over SSH session.
Configure X11 Forwarding Using SSH In Linux
For the purpose of this guide, I will be using the following two systems:
Remote server - CentOS 8 minimal server (No GUI).
Local system - Ubuntu 20.04 LTS with Gnome DE.
Configuring X11 forwarding is trivial.
Make sure you have installed "xauth" on your remote serer system. If it is not installed, run the following command as root or sudo user:
# dnf install xorg-x11-xauth
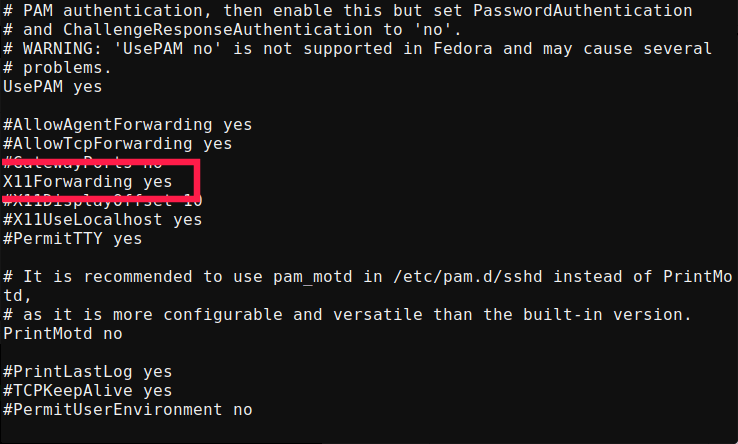
Go to your remote system (in my case it is CentOS 8) and edit "/etc/ssh/sshd_config" file using your favorite editor:
# vi /etc/ssh/sshd_config
Add/modify following line:
[...]
X11Forwarding yes
Configure X11 Forwarding Using SSH In Linux
Press ESC key and type :wq to save and close the file.
Restart sshd service to effect the changes:
# systemctl restart sshd
Done! We have configured X11 forwarding.
Now go to your client system (in my case, it is Ubuntu 20.04) and access the remote server via SSH using command:
$ ssh -X root@192.168.225.52
Here, -X option is used to enable X11 forwarding over SSH. Replace "root@192.168.225.52" with your remote server's username and IP address.
You will see the following warning message at first time.
/usr/bin/xauth: file /root/.Xauthority does not exist
However, the .Xauthority file should be automatically generated during the first login, thus subsequent logins should be fine.
Next, launch any GUI applications from this SSH session. I already have installed Gedit graphical text editor in my CentOS 8 server, so I am going to launch it using command:
# gedit
The gedit GUI window screen will now appear in your local system.
Run remote graphical applications over SSH session in Linux
You can interact with the Gedit application installed on the remote server using your local system's display, mouse, and keyboard.
Even though my CentOS 8 server doesn't have GUI desktop, I can be able to open Gedit graphical editor and use it from my local Ubuntu system.
Configure X11 forwarding in Putty
If you use Putty client to access remote systems, enter your remote system's IP or hostname in the Session tab:
Connect to remote system using Putty
Next, navigate to Connection -> SSH -> X11 and enable X11 forwarding option. Click Open to establish a new Putty session:
Configure X11 forwarding in Putty
Enter the username and password of the remote server. Once you connected to the remote system via Putty, launch any X application installed in the remote server.
Run graphical applications over Putty session
Start interacting with the remote GUI application from your local system!
This tutorial explains what is Anaconda Python distribution, the features of Anaconda, and how to install Anaconda on Linux operating system.
What is Anaconda distribution?
Anacondais a cross-platform distribution of the Python and R programming languages. It is used for data science, machine learning, large-scale data processing and predictive analytics etc. Anaconda is available as four editions namely individual (open source) edition, commercial edition, team edition and enterprise edition. Anaconda individual edition is the world’s most popular Python distribution platform with over 20 million users worldwide. The Individual edition is free for personal use while the three other editions are commercial versions.
Anaconda ships with a command line package and virtual environment manager called Conda, which is used to manage and deploy applications, environments and packages. Conda was created for Python packages, however it can be used for other languages as well.
Using Conda utility, we can,
Create new Conda environments,
Install packages into specified Conda environment,
List packages in a Conda environment,
Update conda packages,
Search for packages,
Clean unused packages,
Remove packages from environments,
And more.
It also includes Anaconda Navigator, a graphical alternative for those who are not comfortable with the command line interface.
Anaconda features
Anaconda distribution enables the data scientists to:
download a collection of over 1500+ Python and R data science packages,
manage libraries, packages and virtual environments,
develop and train machine learning and deep learning models,
analyze data,
and visualize results using various tools.
Install Anaconda On Linux
As stated already, Anaconda Python distribution comes as free and paid editions. The Individual edition is free for personal use and learning purposes. For the purpose of this guide, I will be using Anaconda Individual edition.
Before installing Anaconda distribution on your Linux machine, make sure you have installed all required prerequisites.
If you are using Arch Linux and its derivatives like Manjaro Linux, install the following prerequistes:
Compare the above hash value with theofficial Hashes for Anaconda. If the hash value of the locally downloaded installer file matches with the official hash, you're good to go.
Now, start Anaconda installation using command:
$ bash Anaconda3-2020.11-Linux-x86_64.sh
You should include the bash command regardless of the shell you're using.
Press ENTER to continue installation:
Welcome to Anaconda3 2020.11

In order to continue the installation process, please review the license
agreement.
Please, press ENTER to continue
>>>
You will now see the license agreement. Press ENTER key to scroll to the bottom of the license terms and type“Yes”and press to agree the license agreement and continue installation.
Please answer 'yes' or 'no':'
>>> yes
Next the installer will prompt where do you want to install Anaconda. You will be given three choices. Press ENTER to accept the default install location. Press CTRL+C to cancel the installation or mention an alternate installation directory.
I go with the default installation path, which is/home/sk/anaconda3in my case.
[...]
Anaconda3 will now be installed into this location:
/home/sk/anaconda3

  - Press ENTER to confirm the location
  - Press CTRL-C to abort the installation
  - Or specify a different location below

[/home/sk/anaconda3] >>>
If you've chosen the default location, the installer will display“PREFIX=/home/<user>/anaconda<2 or 3>”and continue the installation. It may take a few minutes to complete.
Next you will be prompted to initialize Anaconda. It is recommended to initialize it, so just type Yes and press ENTER to continue.
[...]
Preparing transaction: done
Executing transaction: done
installation finished.
Do you wish the installer to initialize Anaconda3
by running conda init? [yes|no]
[no] >>> yes
After a few seconds, you will see “Thank you for installing Anaconda3!” message if the installation is successful.
[...]
==> For changes to take effect, close and re-open your current shell. <==
 If you'd prefer that conda's base environment not be activated on startup,
    set the auto_activate_base parameter to false:
 conda config --set auto_activate_base false
 Thank you for installing Anaconda3!
 ===========================================================================
 Working with Python and Jupyter notebooks is a breeze with PyCharm Pro,
 designed to be used with Anaconda. Download now and have the best data
 tools at your fingertips.
 PyCharm Pro for Anaconda is available at: https://www.anaconda.com/pycharm
Install Anaconda On Linux
For the installation to take effect, close and re-open your Terminal. Alternatively, run the following command:
$ source ~/.bashrc
You will now see the prefix (base) in front of your shell prompt. It means that the conda'sbaseenvironment is activated.
(base) sk@ostechnix:~$
Conda base environment is activated
If you don't want theconda's base environmentactivated by default on system startup and wish to run conda from anywhere, run the following command:
$ conda config --set auto_activate_base false
$ source ~/.bashrc
Now you won't see the prefix (base) in your shell prompt.
Multi-user Anaconda installation on Linux
By default, Anaconda will be installed for the current user only. If you wish to install Anaconda for all system users, create a common group, for examplecondagroup:
$ sudo group add condagroup
Replace "condagroup" with your own.
Change the group ownership to "condagroup" on the entire directory where Anaconda is installed. In my case, Anaconda is installed in/home/sk/anaconda3directory, so I ran the following command:
$ sudo chgrp -R condagroup /home/sk/anaconda3
Replace/home/sk/anaconda3with the actual path to your installed Anaconda file.
Next, set read and write permission for the owner, root, and the condagroup only using command:
$ sudo chmod 770 -R /home/sk/anaconda3
Finally, add all users to the newly created "condagroup":
$ sudo adduser ostechnix condagroup
Here,ostechnixis the user name andcondagroupis the group name.
From now on, the users added to the "condagroup" group can able to access Anaconda, install packages, and create environments etc.
We have successfully installed Anaconda on our Linux machine. Let us verify if the Anaconda is installed correctly or not.
Verify Anaconda installation
We can verify Anaconda installation from commandline and/or from Anaconda Navigator GUI.
To verify Anaconda installation from commandline, run the following command:
$ conda list
If Anaconda is properly installed and working, you will see list of installed packages and their versions as shown in the following output:
packages in environment at /home/sk/anaconda3:
 #
 Name                    Version                   Build  Channel
 _ipyw_jlab_nb_ext_conf    0.1.0                    py38_0
 _libgcc_mutex             0.1                        main
 alabaster                 0.7.12                     py_0
 anaconda                  2020.11                  py38_0
 anaconda-client           1.7.2                    py38_0
 anaconda-navigator        1.10.0                   py38_0
 anaconda-project          0.8.4                      py_0
 argh                      0.26.2                   py38_0
 argon2-cffi               20.1.0           py38h7b6447c_1
 asn1crypto                1.4.0                      py_0
 astroid                   2.4.2                    py38_0
[...]
Verify Anaconda installation
The another method to verify the Anaconda installation is by entering into the Python shell.
To enter into Python shell, run:
$ python
This command will launch the Python shell. If Anaconda is installed and working, it will display "Anaconda, Inc." message as shown in the below output.
Python 3.8.5 (default, Sep  4 2020, 07:30:14)
 [GCC 7.3.0] :: Anaconda, Inc. on linux
 Type "help", "copyright", "credits" or "license" for more information.
Python shell
To exit the Python shell and go back to your shell prompt, enter the following command:
quit()
We can also verify Anaconda installation by opening Anaconda Navigator GUI.
Launch Anaconda Navigator graphical interface
We can manage packages and environments from command line usingCondapackage manager. If you're a newbie and bit uncomfortable with commandline, just use Anaconda Navigator GUI.
To launch Anaconda Navigator graphical interface, run the following command from your Terminal:
$ anaconda-navigator
The default interface of Anaconda Navigator will look like below:
Anaconda Navigator graphical interface
As you can see, the Anaconda navigator includes many popular IDEs by default. As of writing this guide, it has the following 10 IDEs:
Datalore,
IBM Watson Studio Cloud,
JupyterLab,
Jupyter Notebook,
Qt Console,
Spyder,
Glueviz,
Orange,
PyCharm Professional,
RStudio.
Among the 10 IDEs, the first 6 IDEs were installed by default. You can use any IDE of your choice to write, run and debug your code.
Well, Anaconda is working!
Activate and deactivate Conda environment
By default, a Conda environment named base is created and activated.
If it is not activated by any chance, you can activate the Conda base environment using command:
$ conda activate
To deactivate it, run:
$ conda deactivate
Activate and deactivate Conda environment
Update Anaconda
Let first check the currently installed Conda version using command:
Let us run the following command to see if there is any latest Conda version available:
$ conda update -n base conda
If there are any updates available, you will be prompted to update them. Just typeyto install the updates:
Update Conda
To update all packages to the latest version of Anaconda, run:
$ conda update anaconda
Run a simple Python program from Python shell
Launch Python shell using command:
$ python
You will now see the >>> sign. It means you're in Python shell.
Inside the Python shell, type your code. For example, I type the following code:
print("Welcome to OSTechNix")
When you hit ENTER, you will see "Welcome to OSTechNix" message.
Run a simple Python program from Python shell
To exit the Python shell and go back to your shell prompt, enter the following command:
quit()
All done. We have installed Anaconda on our Linux machine, verified the Anaconda installation from command line as well as from Anaconda GUI, and finally run a sample Python program from Python shell.
In our upcoming articles, we will learn more about Anaconda Navigator GUI, Python IDEs, and Conda command line interface.
If you don't use Anaconda anymore, you can remove it from your system as shown below.
Uninstall Anaconda
First, you need to Install "anaconda-clean" module which is used to completely uninstall Anaconda from your system.
$ conda install anaconda-clean
Next, run the following command to remove Anaconda:
$ anaconda-clean --yes
Here, the--yesflag is used to delete all config files and directories.
The above command will create a backup directory called .anaconda_backup in your $HOME directory.
And then, delete the entire Anaconda directory and the backup directory using commands:
$ rm -fr ~/anaconda3/
$ rm -fr ~/.anaconda_backup/
Finally, delete all Anaconda entries from your~/.bashrcfile.
Make the backup of ~/.bashrc file, just in case:
$ cp ~/.bashrc ~/.bashrc.bak
Open~/.bashrcfile using your preferred editor:
$ nano ~/.bashrc
Find the following lines and delete them. Please double check the lines before deleting them.
>>> conda initialize >>>
 !! Contents within this block are managed by 'conda init' !!
 __conda_setup="$('/home/sk/anaconda3/bin/conda' 'shell.bash' 'hook' 2> /dev/null)"
 if [ $? -eq 0 ]; then
     eval "$__conda_setup"
 else
     if [ -f "/home/sk/anaconda3/etc/profile.d/conda.sh" ]; then
         . "/home/sk/anaconda3/etc/profile.d/conda.sh"
     else
         export PATH="/home/sk/anaconda3/bin:$PATH"
     fi
 fi
 unset __conda_setup
 <<< conda initialize <<<
Delete Anaconda entries from bashrc file
Finally, run the following command to take effect the changes immediately:
$ source ~/.bashrc
That's it. Anaconda has been removed from your system.