Saturday, May 28, 2016

[Quick Install: PXE Boot]: How to Configure PXE(Network Boot) installation Server on CentOS/RHEL 7.x

How to Configure PXE(Network Boot) installation Server on CentOS/RHEL 7.x

The Preboot eXecution Environment (PXE, sometimes pronounced as pixie) specification describes a standardized client-server environment that boots a software assembly, retrieved from a network, on PXE-enabled clients. On the client side it requires only a PXE-capable network interface controller (NIC), and uses a small set of industry-standard network protocols such as DHCP and TFTP.

The concept behind the PXE originated in the early days of protocols like BOOTP/DHCP/TFTP, and as of 2015 it forms part of the Unified Extensible Firmware Interface (UEFI) standard. Given fast and reliable local area networks (LANs), PXE is the most frequent choice for operating system booting, installation and deployment.
Install required packages for PXE Setup
To install and Configure pxe server on centos 7.x we need the following packages.
[root@pxeserver ~]# yum install dhcp tftp tftp-server syslinux vsftpd xinetd
Configure DHCP Server for PXE
Install dhcp package then a sample configuration file of dhcp server is created at "/usr/share/doc/dhcp*/dhcpd.conf.example", though the configuration file of dhcp is at '/etc/dhcp/dhcpd.conf'.
Copy the following lines into the file '/etc/dhcp/dhcpd.conf', replace the ip subnet and other details as per your environment.
[root@pxeserver~]# vi /etc/dhcp/dhcpd.conf

# DHCP Server Configuration file.

ddns-update-style interim;
ignore client-updates;
authoritative;
allow booting;
allow bootp;
allow unknown-clients;

# internal subnet for my DHCP Server
subnet 192.168.2.0 netmask 255.255.255.0 {
range 192.168.2.21 192.168.2.151;
option domain-name-servers 192.168.2.11;
option domain-name "pxeserver.hackthesec.co.in";
option routers 192.168.2.11;
option broadcast-address 192.168.2.255;
default-lease-time 600;
max-lease-time 7200;

# IP of PXE Server
next-server 192.168.2.11;
filename "pxelinux.0";
}
Edit and Config tftp server (/etc/xinetd.d/tftp)
TFTP (Trivial File Transfer Protocol ) is used to transfer files from data server to its clients without any kind of authentication. In case of PXE server setup tftp is used for bootstrap loading. To config tftp server, edit its configuration file '/etc/xinetd.d/tftp', change the parameter ‘disable = yes' to 'disable = no' and leave the other parameters as it is.
[root@pxeserver ~]# vi /etc/xinetd.d/tftp
service tftp
{
 socket_type = dgram
 protocol    = udp
 wait        = yes
 user        = root
 server      = /usr/sbin/in.tftpd
 server_args = -s /var/lib/tftpboot
 disable     = no
 per_source  = 11
 cps         = 100 2
 flags       = IPv4
}
tftp root directory "/var/lib/tftpboot"
Run the following commands to copy required network boot files in '/var/lib/tftpboot/'
[root@pxeserver ~]# cp -v /usr/share/syslinux/pxelinux.0 /var/lib/tftpboot
[root@pxeserver ~]# cp -v /usr/share/syslinux/menu.c32 /var/lib/tftpboot
[root@pxeserver ~]# cp -v /usr/share/syslinux/memdisk /var/lib/tftpboot
[root@pxeserver ~]# cp -v /usr/share/syslinux/mboot.c32 /var/lib/tftpboot
[root@pxeserver ~]# cp -v /usr/share/syslinux/chain.c32 /var/lib/tftpboot
[root@pxeserver ~]# mkdir /var/lib/tftpboot/pxelinux.cfg
[root@pxeserver ~]# mkdir /var/lib/tftpboot/networkboot
Mount CentOS 7.x ISO file and copy its contents to local ftp server
Run the following commands to mount iso file and copy its contents in ftp server’s directory '/var/ftp/pub'
[root@pxeserver ~]# mount -o loop CentOS-7-x86_64-DVD-1511.iso /mnt/
mount: /dev/loop0 is write-protected, mounting read-only
[root@pxeserver ~]# cd /mnt/
[root@pxeserver mnt]# cp -av * /var/ftp/pub/
Copy Kernel file (vmlimz) and initrd file from mounted iso file to '/var/lib/tftpboot/networkboot/'
[root@pxeserver ~]# cp /mnt/images/pxeboot/vmlinuz /var/lib/tftpboot/networkboot/
[root@pxeserver ~]# cp /mnt/images/pxeboot/initrd.img /var/lib/tftpboot/networkboot/
Create kickStart & PXE menu file.
Before creating kickstart file, let's first create the root password in an encrypted string because we will using that encrypted password string in kickstart file
[root@pxeserver ~]# openssl passwd -1 Pxese@123#
$1$e2wrcGGw$tZOPMCSXVhNmbiGg66seGH
System default kickstart file is placed under /root/anaconda-ks.cfg. and we will be creating a new kickstart under the folder /var/ftp/pub with the name'centos7.cfg'
Copy the following content into the new kickstart file. Please modify the kickstart file as per your needs.
[root@pxeserver ~]# vi /var/ftp/pub/centos7.cfg

#platform=x86, AMD64, or Intel EM64T
#version=DEVEL
# Firewall configuration
firewall --disabled
# Install OS instead of upgrade
install
# Use FTP installation media
url --url="ftp://192.168.2.11/pub/"
# Root password
rootpw --iscrypted $1$e2wrcGGX$tZPQKPsXVhNmbiGg53MN41
# System authorization information
auth useshadow passalgo=sha512
# Use graphical install
graphical
firstboot disable
# System keyboard
keyboard us
# System language
lang en_US
# SELinux configuration
selinux disabled
# Installation logging level
logging level=info
# System timezone
timezone asia/kolkata
# System bootloader configuration
bootloader location=mbr
clearpart --all --initlabel
part swap --asprimary --fstype="swap" --size=1024
part /boot --fstype xfs --size=300
part pv.01 --size=1 --grow
volgroup root_vg01 pv.01
logvol / --fstype xfs --name=lv_01 --vgname=root_vg01 --size=1 --grow
%packages
@^minimal
@core
%end
%addon com_redhat_kdump --disable --reserve-mb='auto'
%end
Create a PXE menu file (/var/lib/tftpboot/pxelinux.cfg/default), copy the following contents into the pxe menu file.
[root@pxeserver ~]# vi /var/lib/tftpboot/pxelinux.cfg/default

default menu.c32
prompt 0
timeout 30
MENU TITLE Hack The Sec PXE Menu
LABEL centos7_x64
MENU LABEL CentOS 7_X64
KERNEL /networkboot/vmlinuz
APPEND initrd=/networkboot/initrd.img inst.repo=ftp://192.168.2.11/pub ks=ftp://192.168.2.11/pub/centos7.cfg
Start and enable xinetd, dhcp and vsftpd service.
Use the fllowing commands to start and enable xinetd, dhcp and vsftpd.
[root@pxeserver ~]# systemctl start xinetd
[root@pxeserver ~]# systemctl enable xinetd
[root@pxeserver ~]# systemctl start dhcpd.service
[root@pxeserver ~]# systemctl enable dhcpd.service
Created symlink from /etc/systemd/system/multi-user.target.wants/dhcpd.service to /usr/lib/systemd/system/dhcpd.service.
[root@pxeserver ~]# systemctl start vsftpd
[root@pxeserver ~]# systemctl enable vsftpd
Created symlink from /etc/systemd/system/multi-user.target.wants/vsftpd.service to /usr/lib/systemd/system/vsftpd.service.
If your SELinux is enabled, then set the following selinux rule for ftp server.
[root@pxeserver ~]# setsebool -P allow_ftpd_full_access 1
Open the ports in the OS firewall using following firewall-cmd commands
[root@pxeserver ~]# firewall-cmd --add-service=ftp --permanent
success
[root@pxeserver ~]# firewall-cmd --add-service=dhcp --permanent
success
[root@pxeserver ~]# firewall-cmd --add-port=69/tcp --permanent 
success
[root@pxeserver ~]# firewall-cmd --add-port=69/udp --permanent 
success
[root@pxeserver ~]# firewall-cmd --add-port=4011/udp --permanent
success
[root@pxeserver ~]# firewall-cmd --reload
success
Boot the clients with pxe boot option.

Monday, May 16, 2016

[Clustering: High Availability]: How To Configure Online Failover/Failback on CentOS 6 Using Heartbeat

How To Configure Online Failover/Failback on CentOS 6 Using Heartbeat

Heartbeat is a daemon that provides cluster infrastructure (communication and membership) services to its clients. This allows clients to know about the presence (or disappearance!) of peer processes on other machines and to easily exchange messages with them.

In this guidance, i am build 2 system for online failover. The systems using CentOS 6 64 Bit. For easy understanding, this is my information system
 
# Server 1
Hostname   : node1
Domain     : imanudin.net
IP Address : 192.168.80.91

# Server 2
Hostname   : node2
Domain     : imanudin.net
IP Address : 192.168.80.92

# Alias IP for online failover testing
IP Address : 192.168.80.93

# Configure Network
First, we must configure network on CentOS. Assuming name of your network interface is eth0. Do the following configuration on all nodes (node1 and node2) and adjust on node2

1.vi /etc/sysconfig/network-scripts/ifcfg-eth0
 
DEVICE=eth0
ONBOOT=yes
NM_CONTROLLED=no
BOOTPROTO=none
IPADDR=192.168.80.91
NETMASK=255.255.255.0
DNS1=192.168.80.91
GATEWAY=192.168.80.11
DNS2=192.168.80.11
DNS3=8.8.8.8
USERCTL=no

Restart network service and setup for automatic boot on all nodes (node1 and node2)

1.service network restart
2.chkconfig network on

# Configure Disable Selinux & Firewall on all nodes (node1 and node2)

Open file /etc/sysconfig/selinux and change SELINUX=enforcing become SELINUX=disabled.

Also disable some service such as iptables and ip6tables.

1.setenforce 0
2.service iptables stop
3.service ip6tables stop
4.chkconfig iptables off
5.chkconfig ip6tables off

# Configure /etc/hosts and hostname on all nodes (node1 and node2)
 Open file /etc/hosts and configure as follows
# node1
127.0.0.1     localhost
192.168.80.91 node1.imanudin.net node1
192.168.80.92 node2.imanudin.net node2

# node2
127.0.0.1     localhost
192.168.80.91 node1.imanudin.net node1
192.168.80.92 node2.imanudin.net node2

Do the following command as root and open file /etc/sysconfig/network to change hostname
On node1
1.hostname node1.imanudin.net
2.vi /etc/sysconfig/network

Change HOSTNAME so that like below :
NETWORKING=yes
HOSTNAME=node1.imanudin.net

On node2
1.hostname node2.imanudin.net
2.vi /etc/sysconfig/network

Change HOSTNAME so that like below :
NETWORKING=yes
HOSTNAME=node2.imanudin.net

# Update repos and install packages Heartbeat on all nodes (node1 and node2)
1.yum update
2.yum install epel-release
3.yum -y install heartbeat

If you cannot get epel repo, please use this repo and install : http://dl.fedoraproject.org/pub/epel/6/x86_64/epel-release-6-8.noarch.rpm

# Configure Heartbeat

– Create a file /etc/ha.d/ha.cf (enough on node1 only)
1.vi /etc/ha.d/ha.cf

fill with the following line
keepalive 2
warntime 5
deadtime 15
initdead 90
udpport 694
auto_failback on
ucast eth0 192.168.80.92
logfile /var/log/ha-log
node node1.imanudin.net node2.imanudin.net

Note :
eth0 is interface on your system. If your system using eth1 for interface name, please change eth0 to the eth1. 192.168.80.92 is IP Address of node2

– Create a file /etc/ha.d/authkeys (enough on node1 only)
1.vi /etc/ha.d/authkeys
fill with the following line
auth 2
2 crc

change permission authkeys
1.chmod 0600 /etc/ha.d/authkeys
– Create a file /etc/ha.d/haresources (enough on node1 only)

1.vi /etc/ha.d/haresources
fill with the following line
node1.imanudin.net IPaddr::192.168.80.93/24/eth0:0

Note :
node1.imanudin.net will become as a master server. 192.168.80.93 is an alias IP for testing online/failover
# Copy those files from node1 to node2 (run the following command on node1)
1.cd /etc/ha.d/
2.scp authkeys ha.cf haresources root@192.168.80.92:/etc/ha.d/
# Change ha.cf file on node2 (run the following command on node2)
1.vi /etc/ha.d/ha.cf
change line ucast eth0 192.168.80.92 so that become
ucast eth0 192.168.80.91
192.168.80.91 is IP Address of node1
# Start service Heartbeat and configure for automatic startup at boot on all nodes (node1 and node2)
1.service heartbeat start
2.chkconfig heartbeat on
TESTING ONLINE FAILOVER/FAILBACK
After your start service heartbeat on all nodes, you will see an alias IP on node1. Please check with command ifconfig. For testing failover, please stop service heartbeat on node1 (service heartbeat stop). Please check your IP on node2 with command ifconfig. You will see an alias IP on node2 (an alias IP that has been taken by node2). For testing failback, please start again service heartbeat on node1 (service heartbeat start). An alias IP will automatically taken by node1.
TESTING WITH APACHE WEB SERVER
Please install Apache on all nodes
1.yum install httpd
– Create an index.html on DocumentRoot node1
1.vi /var/www/html/index.html
Fill with the following example
This is node1
Save and restart service Apache
1.service httpd restart
Please try to access node1 via browser. You will see a text This is node1
– Create an index.html on DocumentRoot node2
1.vi /var/www/html/index.html
Fill with the following example
This is node2
Save and restart service Apache
1.service httpd restart
Please try to access node2 via browser. You will see a text This is node2
Integrate Apache with Heartbeat
Please change file /etc/ha.d/haresources on all nodes
1.vi /etc/ha.d/haresources
so that like below :
node1.imanudin.net IPaddr::192.168.80.93/24/eth0:0 httpd
Stop service Apache and configure automatic off at boot on all nodes (Service Apache will be handled by Heartbeat)
1.service httpd stop
2.chkconfig httpd off
Please try to access an alias IP from browser. You will see a text This is node1. Please try to stop Heartbeat service on node1 and refresh browser. You will see a text This is node2 (all services handled by Heartbeat on node1 will be taken by node2). For failback, please start again Heartbeat service on node1 (all services handled by Heartbeat on node2 will be taken again by node1)
You could also experiment with other services for online failover such as Samba, MySQL, MariaDB etc. The Heartbeat application only configure failover/failback, not data synchronize.
Good luck and hopefully useful

[Quick Tips: Process Limit]: How to Set Limits on User Running Processes in Linux

How to Set Limits on User Running Processes in Linux

ne of the Linux’s beauties is that you can control almost everything about it. This gives a system administrator a great control over his system and better utilization of the system resources.
While some might have never thought about doing this, it is important to know that in Linux you can limit how much resource a single user may use and for how long.
In this short topic, we will show you how to limit the number of processes started by user and how to check the current limits and modify them.
Before we go any further there are two things we need to point:
  1. You need root access to your system to modify the user limits
  2. You must be extremely careful if you plan to modify these limits
To setup user limits, we will need to edit the following file:
/etc/security/limits.conf
This file is used to apply ulimit created by the pam_module
The file has the following syntax:
<domain> <type> <item> <value>
Here we will stop to discuss each of the options:
  • Domain – this includes usernames, groups, guid ranges etc
  • Type – soft and hard limits
  • Item – the item that will be limited – core size, file size,  nproc etc
  • Value – this is the value for the given limit
A good sample for a limit is:
@student          hard           nproc                20
The above line sets a hard limit of maximum 20 processes on the "student" group.
If you want to see the limits of a certain process has you can simply “cat” the limits file like this:
# cat /proc/PID/limits
Where PID is the actual process ID, you can find out process id by using ps command.
So here is an example:
# cat /proc/2497/limits
Sample Output
Limit                     Soft Limit           Hard Limit           Units     
Max cpu time              unlimited            unlimited            seconds   
Max file size             unlimited            unlimited            bytes     
Max data size             unlimited            unlimited            bytes     
Max stack size            8388608              unlimited            bytes     
Max core file size        0                    unlimited            bytes     
Max resident set          unlimited            unlimited            bytes     
Max processes             32042                32042                processes 
Max open files            1024                 4096                 files     
Max locked memory         65536                65536                bytes     
Max address space         unlimited            unlimited            bytes     
Max file locks            unlimited            unlimited            locks     
Max pending signals       32042                32042                signals   
Max msgqueue size         819200               819200               bytes     
Max nice priority         0                    0                    
Max realtime priority     0                    0                    
Max realtime timeout      unlimited            unlimited            us   
All of the lines are pretty much self explanatory. However if you want to find more the settings you can input inlimits.conf file, you can have a look at the manual provided here.

[Quick Install: RDP]: HOW TO INSTALL AND CONFIGURE XRDP FOR REMOTE SESSION

HOW TO INSTALL AND CONFIGURE XRDP FOR REMOTE SESSION


In this tutorial we will learn about xrdp. We will discuss difference between xrdp and VNC briefly. We will install and xrdp server.
Introduction
Xrdp is daemon that supports Windows Remote Desktop Protocol. Xrdp is very easy to config and use as compare to VNC server. Xrdp utility provide us platform to access Linux in Windows environment. Xrdp is light weight and easy to setup as compared to VNC. With xrdp you can lock remote system and can map local devices where as in VNC you can not.. By default it listens on port number 3389.
Make sure you have installed GNOME Desktop on your distro.
To  install xrdp and tigervnc-server you can use command.
[root@faraz ~]# yum install xrdp  tigervnc-server
After installation you need to configure SELinux because you need change the file context by using command chconwhich stand for change context. Through this command change the SELinux security context of each file. You do not need to pay much attention to SELinux commands at this stage. Just use below commands
[root@faraz ~]# chcon  --type=bin_t  /usr/sbin/xrdp

[root@faraz ~]# chcon  --type=bin_t  /usr/sbin/xrdp-sesman
Now you are able to start the service of xrdp or you can set at boot time by using keyword enable.
[root@faraz ~]# systemctl start xrdp.service
If your firewall is running then stopfirewall by using command systemctl stop firewalld or make rule for xrdp with defining the port number 3389.
[root@faraz ~]# firewall-cmd   --permanent   --zone=public   --add-port=3389/tcp

[root@faraz ~]# firewall -cmd  --reload
Now your configuration is complete you can use Linux from any Windows machine by using remote desktop connection. Click on start button and write in the text area “Remote Desktop or mstsc” you will the application for remote connection click on it. Dialog box will open, enter the IP of Linux Server and click connect button.
mstsc remote access
mstsc remote access

You will see the xrdp login panel of session sesman-Xvnc enter username and password which is on Linux server choose any one or you can access from root also.
Xvnc sesman access to linux
It may take a minute or depending on your machine.
xrdp remote windows
xrdp remote windows
We have successfully connected with xrdp Linux from Windows.

We have seen  it is very easy to install and  configure  xrdp. Only the technique of SELinux is required to change the security context of the file. 

Thursday, May 5, 2016

[Quick Tips: IPTABLES VS FIREWALLD]: IPTABLES VS FIREWALLD

IPTABLES VS FIREWALLD


What is iptables?

First, we need to know what is iptables. Most of senior IT professionals knows about it and used to work with it as well. Iptables is an application / program that allows a user to configure the security or firewall security tables provided by the Linux kernel firewall and the chains so that a user can add / remove firewall rules to it accordingly to meet his / her security requirements. Iptables uses different kernel modules and different protocols so that user can take the best out of it. As for example, iptables is used for IPv4 ( IP version 4/32 bit ) and ip6tables for IPv6 ( IP version 6/64 bit ) for both tcp and udp. Normally, iptables rules are configured by System Administrator or System Analyst or IT Manager.  You must have root privileges to execute each iptables rules. Linux Kernel uses the Netfilter framework so that it can provide various networking-related operations which can be performed by using iptables. Previously, ipchains was used in most of the Linux distributions for the same purpose. Every iptables rules are directly handled by the Linux Kernel itself and it is known as kernel duty. Whatever GUI tools or other security tools you are using to configure your server’s firewall security, at the end of the day, it is converted into iptables rules and supplied to the kernel to perform the operation.

History of iptables

The rise of the iptables begin with netfilter. Paul Rusty Russell was the initial author and the head think tank behind netfilter / iptables. Later he was joined by many other tech people then form and build the Netfilter core team and develop & maintain the netfilter/iptables project as a joint effort like many other open source projects. Harald Welte was the former leader until 2007 and then Patrick McHardy was the head until 2013. Currently, netfilter core team head is Pablo Neira Ayuso.
To know more about netfilter, please visit this link. To know more about the histrity of netfilter, please visit this link.
To know more about iptables history, please visit this link.

How to install iptables

Now a days, every Linux Kernel comes with iptables and can be found pre build or pre installed on every famous modern Linux distributions. On most Linux systems, iptables is installed in this /usr/sbin/iptables directory. It can be also  found in /sbin/iptables, but since iptables is more like a service rather than an “essential binary”, the preferred location remains in /usr/sbin directory.

For Ubuntu or Debian
sudo apt-get install iptables

For CentOS
sudo yum install iptables-services

For RHEL
sudo yum install iptables

Iptables version

To know your iptables version, type the following command in your terminal.
 
sudo iptables --version

Start & Stopping your iptables firewall

For OpenSUSE 42.1, type the following to stop.
sudo /sbin/rcSuSEfirewall2 stop

To start it again
sudo /sbin/rcSuSEfirewall2 start

For Ubuntu, type the following to stop.
sudo service ufw stop

To start it again
sudo service ufw start

For Debian & RHEL , type the following to stop.
sudo /etc/init.d/iptables stop

To start it again
sudo /etc/init.d/iptables start

For CentOS, type the following to stop.
sudo service iptables stop

To start it again
sudo service iptables start

Getting all iptables rules lists

To know all the rules that is currently present & active in your iprables, simply open a terminal and type the following.
 
sudo iptables -L

If there are no rules exits on the iptables means if there are no rules added so far in your iptables firewall, you will see something like the below image.
Iptables_Lists_OpenSUSE42.1
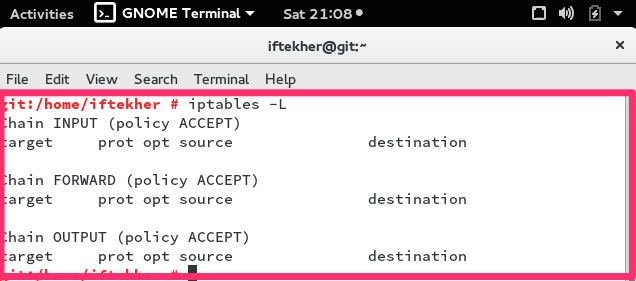
In this above picture, you can see that , there are three (3) chains and they are INPUT, FORWARD, OUTPUT and there are no rules exists. Actually I haven’t add one yet.

Type the following to know the status of the chains of your iptables firewall.
sudo iptables -S

With the above command, you can learn whether your chains are accepting or not.

Clear all iptables rules

To clear all the rules from your iptables firewall, please type the following. This is normally known as flushing your iptables rules.
 
sudo iptables -F

If you want to flush the INPUT chain only, or any individual chains, issue the below commands as per your requirements.
 
sudo iptables -F INPUT
sudo iptables -F OUTPUT
sudo iptables -F FORWARD

ACCEPT or DROP Chains

To accept or drop a particular chain, issue any of the following command on your terminal to meet your requirements.
 
iptables --policy INPUT DROP

The above rule will not accept anything that is incoming to that server. To revert it again back to ACCEPT, do the following
 
iptables --policy INPUT ACCEPT

Same goes for other chains as well like
 
iptables --policy OUTPUT DROP
iptables --policy FORWARD DROP

Note: By default, all chains of iptables ( INPUT, OUTPUT, FORWARD ) are in ACCEPT mode. This is known as Policy Chain Default Behavior.

Allowing any port

If you are running any web server on your host, then you must allow your iptables firewall so that your server listen or respond to port 80. By default web server runs on port 80. Let’s do that then.
 
sudo iptables -A INPUT -p tcp --dport 80 -j ACCEPT

On the above line, A stands for append means we are adding a new rule to the iptables list. INPUT stands for the INPUT chain. P stands for protocol and dport stands for destination port. By default any web server runs on port 80. Similarly, you can allow SSH port as well.
 
sudo iptables -A INPUT -p tcp --dport 22 -j ACCEPT

By default, SSH runs on port 22. But it’s good practise not to run SSH on port 22. Always run SSH on a different port. To run SSH on a different port, open /etc/ssh/sshd_config file on your favorite editor and change the port 22 to a other port.

Blocking any port

Say we want to block port 135. We can do it by
 
sudo iptables -A INPUT -p tcp --dport 135 -j DROP

if you want to block your server to initiate any SSH connection from the server to another host/server, issue the following command
 
sudo iptables -A OUTPUT -p tcp --dport 22 -j DROP

By doing so, no one can use your sever to initiate a SSH connection from the server. The OUPUT chain will filter and DROP any outgoing tcp connection towards another hosts.

Allowing specific IP with Port

sudo iptables -A INPUT -p tcp -s 0/0 --dport 22  -j ACCEPT

Here -s 0/0 stand for any incoming source with any IP addresses. So, there is no way your server is going to respond for a tcp packet which destination port is 22. If you want to allow only any particular IP then use the following one.
 
sudo iptables -A INPUT -p tcp -s 12.12.12.12/32 --dport 22  -j ACCEPT

On the above example, you are only allowing 12.12.12.12 IP address to connect to port SSH. Rest IP addresses will not be able to connect to port 22. Similarly you can allow by using CIDR values. Such as
sudo iptables -A INPUT -p tcp -s 12.12.12.0/24 --dport 22  -j ACCEPT

The above example show how you can allow a whole IP block for accepting connection on port 22. It will accept IP starting from 12.12.12.1 to 12.12.12.255.
If you want to block such IP addresses range, do the reverse by replacing ACCEPT by DROP like the following
 
sudo iptables -A INPUT -p tcp -s 12.12.12.0/24 --dport 22  -j DROP

So, it will not allow to get a connection on port 22 from from 12.12.12.1 to 12.12.12.255 IP addresses.

Blocking ICMP

If you want to block ICMP (ping) request to and from on your server, you can try the following. The first one will block not to send ICMP ping echo request to another host.
 
sudo iptables -A OUTPUT -p icmp --icmp-type 8 -j DROP

Now, try to ping google.com. Your OpenSUSE server will not be able to ping google.com.

If you want block the incoming ICMP (ping) echo request for your server, just type the following on your terminal.
 
sudo iptables -I INPUT -p icmp --icmp-type 8 -j DROP

Now, It will not reply to any ICMP ping echo request. Say, your server IP address is 13.13.13.13.

And if you ping ping that IP of your server then you will see that your server is not responding for that ping request.

Blocking MySql / MariaDB Port

As Mysql is holding your database so you must protect your database from outside attach. Allow your trusted application server IP addresses only to connect with your MySQL server. To block other
 
sudo iptables -A INPUT -p tcp -s 192.168.1.0/24 --dport 3306 -m state --state NEW,ESTABLISHED -j ACCEPT

So, it will not take any MySql connection except 192.168.1.0/24 IP block. By default MySql runs on 3306 port.

Blocking SMTP

If you not running any mail server on your host server or if your server is not configured to act like a mail server, you must block SMTP so that your server is not sending any spam or any mail towards any domain. You must do this to block any outgoing mail from your server. To do so,
 
sudo iptables -A OUTPUT -p tcp --dport 25 -j DROP

Block DDoS

We all are familiar with the term DDoS. To get rid of it, issue the following command in your terminal.
 
iptables -A INPUT -p tcp --dport 80 -m limit --limit 20/minute --limit-burst 100 -j ACCEPT

You need to configure the numerical value to meet your requirements. This is just a standard to maintain.

You can protect more by
echo 1 > /proc/sys/net/ipv4/ip_forward
echo 1 > /proc/sys/net/ipv4/tcp_syncookies
echo 0 > /proc/sys/net/ipv4/conf/all/accept_redirects
echo 0 > /proc/sys/net/ipv4/conf/all/accept_source_route
echo 1 > /proc/sys/net/ipv4/conf/all/rp_filter
echo 1 > /proc/sys/net/ipv4/conf/lo/rp_filter
echo 1 > /proc/sys/net/ipv4/conf/lo/arp_ignore
echo 2 > /proc/sys/net/ipv4/conf/lo/arp_announce
echo 1 > /proc/sys/net/ipv4/conf/all/arp_ignore
echo 2 > /proc/sys/net/ipv4/conf/all/arp_announce
echo 0 > /proc/sys/net/ipv4/icmp_echo_ignore_all
echo 1 > /proc/sys/net/ipv4/icmp_echo_ignore_broadcasts
echo 30 > /proc/sys/net/ipv4/tcp_fin_timeout
echo 1800 > /proc/sys/net/ipv4/tcp_keepalive_time
echo 1 > /proc/sys/net/ipv4/tcp_window_scaling 
echo 0 > /proc/sys/net/ipv4/tcp_sack
echo 1280 > /proc/sys/net/ipv4/tcp_max_syn_backlog

Blocking Port Scanning

There are hundred of people out there to scan your open ports of your server and try to break down your server security. To block it
 
sudo iptables -N block-scan
sudo iptables -A block-scan -p tcp —tcp-flags SYN,ACK,FIN,RST RST -m limit —limit 1/s -j RETURN
sudo iptables -A block-scan -j DROP

Here, block-scan is a name of a new chain.

Blocking Bad Ports

You may need to block some bad ports for your server as well. Here is how you can do this.
badport="135,136,137,138,139,445" 
 
sudo iptables -A INPUT -p tcp -m multiport --dport $badport -j DROP
sudo iptables -A INPUT -p udp -m multiport --dport $badport -j DROP

You can add more ports according to your needs.

What is firewalld?

Firewalld provides a dynamically managed firewall with support for network/firewall zones that defines the trust level of network connections or interfaces. It has support for IPv4, IPv6 firewall settings, ethernet bridges and IP sets. There is a separation of runtime and permanent configuration options. It also provides an interface for services or applications to add firewall rules directly.
The former firewall model with system-config-firewall/lokkit was static and every change required a complete firewall restart. This included also to unload the firewall netfilter kernel modules and to load the modules that are needed for the new configuration. The unload of the modules was breaking stateful firewalling and established connections. The firewall daemon on the other hand manages the firewall dynamically and applies changes without restarting the whole firewall. Therefore there is no need to reload all firewall kernel modules. But using a firewall daemon requires that all firewall modifications are done with that daemon to make sure that the state in the daemon and the firewall in kernel are in sync. The firewall daemon can not parse firewall rules added by the iptables and ebtables command line tools. The daemon provides information about the current active firewall settings via D-BUS and also accepts changes via D-BUS using PolicyKit authentication methods.
So, firewalld uses zones and services instead of chain and rules for performing the operations and it can manages rule(s) dynamically allowing updates & modification without breaking existing sessions and connections.
It has following features.
  • D-Bus API.
  • Timed firewall rules.
  • Rich Language for specific firewall rules.
  • IPv4 and IPv6 NAT support.
  • Firewall zones.
  • IP set support.
  • Simple log of denied packets.
  • Direct interface.
  • Lockdown: Whitelisting of applications that may modify the firewall.
  • Support for iptables, ip6tables, ebtables and ipset firewall backends.
  • Automatic loading of Linux kernel modules.
  • Integration with Puppet.
To know more about firewalld, please visit this link.

How to install firewalld

Before installing firewalld, please make sure you stop iptables and also make sure that iptables are not using or working anymore. To do so,
 
sudo systemctl stop iptables

This will stop iptables form your system.

And then make sure iptables are not used by your system any more by issuing the below command in the terminal.
sudo systemctl mask iptables

Now, check the status of iptables.
sudo systemctl status iptables
iptables_status_unixmen
Now, we are ready to install firewalld on to our system.
For Ubuntu
To install it on Ubuntu, you must remove UFW first and then you can install Firewalld. To remove UFW, issue the below command on the terminal.
sudo apt-get remove ufw
After removing UFW, issue the below command in the terminal
sudo apt-get install firewall-applet
Or
You can open Ubuntu Software Center and look or seacrh  for “firewall-applet” then install it on to your Ubuntu system.
For RHEL, CentOS & Fedora
Type the below command to install firewalld on your CentOS system.
sudo yum install firewalld firewall-config -y

How to configure firewalld

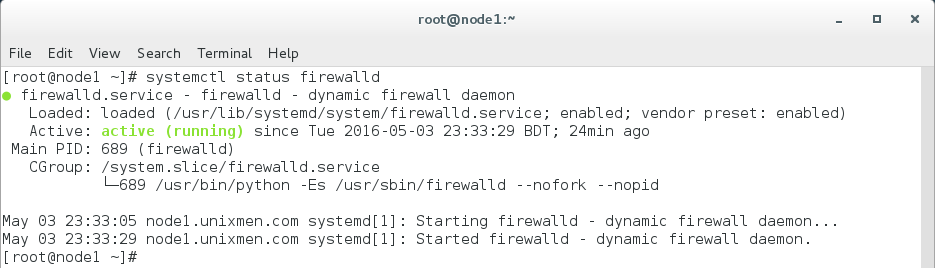
Before configuring firewalld, we must know the status of firewalld after the installation. To know that, type the following.
sudo systemctl status firewalld
firewalld_status_unixmen
As firewalld works on zones basis, we need to check all the zones and services though we haven’t done any configuring yet.
For Zones
sudo firewall-cmd --get-active-zones
firewalld_activezones_unixmen

or
 
sudo firewall-cmd --get-zones
firewalld_getzones_unixmen
To know the default zone, issue the below command
sudo firewall-cmd --get-default-zone
firewalld_defaultszones_unixmen
And, For Services
sudo firewall-cmd --get-services
firewalld_services_unixmen
Here, you can see those services covered under firewalld.

Setting Default Zone

An important note is, after each modification, you need to reload firewalld so that your changes can take place.

To set the default zone
sudo firewall-cmd --set-default-zone=internal

or
sudo firewall-cmd --set-default-zone=public

After changing the zone, check whether it changes or not.
sudo firewall-cmd --get-default-zone

Adding Port in Public Zone

sudo firewall-cmd --permanent --zone=public --add-port=80/tcp
firewalld_addport_unixmen

This will add tcp port 80 in the public zone of firewalld. You can add your desired port as well by replacing 80 by your’s.

Now reload the firewalld.
sudo firewall-cmd --reload

Now, check the status to see whether tcp 80 port has been added or not.
sudo firewall-cmd --zone=public --list-ports
firewalld_statusafterport_unixmen
Here, you can see that tcp port 80 has been added.
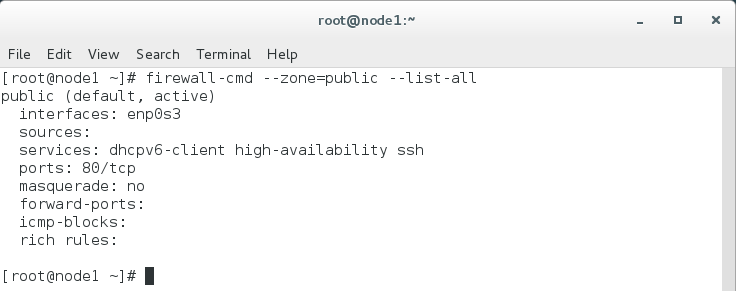
Or even you can try something like this.
 
sudo firewall-cmd --zone=public --list-all
firewalld_statusall_unixmen

Removing Port from Public Zone

To remove Tcp 80 port from the public zone, type the following.
 
sudo firewall-cmd --zone=public --remove-port=80/tcp

You will see a “success” text echoing in your terminal.
You can put your desired port as well by replacing 80 by your’s own port.

Adding Services in Firewalld

To add ftp service in firewalld, issue the below command
sudo firewall-cmd --zone=public --add-service=ftp

You will see a “success” text echoing in your terminal.

Similarly for adding smtp service, issue the below command
sudo firewall-cmd --zone=public --add-service=smtp

Replace ftp and smtp by your’s own service that you want to add in the firewalld.

Removing Services from Firewalld

For removing ftp & smtp services from firewalld, issue the below command in the terminal.
 
sudo firewall-cmd --zone=public --remove-service=ftp
sudo firewall-cmd --zone=public --remove-service=smtp

Block Any Incoming and Any Outgoing Packet(s)

If you wish, you can block any incoming or outgoing packets / connections by using firewalld. This is known as “panic-on” of firewalld. To do so, issue the below command.
sudo firewall-cmd --panic-on

You will see a “success” text echoing in your terminal.

After doing this, you will not be able to ping a host or even browse any websites.

To turn this off, issue the below command in your terminal.
sudo firewall-cmd --panic-off

Adding IP Address in Firewalld

sudo firewall-cmd --zone=public --add-rich-rule='rule family="ipv4" source address="192.168.1.4" accept'
By doing so, firewalld will accept IP v4 packets from the source IP 192.168.1.4.

Blocking IP Address From Firewalld

Similarly, to block any IP address
sudo firewall-cmd --zone=public --add-rich-rule='rule family="ipv4" source address="192.168.1.4" reject'

By doing so, firewalld will drop / discards every IP v4 packets from the source IP 192.168.1.4.

Wednesday, May 4, 2016

[Quick Tips: DU]: How to find large files and directories in Linux

How to find large files and directories in Linux

This is a command string I learned awhile back that always comes in handy.

du -c |sort -rn |head

Optionally qualify the directory you want to search in, say:

john@ubuntu15:~$ sudo du -c /var |sort -rn |head

624688    /var

624688    total

383784    /var/lib

323144    /var/lib/apt

323092    /var/lib/apt/lists

179464    /var/cache

159500    /var/lib/apt/lists/partial

155556    /var/cache/apt

69332    /var/cache/apt/archives

39728    /var/lib/dpkg

[Quick Install : VPN]: How to configure VPN Server in Linux

How to configure VPN Server in Linux

VPN is pronounced as separate letters and is short for virtual private network. VPN, or virtual private network, is a network that is constructed by using public wires usually the Internet to connect to a private network, such as a company's internal network.

OpenVPN is a popular open source application that implements a virtual private network. works on Linux, Windows operating systems.

In this Article i will explain how to install and configure OpenVPN in centOS 7 server.

OpenVpn is not available in the default CentOS repositories. So we need to install Enterprise Linux (EPEL) repository. Use the following command to install EPEL repository.


yum install epel-release
 
Next install openvpn package and easy-rsa and iptables services by the following command.


yum -y install openvpn easy-rsa iptables-services
 
Then we need to configure the following certificates and keys for easy -rsa

Certificate Authority (ca)
Server Key and Certificate
Diffie-Hellman key
Client Key and Certificate

copy easy-rsa script generation to "/etc/openvpn/"

cp -rf /usr/share/easy-rsa/ /etc/openvpn/
 
Then go to the easy-rsa directory and edit the vars file.

cd /etc/openvpn/easy-rsa/2.*/
vim vars
 
Set KEY_CONFIG to point to the openssl.cnf file included in this distribution
 
 Set KEY_DIR to point to a directory which will contain all keys, certificates, etc. 
 This directory need not exist, and if it does, it will be deleted with rm -rf, 
 so be careful how you set KEY_DIR.
 
Edit other fields in vars per your site data.You may want to increase KEY_SIZE to 
2048 if you are paranoid and don't mind slower key processing, but certainly 1024 is
 fine for testing purposes.KEY_SIZE must be compatible across both peers participating
 in a secure SSL/TLS connection.
 
Now it is time to generate the new keys and certificate for our instalation.

source ./vars
 
Then run clean-all to ensure that we have a clean certificate setup.

./clean-all
 
Now generate a certificate authority(ca). You will be asked about Country Name etc.

This command will create a file ca.crt and ca.key in the directory /etc/openvpn/easy-rsa/2.0/keys/.

./build-ca
 
Now generate a server key and certificate.

./build-key-server server
 
Build a Diffie-Hellman key exchange.


./build-dh
 
Generate client key and certificate.

./build-key client
 
Move or copy the directory  keys/ to /etc/opennvpn

Configure OpenVPN
Now we can copy the OpenVPN configuration from  /usr/share/doc/openvpn-2.3.6/sample/sample-config-files to /etc/openvpn/ or create a new one


cd /etc/openvpn/
vim server.conf
 
set the configuration of file as follows


#change with your port
port 1337

#You can use udp or tcp
proto udp

# "dev tun" will create a routed IP tunnel.
dev tun

#Certificate Configuration

#ca certificate
ca /etc/openvpn/keys/ca.crt

#Server Certificate
cert /etc/openvpn/keys/server.crt

#Server Key and keep this is secret
key /etc/openvpn/keys/server.key

#See the size a dh key in /etc/openvpn/keys/
dh /etc/openvpn/keys/dh1024.pem

#Internal IP will get when already connect
server 192.168.200.0 255.255.255.0

#this line will redirect all traffic through our OpenVPN
push "redirect-gateway def1"

#Provide DNS servers to the client, you can use goolge DNS
push "dhcp-option DNS 8.8.8.8"
push "dhcp-option DNS 8.8.4.4"

#Enable multiple client to connect with same key
duplicate-cn

keepalive 20 60
comp-lzo
persist-key
persist-tun
daemon

#enable log
log-append /var/log/myvpn/openvpn.log

#Log Level
verb 3
save the file by using Esc+:wq  command.

create a folder for log file.

mkdir -p /var/log/myvpn/
touch /var/log/myvpn/openvpn.log

Disable firewalld

systemctl mask firewalld
systemctl stop firewalld
 
Disable SELinux

Edit the file selinux located in /etc/sysconfig by using vim editor in the following way.

vim /etc/sysconfig/selinux
 
Then set SELINUX to disabled for disable the selinux


SELINUX=disabled
 
Then reboot the server to apply the changes made.

Configure Routing and Iptables

First we need to enable the iptables service by the following commnds

systemctl enable iptables
systemctl start iptables
iptables -F
 
Add iptables-rule to forward a routing to our openvpn subnet. 

iptables -t nat -A POSTROUTING -s 192.168.1.1/24 -o eth0 -j MASQUERADE
iptables-save > /etc/sysconfig/iptablesvpn
 
For enable port forwarding in linux operating system edit the file sysctl.conf located in /etc directory by using vim editor.

vim /etc/sysctl.conf
 
Then add the following line at the end of the file and save the file

net.ipv4.ip_forward = 1
 
Reboot the server and enjoy VPN Server

Client Setup

 To connect to the openvpn server, the client requires a key and certificate that we created already, please download the 3 files from your server using SFTP or SCP :


  • ca.crt
  • client.crt
  • client.key
 Afterwards create a new file called client.ovpn and paste configuration below :

client
dev tun
proto udp

#Server IP and Port
remote 192.168.1.1 1337

resolv-retry infinite
nobind
persist-key
persist-tun
mute-replay-warnings
ca ca.crt
cert client.crt
key client.key
ns-cert-type server
comp-lzo

Then download the client application for openvpn and install it on your client computer.