Linux cluster sysadmin -- Parallel command execution with PDSH
PDSH is a very smart little tool that enables you to issue the same command on multiple hosts at once, and see the output. You need to have set up ssh key authentication from the client to host on all of them, so if you followed the steps in the first section of this article you’ll be good to go.The syntax for using it is nice and simple:
-wspecifies the addresses. You can use numerical ranges[1-4]and/or comma-separated lists of hosts. If you want to connect as a user other than the current user on the calling machine, you can specify it here (or as a separate-largument)- After that is the command to run.
robin@RNMMBP $ pdsh -w root@rnmcluster02-node0[1-4] date

rnmcluster02-node01: Fri Nov 28 17:26:17 GMT 2014
rnmcluster02-node02: Fri Nov 28 17:26:18 GMT 2014
rnmcluster02-node03: Fri Nov 28 17:26:18 GMT 2014
rnmcluster02-node04: Fri Nov 28 17:26:18 GMT 2014
PDSH can be installed on the Mac under Homebrew (did I mention that Rittman Mead laptops are Macs, so I can do all of this straight from my work machine... :-) )
brew install pdshAnd if you want to run it on Linux from the EPEL yum repository (RHEL-compatible, but packages for other distros are available):
yum install pdshYou can run it from a cluster node, or from your client machine (assuming your client machine is mac/linux).
Example - install and start collectl on all nodes
I started looking into pdsh when it came to setting up a cluster of machines from scratch. One of the must-have tools I like to have on any machine that I work with is the excellent collectl. This is an OS resource monitoring tool that I initially learnt of through Kevin Closson and Greg Rahn, and provides the kind of information you’d get from top etc – and then some! It can run interactively, log to disk, run as a service – and it also happens to integrate very nicely with graphite, making it a no-brainer choice for any server.So, instead of logging into each box individually I could instead run this:
pdsh -w root@rnmcluster02-node0[1-4] yum install -y collectl
pdsh -w root@rnmcluster02-node0[1-4] service collectl start
pdsh -w root@rnmcluster02-node0[1-4] chkconfig collectl on
Yes, I know there are tools out there like puppet and chef that are designed for doing this kind of templated build of multiple servers, but the point I want to illustrate here is that pdsh enables you to do ad-hoc changes to a set of servers at once. Sure, once I have my cluster built and want to create an image/template for future builds, then it would be daft if I were building the whole lot through pdsh-distributed yum commands.
Example - setting up the date/timezone/NTPD
Often the accuracy of the clock on each server in a cluster is crucial, and we can easily do this with pdsh:Install packages
robin@RNMMBP ~ $ pdsh -w root@rnmcluster02-node0[1-4] yum install -y ntp ntpdateSet the timezone:
robin@RNMMBP ~ $ pdsh -w root@rnmcluster02-node0[1-4] ln -sf /usr/share/zoneinfo/Europe/London /etc/localtimeForce a time refresh:
robin@RNMMBP ~ $ pdsh -w root@rnmcluster02-node0[1-4] ntpdate pool.ntp.org
rnmcluster02-node03: 30 Nov 20:46:22 ntpdate[27610]: step time server 176.58.109.199 offset -2.928585 sec
rnmcluster02-node02: 30 Nov 20:46:22 ntpdate[28527]: step time server 176.58.109.199 offset -2.946021 sec
rnmcluster02-node04: 30 Nov 20:46:22 ntpdate[27615]: step time server 129.250.35.250 offset -2.915713 sec
rnmcluster02-node01: 30 Nov 20:46:25 ntpdate[29316]: 178.79.160.57 rate limit response from server.
rnmcluster02-node01: 30 Nov 20:46:22 ntpdate[29316]: step time server 176.58.109.199 offset -2.925016 sec
Set NTPD to start automatically at boot:
robin@RNMMBP ~ $ pdsh -w root@rnmcluster02-node0[1-4] chkconfig ntpd onStart NTPD:
robin@RNMMBP ~ $ pdsh -w root@rnmcluster02-node0[1-4] service ntpd start
Example - using a HEREDOC (here-document) and sending quotation marks in a command with PDSH
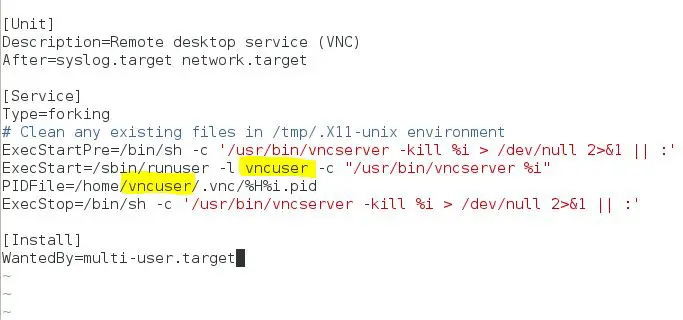
Here documents (heredocs) are a nice way to embed multi-line content in a single command, enabling the scripting of a file creation rather than the clumsy instruction to “open an editor and paste the following lines into it and save the file as /foo/bar”.Fortunately heredocs work just fine with pdsh, so long as you remember to enclose the whole command in quotation marks. And speaking of which, if you need to include quotation marks in your actual command, you need to escape them with a backslash. Here’s an example of both, setting up the configuration file for my ever-favourite gnu screen on all the nodes of the cluster:
robin@RNMMBP ~ $ pdsh -w root@rnmcluster02-node0[1-4] "cat > ~/.screenrc <<EOF
hardstatus alwayslastline \"%{= RY}%H %{kG}%{G} Screen(s): %{c}%w %=%{kG}%c  %D, %M %d %Y  LD:%l\"
startup_message off
msgwait 1
defscrollback 100000
nethack on
EOF
"
Now when I login to each individual node and run screen, I get a nice toolbar at the bottom: 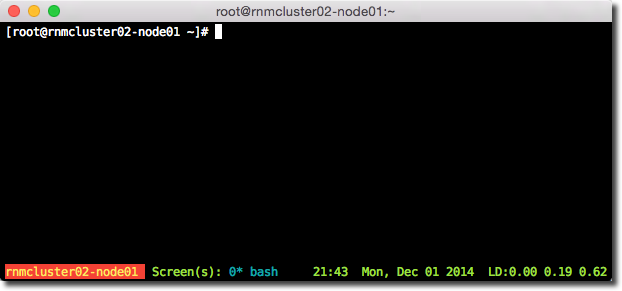
Combining commands
To combine commands together that you send to each host you can use the standard bash operator semicolon; robin@RNMMBP ~ $ pdsh -w root@rnmcluster02-node0[1-4] "date;sleep 5;date" rnmcluster02-node01: Sun Nov 30 20:57:06 GMT 2014 rnmcluster02-node03: Sun Nov 30 20:57:06 GMT 2014 rnmcluster02-node04: Sun Nov 30 20:57:06 GMT 2014 rnmcluster02-node02: Sun Nov 30 20:57:06 GMT 2014 rnmcluster02-node01: Sun Nov 30 20:57:11 GMT 2014 rnmcluster02-node03: Sun Nov 30 20:57:11 GMT 2014 rnmcluster02-node04: Sun Nov 30 20:57:11 GMT 2014 rnmcluster02-node02: Sun Nov 30 20:57:11 GMT 2014Note the use of the quotation marks to enclose the entire command string. Without them the bash interpretor will take the
; as the delineator of the local commands, and try to run the subsequent commands locally: robin@RNMMBP ~ $ pdsh -w root@rnmcluster02-node0[1-4] date;sleep 5;date rnmcluster02-node03: Sun Nov 30 20:57:53 GMT 2014 rnmcluster02-node04: Sun Nov 30 20:57:53 GMT 2014 rnmcluster02-node02: Sun Nov 30 20:57:53 GMT 2014 rnmcluster02-node01: Sun Nov 30 20:57:53 GMT 2014 Sun 30 Nov 2014 20:58:00 GMTYou can also use
&& and || to run subsequent commands conditionally if the previous one succeeds or fails respectively: robin@RNMMBP $ pdsh -w root@rnmcluster02-node[01-4] "chkconfig collectl on && service collectl start" rnmcluster02-node03: Starting collectl: [ OK ] rnmcluster02-node02: Starting collectl: [ OK ] rnmcluster02-node04: Starting collectl: [ OK ] rnmcluster02-node01: Starting collectl: [ OK ]
Piping and file redirects
Similar to combining commands above, you can pipe the output of commands, and you need to use quotation marks to enclose the whole command string.robin@RNMMBP ~ $ pdsh -w root@rnmcluster02-node[01-4] "chkconfig|grep collectl" rnmcluster02-node03: collectl 0:off 1:off 2:on 3:on 4:on 5:on 6:off rnmcluster02-node01: collectl 0:off 1:off 2:on 3:on 4:on 5:on 6:off rnmcluster02-node04: collectl 0:off 1:off 2:on 3:on 4:on 5:on 6:off rnmcluster02-node02: collectl 0:off 1:off 2:on 3:on 4:on 5:on 6:offHowever, you can pipe the output from pdsh to a local process if you want:
robin@RNMMBP ~ $ pdsh -w root@rnmcluster02-node[01-4] chkconfig|grep collectl
rnmcluster02-node02: collectl           0:off   1:off   2:on    3:on    4:on    5:on    6:off
rnmcluster02-node04: collectl           0:off   1:off   2:on    3:on    4:on    5:on    6:off
rnmcluster02-node03: collectl           0:off   1:off   2:on    3:on    4:on    5:on    6:off
rnmcluster02-node01: collectl           0:off   1:off   2:on    3:on    4:on    5:on    6:off
The difference is that you’ll be shifting the whole of the pipe across the network in order to process it locally, so if you’re just grepping etc this doesn’t make any sense. For use of utilities held locally and not on the remote server though, this might make sense.
File redirects work the same way – within quotation marks and the redirect will be to a file on the remote server, outside of them it’ll be local:
robin@RNMMBP ~ $ pdsh -w root@rnmcluster02-node[01-4] "chkconfig>/tmp/pdsh.out"
robin@RNMMBP ~ $ ls -l /tmp/pdsh.out
ls: /tmp/pdsh.out: No such file or directory

robin@RNMMBP ~ $ pdsh -w root@rnmcluster02-node[01-4] chkconfig>/tmp/pdsh.out
robin@RNMMBP ~ $ ls -l /tmp/pdsh.out
-rw-r--r--  1 robin  wheel  7608 30 Nov 19:23 /tmp/pdsh.out
Cancelling PDSH operations
As you can see from above, the precise syntax of pdsh calls can be hugely important. If you run a command and it appears ‘stuck’, or if you have that heartstopping realisation that theshutdown -h now you meant to run locally you ran across the cluster, you can press Ctrl-C once to see the status of your commands: robin@RNMMBP ~ $ pdsh -w root@rnmcluster02-node[01-4] sleep 30 ^Cpdsh@RNMMBP: interrupt (one more within 1 sec to abort) pdsh@RNMMBP: (^Z within 1 sec to cancel pending threads) pdsh@RNMMBP: rnmcluster02-node01: command in progress pdsh@RNMMBP: rnmcluster02-node02: command in progress pdsh@RNMMBP: rnmcluster02-node03: command in progress pdsh@RNMMBP: rnmcluster02-node04: command in progressand press it twice (or within a second of the first) to cancel:
robin@RNMMBP ~ $ pdsh -w root@rnmcluster02-node[01-4] sleep 30 ^Cpdsh@RNMMBP: interrupt (one more within 1 sec to abort) pdsh@RNMMBP: (^Z within 1 sec to cancel pending threads) pdsh@RNMMBP: rnmcluster02-node01: command in progress pdsh@RNMMBP: rnmcluster02-node02: command in progress pdsh@RNMMBP: rnmcluster02-node03: command in progress pdsh@RNMMBP: rnmcluster02-node04: command in progress ^Csending SIGTERM to ssh rnmcluster02-node01 sending signal 15 to rnmcluster02-node01 [ssh] pid 26534 sending SIGTERM to ssh rnmcluster02-node02 sending signal 15 to rnmcluster02-node02 [ssh] pid 26535 sending SIGTERM to ssh rnmcluster02-node03 sending signal 15 to rnmcluster02-node03 [ssh] pid 26533 sending SIGTERM to ssh rnmcluster02-node04 sending signal 15 to rnmcluster02-node04 [ssh] pid 26532 pdsh@RNMMBP: interrupt, aborting.If you’ve got threads yet to run on the remote hosts, but want to keep running whatever has already started, you can use Ctrl-C, Ctrl-Z:
robin@RNMMBP ~ $ pdsh -f 2 -w root@rnmcluster02-node[01-4] "sleep 5;date"
^Cpdsh@RNMMBP: interrupt (one more within 1 sec to abort)
pdsh@RNMMBP:  (^Z within 1 sec to cancel pending threads)
pdsh@RNMMBP: rnmcluster02-node01: command in progress
pdsh@RNMMBP: rnmcluster02-node02: command in progress
^Zpdsh@RNMMBP: Canceled 2 pending threads.
rnmcluster02-node01: Mon Dec  1 21:46:35 GMT 2014
rnmcluster02-node02: Mon Dec  1 21:46:35 GMT 2014
NB the above example illustrates the use of the
-f
argument to limit how many threads are run against remote hosts at once.
We can see the command is left running on the first two nodes and
returns the date, whilst the Ctrl-C - Ctrl-Z stops it from being
executed on the remaining nodes. PDSH_SSH_ARGS_APPEND
By default, when you ssh to new host for the first time you’ll be prompted to validate the remote host’s SSH key fingerprint.The authenticity of host 'rnmcluster02-node02 (172.28.128.9)' can't be established. RSA key fingerprint is 00:c0:75:a8:bc:30:cb:8e:b3:8e:e4:29:42:6a:27:1c. Are you sure you want to continue connecting (yes/no)?This is one of those prompts that the majority of us just hit enter at and ignore; if that includes you then you will want to make sure that your PDSH call doesn’t fall in a heap because you’re connecting to a bunch of new servers all at once. PDSH is not an interactive tool, so if it requires input from the hosts it’s connecting to it’ll just fail. To avoid this SSH prompt, you can set up the environment variable PDSHSSHARGS_APPEND as follows:
export PDSH_SSH_ARGS_APPEND="-q -o StrictHostKeyChecking=no -o UserKnownHostsFile=/dev/null"The
-q makes failures less verbose, and the -o passes in a couple of options, StrictHostKeyChecking to disable the above check, and UserKnownHostsFile to stop SSH keeping a list of host IP/hostnames and corresponding SSH fingerprints (by pointing it at /dev/null).
You’ll want this if you’re working with VMs that are sharing a pool of
IPs and get re-used, otherwise you get this scary failure: @@@@@@@@@@@@@@@@@@@@@@@@@@@@@@@@@@@@@@@@@@@@@@@@@@@@@@@@@@@ @ WARNING: REMOTE HOST IDENTIFICATION HAS CHANGED! @ @@@@@@@@@@@@@@@@@@@@@@@@@@@@@@@@@@@@@@@@@@@@@@@@@@@@@@@@@@@ IT IS POSSIBLE THAT SOMEONE IS DOING SOMETHING NASTY! Someone could be eavesdropping on you right now (man-in-the-middle attack)! It is also possible that a host key has just been changed. The fingerprint for the RSA key sent by the remote host is 00:c0:75:a8:bc:30:cb:8e:b3:8e:e4:29:42:6a:27:1c. Please contact your system administrator.For both of these above options, make sure you're aware of the security implications that you're opening yourself up to. For a sandbox environment I just ignore them; for anything where security is of importance make sure you are aware of quite which server you are connecting to by SSH, and protecting yourself from MitM attacks.
PDSH Reference
You can find out more about PDSH at https://code.google.com/p/pdsh/wiki/UsingPDSHSummary
When working with multiple Linux machines I would first and foremost make sure SSH keys are set up in order to ease management through password-less logins.After SSH keys, I would recommend pdsh for parallel execution of the same SSH command across the cluster. It’s a big time saver particularly when initially setting up the cluster given the installation and configuration changes that are inevitably needed.