How to Set Access Control Lists (ACL’s) and Disk Quotas for Users and Groups
ACLs) are a feature of the Linux kernel that allows to define more
fine-grained access rights for files and directories than those
specified by regular
ugo/rwx permissions.
For example, the standard
ugo/rwx permissions does
not allow to set different permissions for different individual users or
groups. With ACLs this is relatively easy to do, as we will see in this
article.
Checking File System Compatibility with ACLs
To ensure that your file systems are currently supporting ACLs, you
should check that they have been mounted using the acl option. To do
that, we will use
tune2fs for ext2/3/4 file systems as indicated below. Replace
/dev/sda1 with the device or file system you want to check:
# tune2fs -l /dev/sda1 | grep "Default mount options:"
Note: With
XFS, Access Control Lists are supported out of the box.
In the following
ext4 file system, we can see that ACLs have been enabled for
/dev/xvda2:
# tune2fs -l /dev/xvda2 | grep "Default mount options:"

Check ACL Enabled on Linux Filesystem
If the above command does not indicate that the file system has been
mounted with support for ACLs, it is most likely due to the
noacl option being present in
/etc/fstab.
In that case, remove it, unmount the file system, and then mount it
again, or simply reboot your system after saving the changes to
/etc/fstab.
Introducing ACLs in Linux
To illustrate how ACLs work, we will use a group named
developers and add users
walterwhite and
saulgoodman (yes, I am a Breaking Bad fan!) to it.:
# groupadd developers
# useradd walterwhite
# useradd saulgoodman
# usermod -a -G developers walterwhite
# usermod -a -G developers saulgoodman
Before we proceed, let’s verify that both users have been added to the developers group:
# id walterwhite
# id saulgoodman

Find User ID in Linux
Let’s now create a directory called
test in
/mnt, and a file named
acl.txt inside (
/mnt/test/acl.txt).
Then we will set the group owner to
developers and change its default
ugo/rwx permissions recursively to
770 (thus granting read, write, and execute permissions granted to both the owner and the group owner of the file):
# mkdir /mnt/test
# touch /mnt/test/acl.txt
# chgrp -R developers /mnt/test
# chmod -R 770 /mnt/test
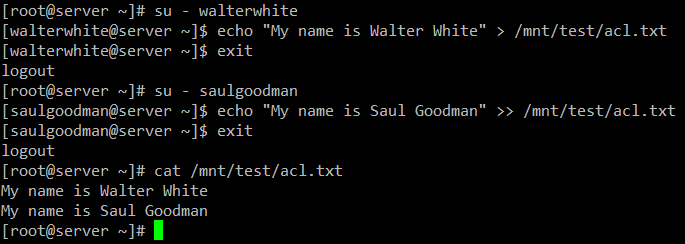
As expected, you can write to
/mnt/test/acl.txt as
walterwhite or
saulgoodman:
# su - walterwhite
# echo "My name is Walter White" > /mnt/test/acl.txt
# exit
# su - saulgoodman
# echo "My name is Saul Goodman" >> /mnt/test/acl.txt
# exit
Verify ACL Rules on Users
So far so good. However, we will soon see a problem when we need to grant write access to
/mnt/test/acl.txt for another user that is not in the developers group.
Standard
ugo/rwx permissions would require that the
new user be added to the developers group, but that would give him/her
the same permissions over all the objects owned by the group. That is
precisely where ACLs come in handy.
Setting ACL’s in Linux
There are two types of ACLs:
access ACLs are (which are applied to a file or directory), and
default (optional) ACLs, which can only be applied to a directory.
If files inside a directory where a
default ACL has been set do not have a ACL of their own, they inherit the default ACL of their parent directory.
Let’s give user
gacanepa read and write access to
/mnt/test/acl.txt. Before doing that, let’s take a look at the current ACL settings in that directory with:
# getfacl /mnt/test/acl.txt
Then change the ACLs on the file, use
u: followed by the username and
:rw to indicate read / write permissions:
# setfacl -m u:gacanepa:rw /mnt/test/acl.txt
And run
getfacl on the file again to compare. The following image shows the
“Before” and
“After”:
# getfacl /mnt/test/acl.txt
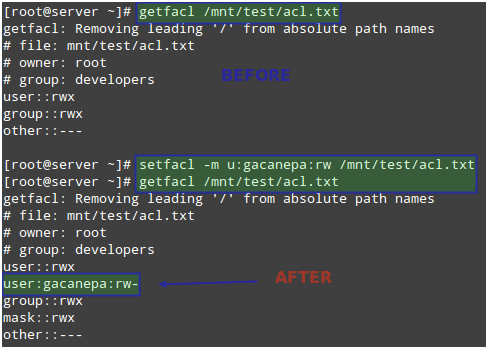
Set ACL on Linux Users
User
gacanepa should now be able to write to the file. Switch to that user account and execute the following command to confirm:
# echo "My name is Gabriel Cánepa" >> /mnt/test/acl.txt
To set a default ACL to a directory (which its contents will inherit unless overwritten otherwise), add
d: before the rule and specify a directory instead of a file name:
# setfacl -m d:o:r /mnt/test
# getfacl /mnt/test/
The ACL above will allow users not in the owner group to have read access to the future contents of the
/mnt/test directory. Note the difference in the output of
getfacl /mnt/test before and after the change:

Set Default ACL to Linux Directory
To remove a specific ACL, replace
-m in the commands above with
-x. For example,
# setfacl -x d:o /mnt/test
Alternatively, you can also use the
-b option to remove ALL ACLs in one step:
# setfacl -b /mnt/test
For more information and examples on the use of ACLs, please refer to
chapter 10,
section 2, of the
openSUSE Security Guide (also available for download at no cost in PDF format).
Set Linux Disk Quotas on Users and Filesystems
Storage space is another resource that must be carefully used and
monitored. To do that, quotas can be set on a file system basis, either
for individual users or for groups.
Thus, a limit is placed on the disk usage allowed for a given user or
a specific group, and you can rest assured that your disks will not be
filled to capacity by a careless (or malintentioned) user.
The first thing you must do in order to enable quotas on a file
system is to mount it with the usrquota or grpquota (for user and group
quotas, respectively) options in
/etc/fstab.
For example, let’s enable user-based quotas on
/dev/vg00/vol_backups and group-based quotas on
/dev/vg00/vol_projects.
Note that the
UUID is used to identify each file system.
UUID=f6d1eba2-9aed-40ea-99ac-75f4be05c05a /home/projects ext4 defaults,grpquota 0 0
UUID=e1929239-5087-44b1-9396-53e09db6eb9e /home/backups ext4 defaults,usrquota 0 0
Unmount and remount both file systems:
# umount /home/projects
# umount /home/backups
# mount -o remount /home/projects
# mount -o remount /home/backups
Then check that the usrquota and grpquota options are present in the output of mount (see highlighted below):
# mount | grep vg00

Check Linux User Quota and Group Quota
Finally, run the following commands to initialize and enable quotas:
# quotacheck -avugc
# quotaon -vu /home/backups
# quotaon -vg /home/projects
That said, let’s now assign quotas to the username and group we mentioned earlier. You can later disable quotas with
quotaoff.
Setting Linux Disk Quotas
Let’s begin by setting an ACL on
/home/backups for user
gacanepa, which will give him read, write, and execute permissions on that directory:
# setfacl -m u:gacanepa:rwx /home/backups/
Then with,
# edquota -u gacanepa
We will make the soft
limit=900 and the hard
limit=1000 blocks (
1024 bytes/block * 1000 blocks = 1024000 bytes = 1 MB) of disk space usage.
We can also place a limit of
20 and
25 as soft and hard limites on the number of files this user can create.
The above command will launch the text editor
($EDITOR) with a temporary file where we can set the limits mentioned previously:

Linux Disk Quota For User
These settings will cause a warning to be shown to user
gacanepa when he has either reached the
900-block or
20-inode limits for a default grace period of 7 days.
If the
over-quota situation has not been eliminated
by then (for example, by removing files), the soft limit will become the
hard limit and this user will be prevented from using more storage
space or creating more files.
To test, let’s have user gacanepa try to create an empty
2 MB file named
test1 inside
/home/backups:
# dd if=/dev/zero of=/home/backups/test1 bs=2M count=1
# ls -lh /home/backups/test1
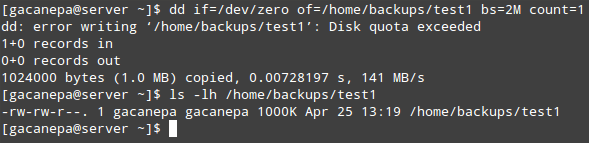
Verify Linux User Quota on Disk
As you can see, the write operation file fails due to the disk quota having been exceeded. Since only the first
1000 KB are written to disk, the result in this case will most likely be a corrupt file.
Similarly, you can create an ACL for the developers groups in order to give members of that group rwx access to
/home/projects:
# setfacl -m g:developers:rwx /home/projects/
And set the quota limits with:
# edquota -g developers
Just like we did with user
gacanepa earlier.
The grace period can be specified for any number of seconds, minutes, hours, days, weeks, or months by executing.
# edquota -t
and updating the values under
Block grace period and Inode grace period.
As opposed to block or inode usage (which are set on an user or group-basis), the grace period is set system-wide.
To report quotas, you can use quota
-u [user] or
quota -g [group] for a quick list or
repquota -v [/path/to/filesystem] for a more detailed (verbose) and nicely formatted report.
Of course, you will want to replace
[user],
[group], and
[/path/to/filesystem] with specific user / group names and file system you want to check.
Summary
In this article we have explained how to set
Access Control Lists and disk quotas for users and groups. Using both, you will be able to manage permissions and disk usage more effectively.
If you want to learn more about quotas, you can refer to the
Quota Mini-HowTo in The Linux Documentation Project.


