Friday, August 26, 2016

Quick Tips: YouTube hacks – Record your Computer using YouTube

YouTube hacks – Record your Computer using YouTube

There are numerous free and paid screen-cast applications are available on the market. However, you can record your Computer using YouTube built-in function called Live streaming, regardless of the operating system you use. You don’t need to install any additional software to do this. All you need is a decent Internet connection and a YouTube account. Just log-in to YouTube using your Google account and start recording the activities of your desktop screen in no-time. This brief tutorial walk you through how to record your desktop using YouTube.
Follow me.

Record your Computer using YouTube

Step 1: First, Log in to the YouTube with your Gmail id.
Click Upload button on the top right corner.
Step 2: In the next screen, click “Get started” button in the Live streaming section on the right side.
Step 3: Click “Events” under Live streaming section on the left side. And then Click that button that says – Enablelive streaming on the other side.
Step 4: In this step, you need to Verify your account by phone to make sure that you’re a real person and not a machine. To do so, enter a valid phone number and click Submit button.
Step 5: Enter the 6-digit verification code that you received in your mobile phone and click Submit to verify the account.
Step 6: Click “I agree” to accept the Terms and conditions.
Step 7: After enabling the Live streaming option, Click “Create live event”.
Step 8: This is important step. Enter your screencast name. Select Private in the share section, because we are going to record the desktop, not to live stream. And, choose “Quick using Google Hangouts On Air” option from the Type section. Finally, click Go live now.
Step 9: Next click Ok to start the recording.
Step 10: Click Allow to join the hangouts. It means you will join the Google Hangout, so that the other people will see and hear you.
Step 11: Click the Share button to start recording the desktop. Here, share means recording.
Step 12: In the next screen, choose what do you want to share (Again, “share” means recording).
I want to record to record my entire screen, so I selected “Entire screen” option. Once you choose the screen you want t record, click Share button. Finally, click on the button that says: Start broadcast on the bottom.
Step 13: Now, do what do you want to do on your Desktop. Everything will be recorded on the background. Once you done, stop the recording by clicking on the button that says: Stop broadcast and then click Stop on the top of the screen.
Step 14: The broadcast has been recorded and ready to use now. Click Close to end the Hangout session.
Step 15: The recorded videos will be automatically saved in your YouTube account. You can view them underVideo Manger -> Videos in the Dashboard.
Just click on the video link to view it or share it to your friends. The recorded videos will be kept as private until you change the share settings to public.


Happy Screencasting!

Tuesday, August 16, 2016

[CentOS - CUPS Print Server]: How to Add printer in Linux Adding Printer to CUPS Server Procedure

How to Add printer in Linux Adding Printer to CUPS Server Procedure


In this article we are going to learn how to add printer in Linux and Adding Printer to CUPS Server procedure. Most of Linux users feel that adding / installing printer in Linux is hard, some times we have to say yes because all the printer models does not have proper drivers for Linux.
Still most of branded printers will work easily with Linux Operating System.

How to Add Printer in Linux RHEL 7 / Centos 7

Below is the process to install an printer from GUI Mode
First Step
Installing Printer in RHEL7
Sundry -> Printer Settings
Add Printer Wizard How to add printer in Linux
Adding Printer Wizard
Add Printer Device URI
Here is the main step where we can select the printer based on its connectivity.
Serial Port #1 – If your printer connected through serial / parallel cable as a local printer then select Serial Port #1 Or #2.
If your Printer is connected through Network then Select Network printer option again here Select the type which is the best for your printer. If you already have CUPS server then that CUPS server URL.
Select Printer Make
Select Printer Make
In this screen Select the option carefully, Select printer from Database is the option few of the printer drivers already available in Linux along with OS. Provide PPD is the option where we have to download driver file from vendor site and attach.
Click Forward
Select Printer Model
Click Forward
Add Printer Description and Click Apply
Provide Printer Name and Printer description then Click on Apply
How to Add printer in Linux Adding Printer to CUPS Server Procedure
Printer has been successfully

Adding Printer to CUPS Server Procedure

This procedure has been written assuming CUPS server is already exists and adding printer to CUPS server
[ravi@TechTutorials~]$ sudo /usr/sbin/lpadmin -p HYDPRINTER -v socket://192.168.2.21:9100 -D "HYD - Cannon MF220 printer" -L "HYD" -o printer-error-policy="retry-job" -u allow:all -m textonly.ppd
Let’s see options
  • -p <Printer Name>
  • -v <Device URI>
  • -D <Description>
  • -L <Location>
  • -o <Options>
  • -u <User to allow>
  • -m <Driver File Name>
Note: Before specifying driver file name we have to copy the PPD file to /usr/share/cups/model/ path
[ravi@TechTutorials~]$ sudo /usr/sbin/cupsenable HYDPRINTER
Above command will enable the printer
Verify the printer status using below command
[ravi@TechTutorials~]$ sudo /usr/bin/lpstat -p HYDPRINTER  -l
Change the printer config to yes
[ravi@TechTutorials~]$ sudo /bin/sed -i 's/No/Yes/g' /etc/cups/printers.conf
Restart CUPS Service to effect the changes
[ravi@TechTutorials~]$ sudo /sbin/service cups restart
[ravi@TechTutorials~]$ sudo lpstat -o -t |grep HYDPRINTER
That’s it your printer is added successfully to CUPS Server.

Monday, August 8, 2016

Ubuntu : How to prevent a package from being automatically installed, upgraded or removed in Ubuntu

How to prevent a package from being automatically installed, upgraded or removed in Ubuntu

An important and useful tip for Debian, Ubuntu distros, and wanted to share it with our readers. In this brief tutorial, we will see how to prevent a package from being automatically installed, upgraded or removed. Some of you might wonder why would someone want to do that. There could be many reasons. You are happy with particular version of a package, and you don’t want to to waste your time by updating a package to the latest version which is unnecessary or not that important to you. Please be careful that sometimes the outdated packages might be vulnerable and cause security issues. In such cases, you must update it to the latest version. If you are don’t care about the security, just keep it outdated as long as you you want.
The updated packages might be problematic. Of course, the developers will test the packages thoroughly before pushing them into the repositories. But sometimes they might push unstable, and problematic packages unknowingly which will eventually damage our systems. You just want to save a bandwidth. Say for example, you don’t want to update a package that consumes more than 300 MB. So that you can simply hold it back from being upgraded. These are some reasons that I find to prevent a package from updating. The reasons might be different and vary for you. Whatever it is , if you want to hold a package go on and find out yourself.
We can lock the package either in Command line (using apt-get) or graphical way (using Synaptic package manager). Both are easy to follow.

The command line way (Using apt-get)

To lock a package from being automatically installed, updated, or removed, we can use ‘apt-mark’ command. This commandhas many options. You can read the man pages for details about each option.
man apt-mark
In this tutorial, We will use two options namely hold and unhold.
  1. hold – block any package from being installed, updated, upgraded, or removed.
  2. unhold – Release the package from hold, and allow us to install, update, remove packages.
Let us mark (hold) a package, for example htop, as shown below.
sudo apt-mark hold htop
Sample output:
htop set on hold.
And that is all, the version currently installed at the time of the lock will stay installed even during upgrades. It is very useful while holding back graphics drivers.
To unhold the package, just run:
sudo apt-mark-unhold htop
Sample output:
Canceled hold on htop.
ostechnix@ostechnix: ~_002
Important: Please note that this method doesn’t opt for manual removal. You can still remove the locked packages using“apt-get remove <packagename>” command. Do not assume that the marked packages can not be removed.
This method only prevents the application from automatically installed, updated, upgraded, or removed during system upgrade. Holding a package actually means you’re telling the package manager to keep the current version no matter what. This is useful if more recent version of a currently working program breaks after an update.
Whenever you try to update the system using commands “sudo apt-get update” or “sudo apt-get upgrade”, the marked packages will still be the same version at the time you hold the package.
You might also want to check our compliment guide for more command line help.

The graphical way (Using Synaptic package manager)

If you have Synaptic package manager installed on your system, you can easily lock a package from being installed, updated, upgraded, or removed.
To do so, Open Synaptic manager either from Unity dash or Menu. Search the package you want to hold. Then go toPackage from the menu bar and click hold.
VirtualBox_Ubuntu 16
That’s it. Now, the package will not be touched during system upgrade as long as you kept it in hold.
If Synaptic package manager is not installed in your system, you can install it using command:
sudo apt-get install synaptic

Conclusion

We have learned how to prevent a package from being installed, updated or removed during system update. It is a good practice if you find out a recent version of a particular package is not stable or break the system. You can simply hold the packages using ‘apt-mark’ command, so that the package managers won’t touch the package as long as you hold them back.

Ubuntu 16.04 & Lower Version: Systemback – Restore Ubuntu Desktop and Server to previous state

Restore Ubuntu Desktop and Server to previous state

About Systemback

Systemback is a free utility that can be used to backup and restore Ubuntu-like systems. It is somewhat similar to MS Windows ‘System restore’ option. Using Systemback, we can easily create backup of a Ubuntu desktop or server system, and restore them to the previous state whenever we want. It creates one or more restore points date and time-wise, and displays the most recent restore points at the top. Not only restore points, we can create the complete backup of your live system including user configuration files and folders as ISO, and save them in an external hard disk.
In a nutshell, using Systemback, we can,
  • Backup the system with or without user configuration files and folders;
  • Restore system to any previous working state;
  • Copy files/folders from one partition to another;
  • Create the live Ubuntu system as ISO, and boot your system using it in-case of any problems;
  • Upgrade our system to next available version etc.
In this tutorial, let us see how to install and use Systemback utility in Ubuntu 16.04 LTS desktop and server editions.

Install Systemback in Ubuntu

I have tested this utility in Ubuntu 16.04 LTS desktop and server editions. However, It will work on previous Ubuntu versions such as Ubuntu 15.10, 15.04, and 14.04 LTS versions, and other Ubuntu derivatives like Linux Mint.
Add Systemback PPA using command:
sudo add-apt-repository ppa:nemh/systemback
Sample output:
Simple system backup and restore application with extra features

Systemback makes it easy to create backups of the system and the users configuration files. In case of problems you can easily restore the previous state of the system. There are extra features like system copying, system installation and Live system creation.

This PPA contain the stable version of Systemback.

Currently supported Ubuntu releases:
 - 14.04.X LTS
 - 15.04
 - 15.10
 - 16.04.X LTS
 - 16.10 (initial, possible buggy)
 More info: https://launchpad.net/~nemh/+archive/ubuntu/systemback
 Press [ENTER] to continue or ctrl-c to cancel adding it
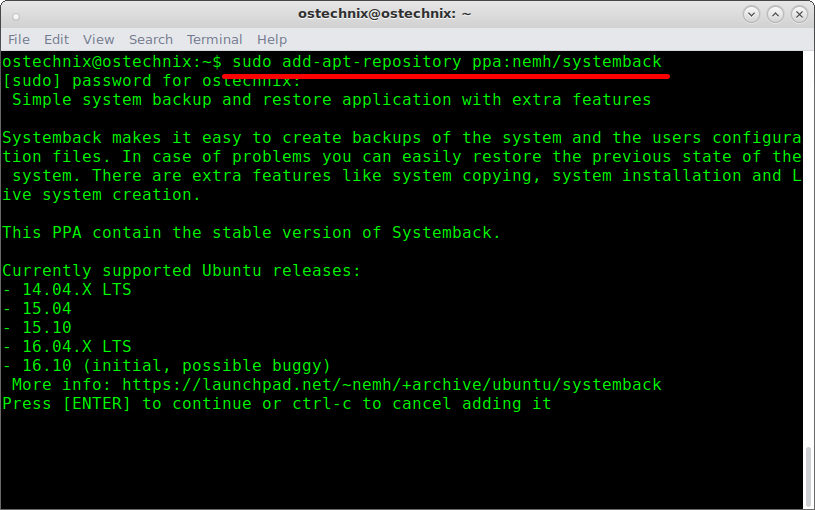
Add Systemback PPA
Add Systemback PPA
Update the software sources using command:
sudo apt-get update
Finally, install Systemback using command:
sudo apt-get install systemback
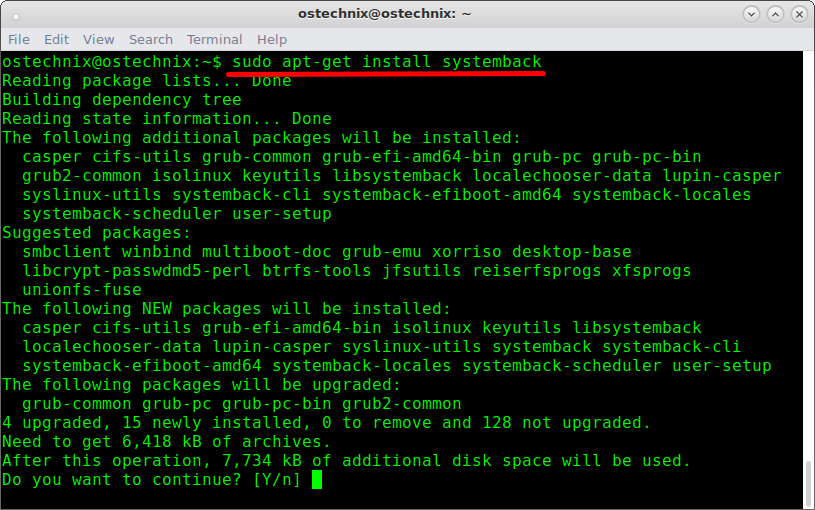
Install Systemback
Install Systemback

Systemback Usage in Ubuntu desktop

Once installed, Launch Systemback either from Menu or Unity launcher.
The default interface should look like below.
Systemback main interface
As you see in the above screenshot, there are five sections namely,
  1. Restored points – List of available restore points
  2. Highly restore points
  3. Point operations – Create, hightlight, rename or delete restore points
  4. Storage directory – The location of saved restore points
  5. Function menu – This menu contains the main options such as System copy, restore, install, live system create, system repair, system upgrade, exclude, include, Schedule, and Settings etc.

Creating system restore points

At first launch, there is no restore points. So, let us create our first restore point. You can create any number of restore points either manually or automatically.
To do so, click Create New button under Point operations section.
Create system restore point
Now, Systemback will start to create the first restore point.
Selection_005
Once the restore point, It will be displayed in the main interface under Restore points sections.
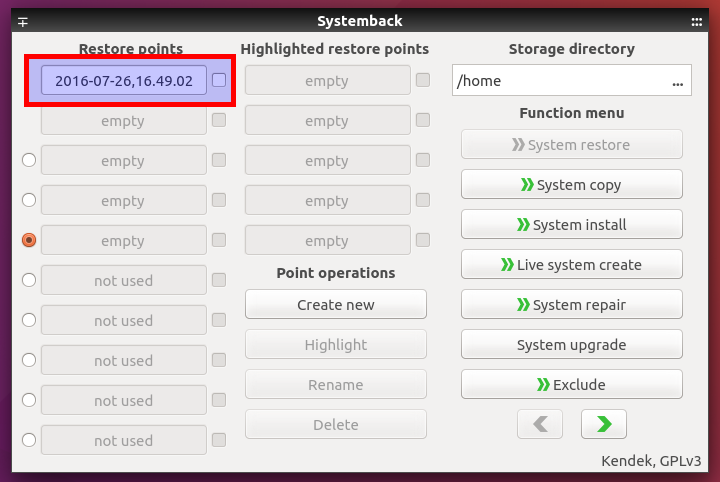
Display system restore points
Display system restore points
The newly created restore points will be stored under /home directory by default. You can change this location fromStorage directory section. Make sure you have enough free space in the storage directory (i.e /home directory).

System restore

To restore your Ubuntu system, select the restore point of your choice and click System restore option found underFunction menu.
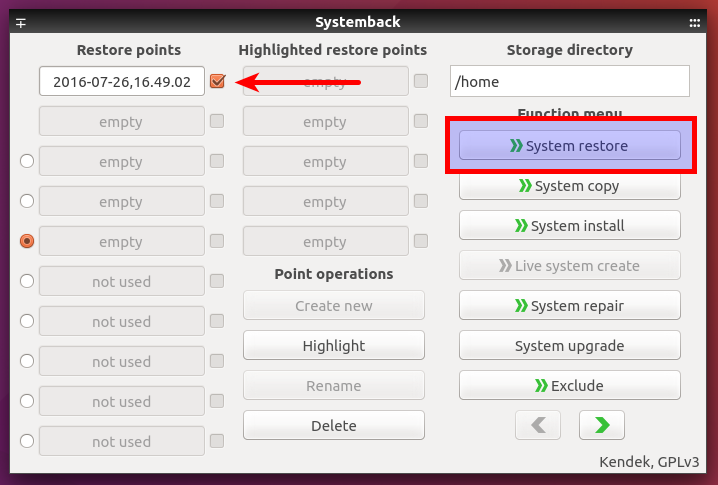
System restore
System restore
In the next window, select whether you want to do full system restore or just the System files restore. Also, you can choose whether you want to restore user(s) configuration files.
I wanted to to do full restore, so I selected the first option.
Selection_008
Finally, click Start.
Selection_009
That’s it. Your system will be restored to the selected restore point.

Create live system as ISO

This is another useful option. You can create the entire the system as live bootable ISO and write the ISO to DVD or USB drive.
Click Live system create button.
Selection_010
Choose the location where you want to store the ISO file. Finally, click Create New button.
Selection_011
Also, you can include the user data files in the ISO by selecting the checkbox that reads Include the user data files.

System repair

This option helps you to fix any errors in the GRUB and fstab files.
Selection_012

System upgrade

Want to upgrade your Ubuntu system to the most recent version? That’s also possible. Just click on the System upgradeoption.
Systemback will upgrade your system automatically.
Ubuntu 16.04 LTS Desktop [Running] - Oracle VM VirtualBox_014

Exclude

Using this section, you can exclude some files and folders from restore points.
Selection_015

Include

This option allows us to include the files and folders in restore points.
Selection_016

Schedule

This another important and useful option. We can create restore points at regular interval.
Selection_017

Settings

The settings option has other settings such as override auto-detected language, disable incremental restore points, create live ISO images automatically, disable scheduler daemon for particular users, enable compress for squashfs filesystems etc.
Selection_018
Systemback backup has plenty of useful options. Just go through every section and choose the options of your choice.

Systemback Usage in Ubuntu server

Systemback is not only for Desktops, but also works very well in Ubuntu Servers too. Systemback doesn’t need GUI desktop environment. You can use it both on GUI and CLI environments.
To launch Systmback in CLI mode (i.e Servers without Graphical desktop), run the following command:
sudo systemback-cli
You will see the following screen.
Systemback-cli
Systemback-cli
Since it is the first time, there is no available restore points. So, let us create a new restore point.
To do so, type “g”.
Now, Syetmback utility will create the restore point of your Ubuntu server.
skubuntu@skubuntu: ~_004
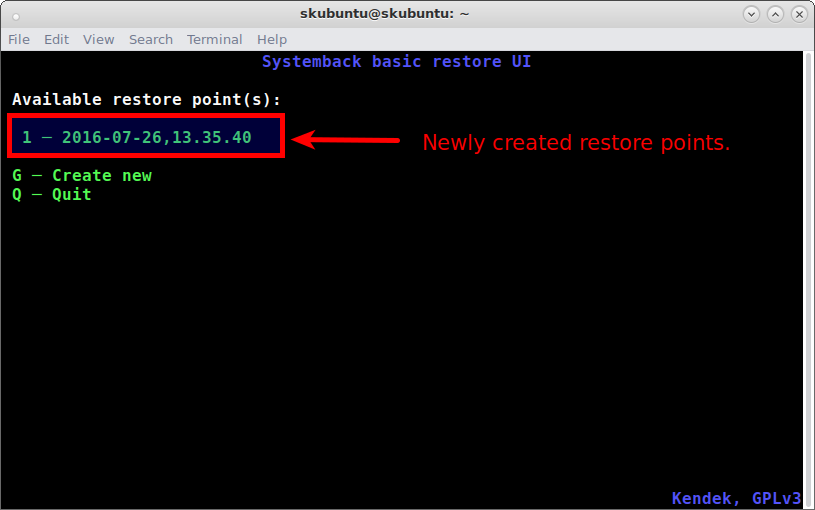
Once the restore point created, Systemback utility will display it in the main window under Available restore point(s)section.
skubuntu@skubuntu: ~_005
As you see in the above screenshot, I have created only one Restore point ( 1 ─ 2016-07-26,13.35.40 )
of my Ubuntu server. The second restore point name will be 2-2016-xx-xx-xx.
To restore the Ubuntu server to its previous state, just select the restore point number (i.e in our case).
In the next screen you will see the following three options.
skubuntu@skubuntu: ~_006
To delete the restore point, type “1”. To restore the system, type “2”. To go back to the previous screen, type “3”.
Let us restore the system. To do so, enter number “2”.
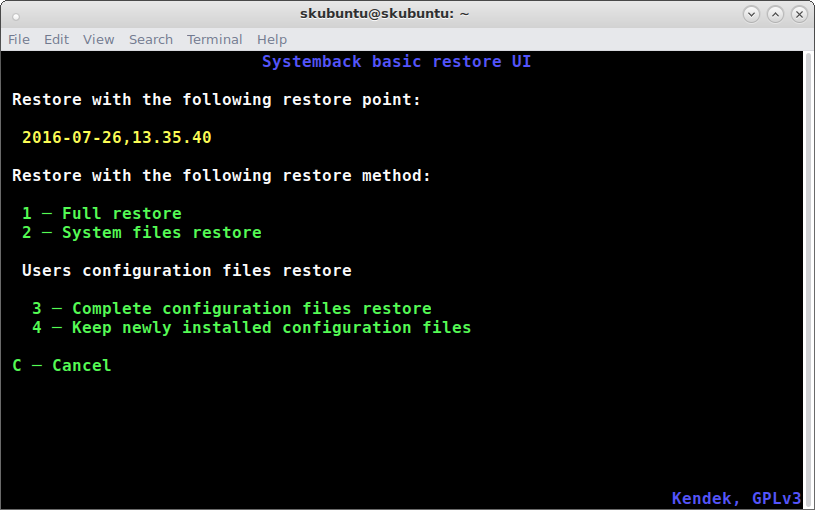
In the next window, you can select the available restore method. There are two methods:
  1. Full restore
  2. System files restore
Also, you can select whether the user configuration files should be restored or not.
I want to do “full system restore”, so I entered number “1”.
skubuntu@skubuntu: ~_007
Next you need to choose whether you want to keep the current fstab file and whether you want to reinstall Grub bootloader file or not.
skubuntu@skubuntu: ~_009
Finally press “Y” to start the “Full Restore”.
That’s it. Now, Your Ubuntu server will be restored to the previous state.
After the full system restoration is completed, Press ‘ENTER’ key to reboot the computer, or ‘Q’ to quit.
skubuntu@skubuntu: ~_011
As I mentioned already, the restore points will be available in the /home directory. Copy them to a USB external drive and keep them in a safe location. You can use them to restore your Ubuntu system if something went wrong.

Conclusion

It is always a best practice to create two or three working restore points in your Production Desktop or Server. It will always help you in-case something went wrong while installing or configuring something in your Ubuntu systems. If something went wrong, You can easily restore your Ubuntu system to the previous working state in couple minutes. As I mentioned already, make sure you have enough free space in your hard drive where you keep the restore points.
That’s all for now. Hope this helps.
Cheers!
Reference links: