Saturday, January 13, 2018

User & Group management : Complete Beginner’s Guide

User & Group management : Complete Beginner’s Guide


One of the major work of a System Administrator is User & Group Management. We have to create new users & groups, delete old ones, providing users access to a group or folder etc etc. So, in this tutorial, we will learn how we can manage users & groups.
Linux systems have two types of users, general/normal user and root/super user . While general users have limited access to the Linux system, root users have access to anything & everything on the Linux system.
When a user is created a group with the same user name is also created. Every user has its own home directory, for user root its /root & for general users its located in /home/. Records with all the user information for all the users is maintained in /etc/passwd file & records for all the groups are kept /etc/group.
Let’s discuss these files in brief before we discuss the commands for user & group management.
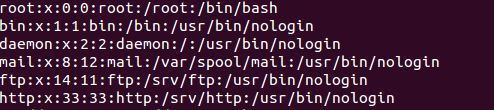
/etc/passwd

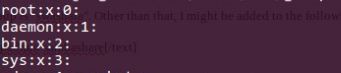
This file contains list of all users with every line of the file containing information regarding single user. Format for each line is
Username:x:UID:GID:Comment:Home Directory: Default shell
Here, x is password for the user in encrypted form (stored in /etc/shadow file)
UID, is the user id
GID is the group id for the user.
/etc/passwd

/etc/group

Just like /etc/passwd, it contains information for groups with each line having information for single group. Format for entries in this file is
Group name:x:GID:members
user management
Where, x again means password in encrypted format.
Now let’s discuss commands for user & group management.

USER Management

Below mentioned are the commands that are used for user management,
Purpose                                                              Command
  • Adding a user                                               useradd dan
  • Assigning password to user                       passwd dan
  • Changing home directory for user             useradd dan –d /home/new
  • Setting expiry for user                                 useradd dan –e 2017-11-25
  • Addding inactive period before expiry      useradd dan –f 2
  • Changing default shell                                useradd dan –s /bin/sh
  • Removing user                                             userdel dan
  • Removing user with home directory         userdel –r dan
We can also modify default settings of a user after it has bee added with usermod command
  • Setting expiry for user                      usermod –e 2017-11-25 dan
  • Changing home directory                 usermod –d /home/new dan
  • Changing default shell                      usermod –s /bin/sh dan
  • Locking an account                           usermod –L dan
  • Unlocking a locked account             usermod –u dan

Group Management

Following are the commands for managing groups
  • Adding a group                                  groupadd  linuxgroup
  • Adding user to group                        usermod –aG linuxgroup dan
  • Changing owner & group of a file    chown dan:linuxgroup newfile.txt
  • Changing only owner of a file          chown dan: newfile.txt
  • Changing only group of a file          chown :linuxgroup newfile.txt
  • Deleting a group                               groupdel linuxgroup

This completes our tutorial on user & group management. 

Thursday, January 11, 2018

How to Install and Enable OpenSSH on Ubuntu 17.04, Ubuntu 16.04

How to Install and Enable OpenSSH on Ubuntu 17.04, Ubuntu 16.04

Before we proceed on how to install and enable OpenSSH on Ubuntu 17.04, Ubuntu 16.04, first we need to understand what OpenSSH (a fork of free SSH) is.
OpenSSH (also known as OpenBSD Secure Shell) is a connectivity tool that enables remote login via the SSH protocol, hence eliminating eavesdropping, connection hijacking, and other attacks. It helps to secure all network communications by encrypting all network traffic over multiple authentication methods through a secured tunnel.
The OpenSSH suite consists of the following tools:
Install and Enable OpenSSH

OpenSSH Key Features

  • Offers strong cryptography (AES, ChaCha20, RSA, ECDSA, Ed25519…)
  • Supports X11 forwarding (which also encrypts X Window System traffic)
  • Port forwarding (encrypted channels for legacy protocols)
  • Strong authentication (public keys, one-time passwords)
  • Agent forwarding
  • Interoperability
  • SFTP client and server support in both SSH1 and SSH2 protocols
  • Optional data compression
  • See list for full details
The most recent release is OpenSSH 7.5 and its mainly bugfix release

Install OpenSSH on Ubuntu 17.04, Ubuntu 16.04

Now lets proceed with how to install and enable OpenSSH

How to enable root password

  • First you need to ensure the root password is enabled if not already done, by running the following commands
sudo passwd root
Enter new UNIX password:
Retype new UNIX password:
passwd: password updated successfully

Install OpenSSH on Ubuntu

  • Next we need to install openssh server / client on ubuntu by running the following commands on terminal
su - #enter your root password
sudo apt-get install openssh-server openssh-client
  • Now start and enable SSH service by running following commands
systemctl start sshd
systemctl enable ssh.service
  • Last step is to open up the ssh firewall port
ufw allow ssh
ufw reload

install and enable OpenSSH

Configure OpenSSH Server

  • To configure OpenSSH, you need to edit the file “sshd_config” located in “/etc/ssh”
sudo gedit /etc/ssh/sshd_config
  • There are quite a few config settings in there but for the purpose of this tutorial, we will enable the following settings for a basic setup
 Port 22                    # Tells sshd on what port to listen on
 AddressFamily any          # sshd listens on either IPv4 or IPv6 or both interface
 ListenAddress 0.0.0.0      # Tells sshd to listen on all ip address
 PermitRootLogin no         # For security, allows set this to no
 MaxAuthTries 6             # To prevent DDOS attack, set the desired value to restrict the number of tries allowed during login
 MaxSessions 10             # This sets the maximum number of simultaneous connections
 PasswordAuthentication yes # This will enforce key-based if set to no and ask passwords if set to yes
  • Save changes and reload sshd for changes to take effect
systemctl reload sshd

install and enable OpenSSH

Test run OpenSSH setup

  • For purpose of testing to see if this works as expected, we will enable ssh root access temporary but in a production setup, DO NOT enable it.
  • Edit the file “sshd_config” located in “/etc/ssh” and change “PermitRootLogin without-password” to “PermitRootLogin yes
  • Restart the SSH server
sudo service ssh restart or
systemctl reload sshd
  • Run the command to connect to it
ssh root@localhost


Ubuntu 17.04 (rc.local) : ubuntu 17.04 /etc/rc.local set

Configure /etc/rc.local in ubuntu 17.04

Due to systemd , the default /etc/rc.local not exists in ubuntu 17.04 .

If you want to make /etc/rc.local execute at the boot time.


You need create a service /etc/systemd/system/rc.local.service
 
[Unit]
Description=/etc/rc.local Compatibility
ConditionPathExists=/etc/rc.local

[Service]
Type=forking
ExecStart=/etc/rc.local start
TimeoutSec=0
StandardOutput=tty
RemainAfterExit=yes
SysVStartPriority=99

[Install]
WantedBy=multi-user.target


And create a file /etc/rc.local
 
#!/bin/sh
echo  deadline > /sys/block/sda/queue/scheduler


Enable and start service, then check it status

systemctl enable rc.local.service

systemctl start rc.local.service

systemctl status rc.local.service

Saturday, January 6, 2018

How To Display Asterisks When You Type Password In terminal

How To Display Asterisks When You Type Password In terminal

When you type passwords in a web browser login or any GUI login, the passwords will be masked as asterisks like ******** or bullets like •••••••••••••. This is the built-in security mechanism to prevent the users near you to view your password. But when you type the password in Terminal to perform any administrative task with sudo or su, you won’t even the see the asterisks or bullets as you type the password. There won’t be any visual indication of entering passwords, there won’t be any cursor movement, nothing at all. You will not know whether you entered all characters or not. All you will see just a blank screen!

Look at the following screenshot.
As you see in the above image, I’ve already entered the password, but there was no indication (either asterisks or bullets). Now, I am not sure whether I entered all characters in my password or not. This security mechanism also prevents the person near you to guess the password length. Of course, this behavior can be changed. This is what this guide all about. It is not that difficult. Read on!

Display Asterisks When You Type Password In terminal

To display asterisks as you type password in Terminal, we need to make a small modification in “/etc/sudoers” file. Before making any changes, it is better to backup this file. To do so, just run:
sudo cp /etc/sudoers{,.bak}
The above command will backup /etc/sudoers file to a new file named /etc/sudoers.bak. You can restore it, just in case something went wrong after editing the file.
Next, edit “/etc/sudoers” file using command:
sudo visudo
Find the following line:
Defaults env_reset
Add an extra word “,pwfeedback” to the end of that line as shown below.
Defaults env_reset,pwfeedback
Then, press “CTRL+x” and “y” to save and close the file. Restart your Terminal to take effect the changes.
Now, you will see asterisks when you enter password in Terminal.
If you’re not comfortable to see a blank screen when you type passwords in Terminal, the small tweak will help. Please be aware that the other users can predict the password length if they see the password when you type it. If you don’t mind it, go ahead make the changes as described above to make your password visible (masked as asterisks, of course!).
And, that’s all for now. More good stuffs to come. Stay tuned!